Cookies

Cornflake, Marshmallow and Chocolate Chip Momofuku Milk Bar Cookies

My sister gave me the Momofuku Milk Bar cookbook for Christmas and once we got home and unpacked everything I started browsing through it.  I’ve never actually been to Milk Bar, but have heard about their legendary cereal milk soft serve, compost cookies and crack pie.  My husband and I have grand plans to make a trip (maybe child-free!) up to New York City sometime in the next year to visit my sister and her family.  If we really do make it, then Milk Bar will be one of the places we have to go.

The cookbook is totally accessible with recipes for yummy things like confetti cookies, cinnamon bun pie, and brownie pie and ingredients you can buy at the grocery store like ritz crackers, corn flakes, fruity pebbles and ovaltine.  But it is intimidating in some ways.  Pretty much every recipe calls for a component that you have to make separately.  This almost always makes me steer away from a recipe.  But this time I found one that seemed doable, even with the extra steps.  These cornflake, chocolate chip, marshmallow cookies are worth every second of time they take to make.

Cornflake, Marshmallow and Chocolate Chip Momofuku Milk Bar Cookies | Hottie Biscotti Cornflake, Marshmallow and Chocolate Chip Momofuku Milk Bar Cookies | Hottie Biscotti

The component you have to make before you make the cookies is cornflake crunch.  It’s simple, really.  Crushed cornflakes, sugar, butter, milk powder and salt.  Mix it all together and toast it in a low oven.  Other crunches in the book include fruity pebble, pretzel and ritz, all similar to the cornflake crunch.  With my new found love of the cornflake crunch I see a day in my future where I make big batches of the stuff and store it all in my freezer so I can add them to all of my cookies.

These cookies are sweet, salty, rich and buttery.  They are crunchy on the edges and soft and chewy in the center.  I usually prefer a puffier cookie, but these are flat and have earned a spot as some of the best cookies ever to come out of my oven.  They are HUGE.  Like the size of your face.  And amazing.  These are so amazing.

Cornflake, Marshmallow and Chocolate Chip Momofuku Milk Bar Cookies | Hottie Biscotti

The cornflake crunch really makes these cookies special and unlike any cookie I’ve made.  I am a believer in the momofuku crunch.  And in milk powder.  It’s magical stuff.

I’ve tried to add marshmallows to cookies before, but they’ve never quite acted like the marshmallows in these cookies.  They provide a sweet, sugary, gooey, chewiness but you don’t get too much marshmallow since they kind of melt into the cookie and join with everything else is perfect baked good harmony.

Mini chocolate chips are the way to go here.  Larger ones would be too overwhelming both in appearance in the cookie and in taste.  Stick with the minis.

Cornflake, Marshmallow and Chocolate Chip Momofuku Milk Bar Cookies | Hottie Biscotti

I am so excited to try more recipes in this cookbook!  Now that I know how worthwhile it is to make the special ingredients, I’ll be much more likely to make that incredible looking birthday cake on page 104.  Drool.

Cornflake, Marshmallow and Chocolate Chip Cookies

From Momofuku Milk Bar Cookbook

Cornflake Crunch

Ingredients

  • 5 cups cornflakes
  • 1/2 cup milk powder
  • 3 tablespoons sugar
  • 1 teaspoon kosher salt
  • 9 tablespoons butter, melted

Directions

  1. Preheat oven to 275°F and line a baking sheet with parchment paper or a silpat.
  2. In a large bowl crush cornflakes with clean hands then mix in milk powder, sugar and salt.  Toss to combine.
  3. Add in the melted butter and toss to coat evenly.
  4. Spread out onto the prepared sheet and bake for 20 minutes, let cool.

Cookies

Ingredients

  • 2 sticks of butter, room temperature
  • 1 1/4 cups sugar
  • 2/3 cup brown sugar
  • 1 egg
  • 1/2 teaspoon vanilla
  • 1 1/2 cups flour
  • 1/2 teaspoon baking powder
  • 1/4 teaspoon baking soda
  • 1 1/4 teaspoon salt
  • 3 cups cornflake crunch
  • 2/3 cup mini chocolate chips
  • 1 1/4 cups mini marshmallows

Directions

  1. Beat butter and sugars on medium high for 2-3 minutes.  Scrape down the bowl and add the egg and vanilla.  Beat for 7-8 minutes.  Scrape down the bowl.
  2. Whisk together the flour, powder, soda and salt, then add to the butter mixture.  Mix on low until just combined, no longer than 1 minute.
  3. Mix in the cornflake crunch and chocolate chips on low speed just to combine, 30-45 seconds.  Then mix in the marshmallows just to combine.
  4. Using a large cookie/ice cream scoop or a 1/4 measuring cup scoop out dough into balls and place on a parchment or silpat lined cookie sheet.  You should have between 15 and 20 cookies.  No need to spread the dough balls out on this sheet.  Place the sheet into the fridge for at least 1 hour.  If you plan to refrigerate them for more than a couple hours, cover the sheet with plastic wrap.
  5. Preheat oven to 375°F.
  6. Arrange dough balls on a parchment or silpat lined cookie sheet (4 or 5 cookies per sheet) with 3-4 inches room for spreading.  Bake for 15-18 minutes until edges are beginning to brown and centers are just set.
  7. Let cool for a few minutes on the sheet, then move to a cooling rack.  Cool completely.

Weikel’s House Special Cookie Copy Cat

There is a place right off of highway 71 in La Grange, Texas, between Houston and Austin, called Weikel’s where you can stop for gas and get a snack.  If you ever make this drive you have definitely driven by and likely stopped at a similar spot called Hruska’s.  It’s right on the highway in Ellinger and impossible to miss.  But Hruska’s has nothing on Weikel’s, in my opinion.  They’re both gas stations with bakeries serving cookies, kolaches, etc.  Hruska’s, which also offers sausages and lunch/dinner items, had been my go-to stop until my in-laws brought some cookies and shortbread bars to us from Weikel’s.  I haven’t gone back since.

Weikel's House Special Cookies Copy Cat | Hottie Biscotti

Every time I stop here I get cookies for the kids, usually whatever Carson wants and plain sugar for Betsy to keep the mess to a minimum.  I also get a box of house special cookies and a cherry shortbread.  The house special cookies are indeed special and I’ve been wanting to duplicate them for some time.  I might be on my way to doing that with these!

Weikel's House Special Cookies Copy Cat | Hottie Biscotti

The house special is a crispy, crunchy cookie that has cornflakes, oats, pecans and coconut.  There is no butter on the ingredient list, only shortening.  So that could account for the difference in texture between mine and theirs.  I also left out the oats.  But the flavor is very similar and I am real excited that I won’t have to drive to La Grange to get my cookie fix!

However, if I had to choose between mine and Weikel’s I’d still choose Weikel’s.  There’s just something really special about them, and something about the experience of stopping with my kids that makes them better somehow.  And maybe it’s about having someone else make them, like how a sandwich is almost always better when someone else makes it for you than if you make it yourself.  Anyway, be sure to grab one (or a box of 6) if you ever stop by.  Then try this recipe and give me some feedback!  I’d love to truly duplicate these tasty cookies.

Weikel's House Special Cookies Copy Cat | Hottie Biscotti

Weikel’s House Special Cookie Copy Cat

Makes 18-20 cookies

Ingredients

  • 1 stick of butter, room temperature
  • 1/2 cup vegetable oil
  • 1/2 cup granulated sugar
  • 1/2 cup powdered sugar
  • 1 egg
  • 2 teaspoons vanilla
  • 2 cups flour
  • 1/2 teaspoon baking soda
  • 1/2 teaspoon salt
  • 1 cup cornflakes
  • 1/2 cup chopped pecans
  • 1/2 cup shredded coconut

Directions

  1. Beat butter until fluffy, about 2 minutes.
  2. Add in the oil, granulated sugar, powdered sugar and egg, beating between each addition.  Scrape the bottom of the bowl, add the vanilla and mix again.
  3. Add in the flour, baking soda and salt and mix just to combine.
  4. Fold in the cornflakes, pecans and coconut making sure that it is evenly mixed.
  5. Refrigerate for an hour.
  6. Preheat oven to 350°F and line 2 cookie sheets with parchment paper.
  7. Scoop into large balls (about 2 tablespoons) and place on cookie sheet (6-8 cookies per sheet) and bake for 10-12 minutes until edges are golden.  Remove from the oven and let cool for a couple minutes on the sheet then move to a wire rack.

Cherry Almond Biscotti

My mom is visiting this week and being a huge help with the kids while Ben is gone.  Along with her lovely self she brought a couple of recipes with her that she thought we could try together.  This biscotti is one of those and I am so very glad that we made them!  These are delicious.

Cherry Almond Biscotti | Hottie Biscotti


Almond is one of the flavors that I think of when I think of my mother.  That and pears.  She adores pears.  These biscotti have sliced almonds and cherries that have been soaked in amaretto which makes the almond flavor even more present and the cherries nice and plump.  I wonder how these would be with dried pears…

Cherry Almond Biscotti | Hottie Biscotti
The prep and cooking method for these is similar to most biscotti I have made.  One of the things that is different is on the second bake.  Instead of baking the sliced biscotti directly on the baking sheet you place them on wire racks in the oven to bake which I think crisps them up more evenly.  I’ll be doing this again for future biscotti. Cherry Almond Biscotti | Hottie Biscotti Try these as an accompaniment to your morning or afternoon coffee.  Or crumble them up over some ice cream.  Or just eat them, that’s the way my 2 year old seems to like them best.

Cherry Almond Biscotti

From a page torn from some Martha Stewart magazine Ingredients

  • 1 3/4 cup dried cherries
  • 1/2 cup amaretto liquor
  • 3 cups flour (more for dusting)
  • 2 teaspoons baking powder
  • 1/2 teaspoon salt
  • 4 tablespoons butter, softened
  • 1 cup sugar
  • 4 eggs (3 for the cookies and 1 for brushing)
  • 2 teaspoons vanilla
  • 3/4 cup sliced almonds
  • raw sugar for sprinkling on the tops

Directions

  1. Preheat oven to 375°F.
  2. Mix cherries and amaretto in a small saucepan and heat over medium low for about 5 minutes.  Liquid should just simmer.  Drain and reserve the liquid.
  3. Sift flour, salt and baking powder and set aside.
  4. Beat butter and sugar until thoroughly mixed, about 2 minutes.  Add in eggs, one at a time, mixing after each.  Mix in 2 tablespoons of cherry juice and vanilla.
  5. Add in the flour and mix just to combine, then add in cherries and almonds and mix to combine.
  6. Flour a work surface and turn dough out.  Divide in half and shape into two logs, about 12 inches long and 2 inches thick.
  7. Transfer to a parchment lined baking sheet.  Pat logs down to about 3/4 inch thickness, about 4 inches wide and 12-14 inches long.
  8. Brush with beaten egg and sprinkle with sugar.
  9. Bake for 25-30 minutes.  The logs will be dark, but shouldn’t be burned.  Check the bottom of the logs at 25 minutes and remove from the oven if they seem dark.  Transfer to wire racks to cool for 20 minutes.
  10. Slice logs at an angle to the thickness you like, 15-20 slices per log.  Reduce the oven temperature to 300°F.
  11.  Transfer biscotti back to the rack and lay the slices on their sides.  You will have to do this in 2 batches.  Place the rack on a baking sheet and bake for 5-7 minutes, flip biscotti over and bake for another 5-7 minutes.  Cook longer for a crispier biscotti and less for a softer one.  Let cool.  Store in an airtight container for a few days or freeze to enjoy later.

Chocolate Chip Chickpea Cookies with Raisins and Pecans

A dear friend gave me her copy of “Deceptively Delicious” , the cookbook by Jessica Seinfeld, when I complained about my kids not eating certain foods.  Vegetables being our main problem.  While perusing the cookbook I came across some really yummy looking recipes.  The great thing is that almost every one sneaks veggies into foods that kids love (macaroni and cheese, spaghetti and meatballs, chicken nugget, etc .)  I came across a chocolate chip cookie recipe that has an entire can of chickpeas in it.  Well, we all know what I had to do that very day.

Chocolate Chip Chickpea Cookies | Hottie Biscotti

I changed a few things about the recipe, using butter instead of tub margarine, one egg and one egg white instead of two egg whites, and white whole wheat flour instead of all purpose.  I also mashed up the chickpeas instead of adding them whole, just to avoid biting into a big ol’ chickpea, which didn’t sound super appealing.

The results were not bad!  You can’t taste the chickpeas.  Ben actually took one off of the cooling rack when he got home, ate it and declared it good before I told him they were semi-healthy.  I didn’t even tell him about the chickpeas.  He’s finding out now via the blog…

Chocolate Chip Chickpea Cookies | Hottie Biscotti

The cookies are cakey and bake up in mounds with very little spreading.  I left some in mounds and flattened others.  You can flatten them with your hand, the bottom of a glass or the back of a fork.  Eaten the same day they’re baked they are really tasty.  After storing them in a container for a day they stick together a bit and are very soft.  BUT still quite delicious.

Chocolate Chip Chickpea Cookies | Hottie Biscotti

I used milk chocolate chips, but I think semi sweet or dark would be better.  The raisins are optional, but I really liked them in these cookies.  I used pecans, because that’s what I had.  But, and I know this is out of character, I think walnuts would be better.  I don’t think the white whole wheat flour made much of a difference in these since they’re already very hearty in texture, I used it because I had some and it made me feel like I was making these even healthier!  Healthier cookies means I can eat more of them!  And I feel better about giving them to the kids.  Both of the big kids, almost 4 and almost 2, really liked these.  So while I won’t be making these cookies every time I want chocolate chip cookies, I will be making these again.

Chocolate Chip Chickpea Cookies | Hottie Biscotti

Chocolate Chip Chickpea Cookies

From Deceptively Delicious

Makes 2 dozen

Ingredients

  • 1 cup brown sugar
  • 3/4 cup (1 and 1/2 sticks) butter, softened
  • 1 egg and 1 egg white
  • 2 teaspoons vanilla
  • 2 cups flour (all purpose or white whole wheat)
  • 1 teaspoon baking soda
  • 1/2 teaspoon salt
  • 1 15-ounce can chickpeas, rinsed and drained
  • 1 1/2 cups chocolate chips
  • heaping 1/2 cup pecans
  • heaping 1/2 cup raisins
  • 1/2 cup oats

Directions

  1. Preheat oven to 350°F.
  2. Place chickpeas in a bowl and mash with a potato masher or a fork, until mixture is coarse, just a few larger pieces, but not perfectly smooth.
  3. Beat butter and brown sugar in a large bowl of a stand mixer, or with a hand mixer.  Beat for 2  minutes, then scrape the bowl.
  4. Add in egg and egg white and beat well, then ass in vanilla and scrape bowl.
  5. Mix in flour, baking powder and salt until just combined.  Then mix in oats.
  6. Mix in chickpeas, chocolate chips, pecans and raisins until evenly mixed.
  7. Scoop by rounded tablespoons onto a cookie sheet lined with parchment.  Bake for 10-12 minutes, until tops are beginning to brown.  Let cool on the pan for a minutes, then move to a wire rack.

Chocolate Chip and Toffee Pudding Cookies

In high school and college I was a lifeguard at a community pool during the summers.  A couple of the other girls and I baked treats and brought them up to share with everyone a couple times a week.  One of the cashiers brought chocolate chip pudding cookies a few times and I fell in love with them.  She shared the recipe with me, but since this was more than 10 years ago and it was written on a piece of notebook paper I have lost it.  But thanks to Pinterest I found another recipe for pudding cookies that seems close to the recipe I got from Ashley!  What would we do without the internet?!

puddingcookies2

These are thick, chewy and soft chocolate chip cookies, the kind I prefer.  It’s a basic chocolate chip cookie recipe, but contains a secret ingredient,  a small package of vanilla pudding mix!  This makes them softer than typical cookies and quite addictive.  I added in some toffee pieces along with the chocolate chips.  The options are endless when it comes to mix-ins though.  You could add any kind of chocolate chip, nuts, caramel bits, crushed up pretzels, etc.

puddingcookies3

These are my favorite chocolate chips, milk chocolate chips from Guittard.  They’re bigger than the standard chip, have terrific milk chocolate flavor and melt terrifically in these cookies.  And in your mouth.  I may or may not eat them by the handful straight from the bag on occasion….or daily.

puddingcookies4

 Chocolate Chips and Toffee Pudding Cookies

From Life in the Lofthouse

Makes 24-30 cookies depending on their size

Ingredients

  • 2 sticks of butter, softened
  • 3/4 cup brown sugar
  • 1/4 cup granulated sugar
  • 1 small box (3.4 ounces) instant vanilla pudding mix
  • 2 eggs
  • 1 teaspoon vanilla extract
  • 2 1/4 cup flour
  • 1 teaspoon baking soda
  • 1 teaspoon kosher salt
  • 1 bag (11 ounces) chocolate chips
  • 1/2 cup toffee pieces

Directions

  1. Preheat oven to 375°F.
  2. In the bowl of a stand mixer, or in a large bowl using a hand mixer, beat the butter and sugars until fluffy.
  3. Add in the pudding mix and beat to combine.
  4. Add in the eggs, one at a time, beating between additions, followed by the vanilla.
  5. Beat in the flour, baking soda and salt until just combined.  Use a spatula to stir everything together from the bottom of the bowl.
  6. Stir in the chocolate chips and toffee with the spatula.
  7. Line two cookie sheets with parchment paper.  Scoop dough by rounded tablespoons onto the sheet, spacing about 2 inches apart, 6-8 cookies per sheet.
  8. Bake for 8-10 minutes, until cookies are slightly browned.
  9. Let cool on cookie sheet for 5 minutes before transferring to a cooling rack.  Scoop dough onto the other cookie sheet while the one you just used cools off.
  10. Cookies will firm up as they cool, so if they appear under-baked wen you take them out of the oven, don’t worry.

Easter Cookie Placecards & A Thick Cut-Out Sugar Cookie Recipe

What could be better than a lovely place card to designate your place at the table this Easter Sunday?  Why, a cute and sweet one that you can eat, of course!

Don’t worry, I’m not going to give Betsy her own china place setting.

I’ve made my fair share of sugar cookies but haven’t ever stuck with one recipe.  I almost always find myself trying a new one.  Not because the others have been bad, but I have an idea in my head of what I want a decorated sugar cookie to look and taste like, and I haven’t yet found it.  This one is much closer to what I’ve been looking for.  It’s sturdy and thick, it holds up well to rolling, transferring and baking and also has good flavor.  Part of that is due to cutting them thicker than I normally do, and part to a new method I tried this time around for cutting the shapes.  It’s genius and greatly decreases the floury mess my kitchen becomes when I make cut outs.

Whenever I decide to make these decorated cookies I have the tendency to make too many shapes which means lots more coloring of icing and piping different designs which translates into late nights, a messy kitchen, color dyed fingernails and sore hands.  It’s more work than you think on those muscles!  Making just a couple different shapes makes life easier and allows you to get really good at decorating that particular shape and design.

I chose eggs (no fancy edges) carrots and bunnies.  I kept everything simple since I’d be writing names on the cookies.  And I kept the colors muted to not distract from the table or stick out like a sore thumb.

The icing recipe here is the best I’ve tried for these cookies.  It takes a while to dry completely, but dries with a nice gloss and isn’t rock hard like royal icing.  You can add more powdered sugar to small amount of this icing to make it good for piping.

For rolling these out I used a new method.  Instead of chilling the dough and then rolling it out (which can often be difficult when the dough is cold from the fridge) I rolled it out right after mixing  in between two pieces of parchment.  Then I placed the sheets of dough in the freezer for 20-30 minutes.  Then I cut out the shapes, moved them to a parchment lined cookie sheet and baked them.  The dough never once touched the counter and I didn’t have to use any flour or get frustrated with a cookie falling apart or sticking to the counter top.  This is definitely the method I will be using from now on.  Thanks to The Kitchn for introducing me to it!

cookieplacecards2

I used the recipe from The Kitchn for these cookies, just left out the lemon zest and added an extra egg yolk for a sturdier cookie.  Since they’re made with all butter, the flavor is still there, but without the super crunchy texture some sugar cookies often have.  And to be honest, I prefer that texture if I’m eating the cookies plain or with just a sprinkling of sugar.  But when I’m going to be decorating them and giving them as favors or gifts, I want them thicker and therefore not as crunchy.  Since the cookies are so thick, I reduced the baking temp to 325 to prevent the bottoms of the cookies from getting too dark before the centers are set.  Then I increased the baking time.  The baking time with depend on what size and just how thick your cookies are.  Mine, which were just about 1/4 inch thick, cooked for almost 15 minutes.  They should be just beginning to brown on the edges  when you remove them from the oven.

You can find lots of good tips on decorating sugar cookies on the web.  But here are some of the cookies I’ve decorated, some with step by step instructions and some without.

And here are the tools I find to be very helpful when making these types of cookies.

  • Frosting tips (Wilton plain tips 2 and 3 are the ones I use most, I have a few of each)
  • Piping bags
  • White-white, it makes white icing solid white instead of semi-translucent and can tone down a color that is too dark
  • Gel colors for coloring the icing, it produces the best color
  • Toothpicks for coloring icing, pushing icing into small spaces and for popping bubbles that form in the icing as it settles and dries
  • Small bowls for coloring small amount of icing
  • Small spoons for filling the cookies
  • Space to work and a place for cookies to dry away from little hands

Thick Cut-Out Sugar Cookies

Adapted very slightly from TheKitchn

Makes 18-24 thick cookies

Ingredients

  • 1 cup unsalted butter, softened at room temperature
  • 2 ounces cream cheese, at room temperature
  • 1 cup sugar
  • 1 large egg
  • 1 egg yolk
  • 1 teaspoon pure vanilla extract
  • 1/2 teaspoon almond extract
  • 3 cups flour
  • 1 1/2 teaspoons baking powder
  • 1/2 teaspoon salt

Directions

  1. Beat butter, cream cheese and sugar in the bowl of a stand mixer until light and fluffy.
  2. Add in the egg, egg yolk, and extracts and beat until well combined.
  3. Add in the flour, salt and baking powder and mix just until combined.
  4. Prepare 4 sheets of parchment, each about the size you’d use to line a cookie sheet.
  5. Lay a towel down on the counter, then place one piece of parchment on top.  Spoon half of the cookie dough onto the parchment and then lay another piece of parchment on top.  Use a rolling pin to roll the dough evenly to the thickness you desire.
  6. Set the sheet of dough onto a cookie sheet.
  7. Repeat with the rest of the dough, stacking them on top of each other.
  8. Place the cookie sheet in the freezer and let them chill for 20-30 minutes.  You want the dough to be firm but still be able to cut it with the cookies cutters.  If you leave it too long in the freezer, just let it sit for a few minutes before cutting your shapes.
  9. Preheat the oven to 325°F.
  10. Using your desired cookie cutters, cut your shapes from the dough and place on a parchment lined cookie sheet, leaving space between the cookies, 8-12 per sheet depending on the size
  11. Bake for 10-15 minutes, checking after 10 minutes, until the edges just begin to brown.  Let them sit on the cookie sheet for a few minutes before moving to a cooling rack.
  12. Repeat with the remaining dough.  Any dough scraps can be combined and re-rolled, chilled, cut and baked.
  13. Let cool completely before decorating.

Chocolate & Pecan Brownie Cookies

I have loved (and hated) all of the chocolate goodies that have been at my house recently, but these might just be my favorite and a recipe I can see myself going back to the most often.  These would make a terrific Valentine’s treat, but really a wonderful cookie for anytime.

A new friend of mine made these as treats for after a morning TV segment that I was lucky to be a part of, and after practically inhaling my cookie I immediately asked her for the recipe.  Sometimes I forget how good a chocolate cookie can be and often opt for chocolate chip or oatmeal raisin when I’m going to make cookies.  But these cookies might become my new go-to. They are thick and brownie like in texture in the center, yet slightly crunchy on the top and edges.  The nuts add terrific flavor and using a mix of chocolate chips makes for a truly amazing cookie.

chocolatebrowniecookie2

I made a batch and boxed up a few for Carson’s teachers at school for Valentine’s Day.  When I went to pick him up his teacher said they were amazing and evil.  “Evil” is one of the best compliments when it comes to baked goods, at least in my opinion.

chocolatebrowniecookie3

The batter for these cookies is more involved than some, but is still not intense by any means.  After I scooped the first batch the batter began to really thicken up, which makes for a bit of a difficult and messy time getting it scooped out.  It was hard on my cookie scoop to the point that I worried it might break.  Thankfully it didn’t.  But even if it had it would’ve been a small price to pay!

chocolatebrowniecookie1

Chocolate and Pecan Brownie Cookies

From Natalie

Makes about 30 cookies

Ingredients

  • 1/2 cup (1 stick) butter
  • 4 ounces of chocolate (70% cacoa or unsweetened squares) chopped
  • 3 cups chocolate chips (semi sweet or a combination of semi sweet, dark and milk chocolate) divided
  • 1 1/2 cups flour
  • 1/2 teaspoon baking powder
  • 1/2 teaspoon salt
  • 4 eggs
  • 1 1/2 cups sugar
  • 2 teaspoons vanilla
  • 2 cups chopped pecans, toasted

Directions

  1. Preheat oven to 350°F.  Line two baking sheets with parchment and set aside.
  2. Melt butter, chopped chocolate and 1 1/2 cups chocolate chips in a heavy saucepan set over low heat.  Stir until everything has melted together, then let cool to room temperature.
  3. In a small bowl whisk together four, powder and salt.  Set aside.
  4. In a large bowl beat eggs, sugar and vanilla until well combined.  Add in dry ingredients until just combined, then beat in melted chocolate until well combined.
  5. Mix in the rest of the chocolate chips and the pecans.
  6. Drop by large spoonfuls (about 2 tablespoons) onto prepared baking sheets, 9 cookies per sheet.
  7. Bake for 10 minutes, until tops are set and cracking.  Cool for a minute or two before removing to a wire rack to cool completely.

Chocolate Almond Biscotti

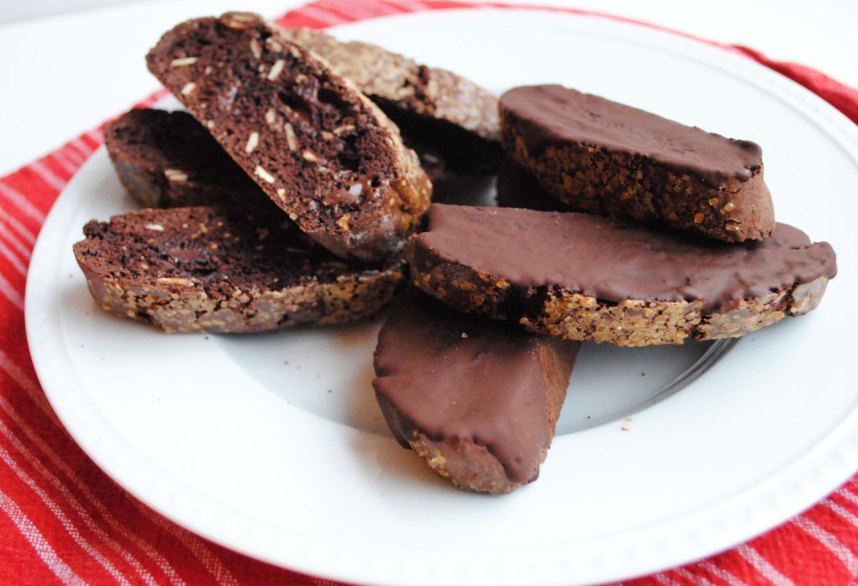
Happy February!  Earlier in the week I shared this flourless chocolate cookie recipe and declared that I would be sharing more chocolate recipes as we get closer and closer to Valentine’s Day, a day that should be full of chocolate.  The name of this blog is Hottie Biscotti, but I’m fairly confident that I’ve only shared one biscotti recipe.  So I thought it only appropriate to make some chocolate biscotti.

chocolatebiscotti1

Biscotti means “twice-baked”.  The dough is baked once in a log, allowed to cool slightly, then sliced into pieces and baked again creating a crunchy cookie that begs to be dipped into your hot beverage of choice.  Coffee is mine, but tea or hot chocolate would do just fine.  And they’re delicious eaten just as a cookie without any dipping.

chocolatebiscotti2

This biscotti is full of almonds and chocolate chips, but isn’t too sweet, making it the perfect morning or afternoon snack.  They would be wonderful crumbled up over a bowl of vanilla ice cream.  They’d also make great little gifts.

chocolatebiscotti4

This recipe is from Dave Lebovitz, a pastry chef whose blog I started reading a few months ago.  It’s a great mix of recipes, stories about life in Paris, cooking tips and restaurant reviews.  It’s been a fun change of pace in blog reading for me, since very few of the blogs I read are written by chefs, most are home cooks like myself.  Check it out and drool over some French food and wine, learn some things you didn’t know and grab some great recipes.

Chocolate Almond Biscotti

From Dave Lebovitz

Makes about 26 cookies

Ingredients

For Biscotti

  • 2 cups flour
  • 3/4 cup good cocoa powder
  • 1 teaspoon baking soda
  • 1/4 teaspoon salt
  • 3 large eggs, at room temperature
  • 1 cup sugar
  • 1 teaspoon vanilla extract
  • 1/2 teaspoon almond extract
  • 1 cup sliced almonds
  • 3/4 cup chocolate chips
  • 1 egg for glaze
  • raw sugar or coarse sugar for sprinkling

For Chocolate Dipping

  • 4 ounces bittersweet or semisweet chocolate
  • 2 teaspoons vegetable oil

Directions

  1. Preheat oven to 350°F and line a cookie sheet with parchment paper.
  2. In a medium bowl sift together flour, cocoa powder, baking soda and salt.
  3. In the bowl of a stand mixer combine eggs, sugar and extracts and mix until well combined.
  4. Add in the dry ingredients and mix until just combined, then add in almonds and chocolate chips and mix until evenly distributed.  The dough will be very stiff.
  5. Turn dough out onto a lightly floured work surface.  Divide dough in half and form each half into a log, about 8 or 9 inches long and 3/4 inch high.
  6. Transfer each log to the parchment lined baking sheet.
  7. Whisk egg and brush tops of each log, then sprinkle with sugar.
  8. Bake for 25 minutes.  Remove from the oven and let cool for 15 minutes.  Move logs to a cutting board and slice on the diagonal into 1/2 inch pieces.  A serrated knife works well for this.
  9. Place slices back on the parchment lined cookie sheet and return to the oven for 15-20 minutes, then flip cookies over and cook for another 10 minutes.  Remove from the oven, transfer to a cooking rack and let cool completely.
  10. You can coat one side in chocolate if you’d like to or leave them plain.  To coat in chocolate: melt chocolate and vegetable oil over low heat, stirring constantly until chocolate has just melted.  Remove from the heat and spread chocolate onto one side of the biscotti in a thin layer.  Move to a clean piece of parchment and allow the chocolate to set.


Flourless Triple Chocolate Cookies

Valentine’s Day is fast approaching and while it’s not my favorite holiday, it is a perfect excuse to make and enjoy loads of sweet treats.  It’s also a good excuse to enjoy an especially  nice meal with your sweetheart, either at home or out.  Candles and roses required of course.

chocolatecookie4

In anticipation of Valentine’s Day I’ve decided to spend the next couple of weeks baking and sharing some delicious Valentine’s Day goodies.  By the time it rolls around my husband is probably going to be sick of chocolate, but that’s ok.  I’ll pick up the slack.  I have this amazing ability to endure baked goods and sugar beyond what is considered normal.  What can I say, it’s a gift!

chocolatecookie3

These are not your typical chocolate cookie since they’re flourless (gluten free!) and end up being very crunchy on the outside with just a little bit of gooey middle.  Whole Foods makes a similar cookie that has walnuts which I kind of love.  You could easily adds nuts into this cookie if you’d like.  The pure chocolately goodness of them without nuts is wonderful, though.  The cocoa powder, semi sweet and milk chocolate chips makes these triple chocolate, but you could opt for just one kind of chip, or go crazy and add in dark chocolate chunks as well.

chocolatecookie1

This cookie batter/dough comes together in no time and while you can use a stand mixer, you don’t need one.  The ingredients are simple and you likely have them all in your kitchen right now.  You definitely need to bake these cookies on parchment paper or a nonstick silicon mat.  They stick a little, even to the parchment, so use a stiff spatula (or a small offset one) to get underneath the cookies as you’re taking them off the sheet.  This way you won’t lose any chocolate pieces.  That would be a tragedy.

Watch out for little hands.  They’ll swoop down when you least expect it and steal these.  I let her eat the whole thing by the way.  Right before dinner.  Great parenting over here.

chocolatecookie2

Flourless Triple Chocolate Cookies

From Food 52

Makes 24-30 cookies

Ingredients

  • 2 1/2 cups powdered sugar
  • 1/2 cup good cocoa
  • 1/4 teaspoon cinnamon
  • 1/4 teaspoon salt
  • 3 egg whites
  • 1 teaspoon vanilla
  • 1 1/4 cup semisweet chocolate chunks or chips
  • 1 1/4 cup milk chocolate chunks or chips
  • 1/2-1 cup nuts, toasted and chopped, optional
  • Sea salt flakes, optional

Directions

  1. Preheat oven to 350°F.
  2. Line 2 baking sheets with parchment (you’ll need more parchment for each batch).
  3. Whisk together powdered sugar, cocoa powder, cinnamon and salt.
  4. Beat in the egg whites until well combined, then mix in vanilla.
  5. Fold in chocolate chips/chunks and nuts if desired.
  6. Spoon batter, 2 rounded teaspoons per cookie, onto your cookie sheets, spacing about 2 inches apart for spreading.  I found I could fit 6-8 cookies per sheet without any problems.  Sprinkle each cookie with salt if desired.
  7. Bake for 12-14 minutes until cookies look just set and dry on top with some cracking.  Let cool on the pan for a few minutes before removing to a cooling rack.


Thin and Chewy Chocolate Chip and Toffee Cookies


chocchiptoffeecookie3

In general I prefer a thick, soft and chewy chocolate chip cookie.  The flat crunchy kind aren’t what I typically make or choose to enjoy with a glass of milk.   I’ve made my fair share of chocolate chip cookies and have some favorite recipes.  These, these and these are probably the ones I’ve enjoyed the most.  Going back in the blog archives makes me nostalgic and a little embarrassed of my food photos and writing.  Yeesh.  But, this is why I blog!  Documenting the good and the not so good, and seeing how my cooking, blogging and photography has changed.  Anyway, back to the cookies.

chocchiptoffeecookie4

I made these cookies for a friend who recently moved into a new house.  I kept a few for myself.  They are thin, but still chewy, which I realize now is what I really crave in a cookie.  And they are buttery and sweet and delicious.  The small amount of toffee pieces adds something special to these.  The original recipe, from The Magnolia Bakery Cookbook, calls for mini chocolate chips.  I used regular sized chips and think that it’s really a personal preference.  With mini chips you’ll get chocolate in each bite.  With the big chips you’ll end up with some bites with no chips, but the bites with chips are super yummy.  I love big hunks of chocolate in a cookie.  I guess a solution for that could be to use more big chips…  Other than the chips and the addition of the toffee pieces, I didn’t do anything differently.  This is a terrifically simple recipe.  Enjoy!

chocchiptoffeecookie2

Thin and Chewy Chocolate Chip and Toffee Cookies

From The Magnolia Bakery Cookbook

Makes 24-36 cookies

Ingredients

  • 1 1/2 cups flour
  • 1 1/2 teaspoons baking soda
  • 1/2 teaspoon salt
  • 11 tablespoons unsalted butter,  softened
  • 1/2 cup sugar
  • 1/2 cup brown sugar
  • 1 large egg
  • 1 teaspoon vanilla extract
  • 1/2 cup chocolate chips
  • 1/4 cup toffee pieces

Directions

  1. Preheat oven to 350°F.
  2. Combine flour, baking soda and salt in a bowl and set aside.
  3. Cream together butter and sugars until light in color, then beat in egg and and vanilla.
  4. Add the flour mixture and beat until combined.
  5. Mix in chocolate chips and toffee pieces.
  6. Use a cookie/ice cream scoop or tablespoon to drop scoops of dough onto a cookie sheet lined with parchment or a nonstick liner.  Space them a couple inches apart since they’ll spread during baking.  8 cookies per sheet works well.
  7. Bake for 8-10 minutes until lightly browned on the edges.  Let cool for a minute before moving to a rack.