Side Dishes

Side Dish Recipes

Roasted Broccoli and Cauliflower

Roasted vegetables are fall perfection.  Anytime of the year perfection for me, really.  But fall and winter seem to be better for the rich and warm flavors and the delicious caramelization of the veggies that takes place in the oven.  One of my favorite things about them is their versatility.  You can use your favorite vegetables.  My favorite combination includes brussels sprouts, sweet potato, onion and cauliflower.  I can’t think of a better side dish, can you?  If you’re still planning your Thanksgiving menu, consider roasting a big tray of vegetables.  You can do all of your prep, including tossing with the oil and salt, the night before.  Refrigerate and roast right before dinner.

After starting this lovely dish in the crock pot I started thinking about what we would eat with it.  I decided on brown rice and salad.  But then I remembered that we had broccoli and cauliflower already cut up and just waiting to be transformed into something magical.  I was honestly pretty worried about roasting the broccoli with my normal method.  I’ve done it before and felt like the ends got too blackened and crunchy, even for me.  So I looked up a recipe for roasted broccoli and found this from Ellie Krieger.  As luck would have it, this particular recipe uses broccoli and cauliflower.  Perfect.

We loved these.  I ate the remainder of them for lunch the next day straight from the fridge.  One of the reasons they were so good is the garlic.  I smashed whole cloves and mixed them in with the vegetables.  If you cut the garlic too small, it burns.  I learned that lesson the hard way!  The garlic mellows enough through the cooking process to not be an unwelcome addition to your bite.  Cooking the vegetables covered allows them to steam before roasting, which keeps the broccoli from burning on the tips and cooking unevenly.  I will probably try this method with my normal line up of vegetables the next time I roast them.  However, I think you could get by with less covered steam cooking, maybe 20 minutes covered and 30-40 uncovered?  I’ll mess with that and see how it goes.

Roasted Broccoli and Cauliflower

From Ellie Krieger

Ingredients

  • 1 small head cauliflower (2 pounds), cut into florets
  • 2 large stalks broccoli (1 pound), cut into florets
  • 1 head garlic, broken into cloves, peeled and smashed but still intact
  • 2 to 3 tablespoons olive oil
  • 1/2 to 1 teaspoon salt

Directions

  1. Preheat the oven to 375°F.
  2. Place cauliflower and broccoli into a 9 by 13 inch baking dish, toss with the olive oil, and sprinkle with salt.
  3. Cover the dish with foil and bake for 1/2 hour.
  4. Remove the foil, stir and cook for 30 to 40 minutes more, until vegetables are tender and nicely browned, stirring occasionally.

Basil Ricotta Pasta with Corn and Zucchini

The last meal I made from Martha Stewart Everyday Food was just ok, so I was a little apprehensive about this one.  It sounded like it had to be delicious, though.  Zucchini and fresh corn tossed with ricotta cheese, pasta and fresh basil.  It was a nice, light dinner served warm, but an even tastier lunch the following day right from the fridge.  This is a good summer pasta.

I changed some of the cooking methods.  The recipe calls for grilled zucchini left over from another meal, which is a great way to use leftovers, so use extra veggies if you have them on hand.  It also says to boil the corn with the pasta.  I just chopped the zucchini and sauteed it with the corn.  Basil and dill are the herbs in the recipe, but I just used basil.  I meant to add some fresh parsley, but forgot about it until my plate was almost clean.  I added some chopped grilled chicken Ben had made the night before.  I might serve this along side grilled chicken next time instead of mixing it in, at least the first night we eat it.  I think they would look good next to each other.  And then the chicken would have pretty grill marks and not look as pale and sad as it does in this picture.

The corn is wonderfully sweet and crunchy.  The basil is spicy and one of my personal favorite herbs for summertime.  The ricotta is not heavy or overwhelming, it just adds a light creamy coating to everything.  The only thing I found to be missing was salt.  I salted the pasta, salted the veggies and salted the sauce, but still I wanted more.  Now that I think about it, a nice squeeze of lemon juice might have done the trick.  Acid is important…at least that’s what they say on Top Chef.  So taste as you go along and definitely taste after mixing everything up to adjust as you see fit and let me know if you try lemon juice.

Here are some other changes.  I used bowtie pasta (and a little penne to make 3/4 pound) but I think you could easily get by with 1/2 pound of pasta.  Just throw in another zucchini or two and another ear of corn.  You can use fat free ricotta, but low fat might give you more of a creamy and substantial feel.  Grill the zucchini and the corn if you can.  While I loved the way the corn tasted I couldn’t stop thinking about how much better it would be with slightly charred smoky corn.  Grill it on the cob, then cut it off.  If you grill the zucchini, use a grill basket or cut the zucchini into long thick strips to grill it, then cut it into proper sized pieces after it cools a bit.

Does anyone have any great tricks for cutting corn from the cob?  I always make a ridiculous mess and throw bits of corn all over my kitchen.  Please advise.

Basil Ricotta Pasta with Corn and Zucchini

From Everyday Food

Serves 6

Ingredients

  • 1/2-3/4 pound short pasta, such as campanelle
  • 1 cup reserved pasta water
  • salt and pepper
  • 1 cup ricotta
  • 1/4 cup grated Parmesan, plus more for serving
  • 4-5 small zucchini, sliced and then quartered
  • 1 3/4 cups corn kernels (from 2-3 ears)
  • 1/2 cup fresh basil leaves, torn, plus more for serving
  • 2 cups chopped, cooked chicken (optional)
Directions
  1. In a large skillet heat a drizzle of olive oil over medium heat.  Add zucchini and corn and cook, stirring occasionally, for 5-7 minutes or until zucchini is slightly softened but not squishy.  Season with salt and pepper.
  2. Meanwhile, in a large pot of boiling salted water, cook pasta according to package instructions. Reserve 1 cup pasta water, then drain.
  3. In a large bowl, whisk together 1/2 cup pasta water, ricotta, and Parmesan. Add pasta mixture, zucchini, and basil, and toss to combine. Add more pasta water if necessary to create a light sauce that coats pasta. Season with salt and pepper and top with more basil and Parmesan.

Thyme and Brown Butter Roasted Potatoes

It is grilling season, and we’ve been taking full advantage of it on the weekends.  We had dinner from the grill both Saturday and Sunday night.  Last night we even ate outside.  It was wonderful.  I love this time of year.

Saturday night Ben grilled steaks, I made these potatoes and a green salad.  If we ate this every night of the week Ben would be the happiest man on earth.  Around 5 that afternoon my plan for a side dish went about as far as potatoes, but I didn’t know exactly what I wanted to do with them.  Mashed is always a good choice to accompany steak, but I didn’t feel like something loaded with butter and cream.  So we had roasted potatoes that had been tossed with brown butter and fresh thyme.  Ben said, “We need to have this meal again.”  I think we will.

When garlic cooks and gets nice and brown it is spectacular and crunchy.  When garlic burns, it turns bitter.  I burned my garlic.  So next time I would throw the garlic in with the potatoes when they had about 20 minutes left instead of at the beginning.

Thyme and Brown Butter Roasted Potatoes

Serves 4

Ingredients

  • 2 russet potatoes, scrubbed and cut into 1-inch cubes
  • 3 tablespoons butter
  • 1 tablespoon fresh thyme leaves
  • 4-5 garlic cloves, minced
  • 1 teaspoon salt

Directions

  1. Brown butter in a small saucepan over medium heat.  Watch it closely and swirl the pan periodically to keep it from burning.
  2. Combine warm butter, thyme and salt in a large bowl.  Add in the potatoes and toss to coat.
  3. Pour potatoes onto a rimmed baking sheet lined with foil or parchment (I used Reynolds parchment/foil pan liner with great results).
  4. Bake at 400°F for 40-45 minutes, stirring the potatoes around so that all sides can get nicely browned every 15-20 minutes.  Toss garlic with potatoes when they have about 20 minutes left to cook.
  5. Let cool on the sheet for a few minutes, then serve.

You Can Make Your Own: Potato Gnocchi…But I Can’t

My gnocchi fell apart between boiling  and pan searing with browned butter.  It made for a gooey mess of a meal.  They tasted good.  But what wouldn’t after being tossed in butter and fresh thyme and topped with freshly grated Parmesan cheese?

After my failure I started reading a little more about gnocchi and came across an article by Tom Colicchio that includes a nice little video of the chef at Craft making gnocchi.  I was very encouraged to read that the first time you make gnocchi you will probably not get it right.  Thank you, Mr. Colicchio.

I used this recipe from Giada (like how I just use her first name like we’re old pals?) for the proportions and this article and instructions from Fine Cooking for the method.  Maybe mixing the two was one of my problems.  I will probably try the Colicchio method, but it strikes me as one of those things you have to do a lot to get the feel for.  Good thing potatoes are cheap because I think this is going to take me a while.

Honestly the process is not a long or arduous one, but getting the right feel for the dough seems to be the tricky part.  It’s kind of like bread baking.  My mom and I went out to my great aunt’s once to have her teach us how to make her incredible Swedish rye bread.  She didn’t use a recipe, didn’t use times for rising or baking, she just knew what it was supposed to look and feel and smell like.  While mom and I came prepared with pencil and pad in hand, we weren’t able to go home and recreate the bread with our notes.  So I’m not going to be down on myself about this, I’m just going to have to keep doing it if I want to get it right.

Next time I will do the following things differently.

  1. Bake instead of boil my potatoes.
  2. Cut open and rice the potatoes right onto my work space right after baking.
  3. Make and shape the gnocchi right before I want to cook them. (I let them sit our for a couple hours…)
  4. Boil just until they float to the surface to avoid overcooking.
  5. Ice them down before saucing.
I will let you know how batch #2 comes out.  I’m going to try to convince my sister to make some with me.  Cooking is always more fun with someone else, especially when you’re unsure about what you’re doing and someone else can laugh about it with you when it turns into a big mess.
Dough Before Rolling
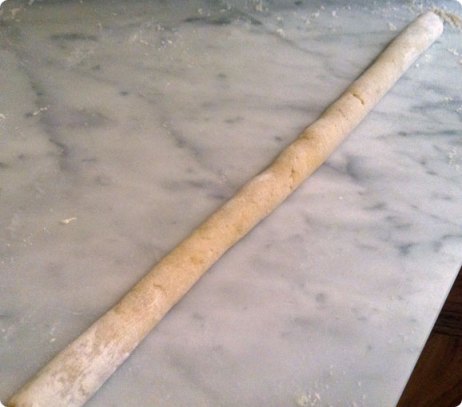
Dough Rolled Out
Cute Little Gnocchi


Kale Salad with Curried Almond Dressing

This vegan salad is wheat free, gluten free, oil free and soy free!  Big deal.  I don’t care a whole lot about stuff like this.  I am not a vegetarian, much less a vegan, though there are times I cook vegetarian meals or order a vegetarian pizza, with extra cheese, please.  I don’t worry about soy, or oil, or gluten, or wheat.  I do not make stuff like this.  Ever.  But I did today.  And…I liked it.

Some time in the last year I started following this blog, Eating Bird Food.  No doubt this was one of those stages when I told myself that I would start eating better.  I don’t eat poorly, but I also don’t make “health” food a big priority in my life.  I definitely do not worry about wheat and gluten, and thankfully I don’t have some allergy that requires me to.  I eat stuff that tastes good and makes me feel good.  Though I have been known to eat too much of the “tastes good” (darn you Cabdury Mini Eggs!) and then I have less of the “feel good”.

So, why did I even make this salad if I am not into food like this?  It just sounded really yummy.  So I made it.  And it was yummy.  It made for a nice, fresh, lunch that left me feeling really good.  I might even consider making it again.  The dressing is creamy and nutty and has a nice flavor from the ginger and curry.  The vegetables are perfect together and different enough in flavor and texture to be interesting.  The sweet apples and cranberries are a perfect contrast to the rest of the savory flavors.  The fennel is genius.  Make sure it is sliced as thin as you can get it.  Raw fennel can be overpowering if the pieces are too big.

Dressed salads do not typically hold up overnight.  This one was still crunchy and delicious after 24 hours in the fridge, so I was able to make lunch out of it 2 days in a row!  Crossing my fingers about tomorrow!  If you wanted to have it all week, just dress each individual serving when you want it to avoid soggy salad.

The recipe for this salad is from the cookbook Let Them Eat Vegan!  and was posted on Eating Bird Food this week.  She’s made and reviewed some other recipes from the book, and they all look pretty tasty.  I’m not about to give up my cheese, beef and bacon, but I have been convinced that eating vegan isn’t disgusting!  But it’s also not a lifestyle choice I’m going to make for myself.  I will, however, stop cringing at vegan recipes.  You might even see more vegan recipes on my blog…

Do ahead:

  • Make dressing and refrigerate.
  • Slice and julienne the fruit and vegetables (except the apples) and refrigerate.
  • Chop the almonds and measure out the cranberries.
Doing all this the day before will make assembly a breeze.

Kale Salad with Curried Almond Dressing

Ingredients

Salad

  • 1 small to medium-size apple, cored and julienned (3⁄4 to 1 cup), tossed in 1tsp freshly squeezed lemon juice
  • 2 1/2 – 3 cups chopped or julienned kale (leaves cut/torn from stems and stems discarded)
  • 1 1/2 cups grated carrot
  • 1 cup very thinly sliced or julienned fennel
  • 1/4 cup cranberries or raisins
  • 2/3 – 3/4 cup Creamy Curried Almond Dressing (or more, if desired; recipe follows)
  • 2 to 4 Tablespoons sliced or chopped raw almonds
  • Extra salt and pepper to taste
Dressing
  • 1⁄2 cup raw almonds
  • 2 1/2 Tablespoons apple cider vinegar
  • 2 Tablespoons pure maple syrup or agave nectar
  • 2/3 cup water (or more to thin as needed; see note)
  • 1 very small clove garlic
  • 1 teaspoon freshly grated ginger
  • 1⁄2 teaspoon Dijon mustard
  • 1⁄2 teaspoon sea salt
  • Freshly ground black pepper (optional)
  • 1⁄4 teaspoon curry powder, or more to taste
Directions
Salad
  1. Place the apple, vegetables, and cranberries in a bowl and toss.
  2. Add the dressing, starting with about 2⁄3 cup and adding more as desired, if you want a thicker coating of dressing.
  3. Toss to coat well, then let sit for 5 minutes or more to allow the kale leaves to soften slightly in the dressing.
  4. Serve, garnishing with a light sprinkling of almonds and extra salt and pepper, if desired.
Dressing
  1. Using a standing blender, food processor or an immersion blender and deep cup or jar, puree all the ingredients (starting with 1⁄2 cup of the water) until very smooth.
  2. Add additional curry to taste, and additional water to thin as desired.  Dressing thickens with refrigeration.


Mini Cornbread Puddings

In preparing for our move to Houston I am trying to get rid of things.  I have a stack of old Everyday Food magazines that I’ve kept on a bookshelf for years, but haven’t used them for recipes in quite some time.  I decided to go through them, rip out recipes I could see myself making (or have made before), and then throw the rest away.  This recipe for mini cornbread puddings came from one of the many pages torn from one of those magazines.

They were a cinch to prepare, a little tough to remove from from the pan (despite being greased) and a pleasure to eat, warm and at room temperature the next day.  They could maybe use a kick from some cayenne pepper, chopped jalapenos or green chiles.  These little treats are much more  moist than your regular corn muffin, and I am sure could be done in a regular sized 12-cup muffin tin with some changes in cooking time and temperature.

Mini Cornbread Puddings

Courtesy of Martha Stewart Everyday Food 

Ingredients

  • 1/2 cup all-purpose flour, (spooned and leveled)
  • 1/2 cup yellow cornmeal
  • 2 tablespoons sugar
  • 1 teaspoon baking powder
  • 1 teaspoon salt
  • 1/4 teaspoon baking soda
  • 1 large egg
  • 1 1/2 cups sour cream
  • 1 package (10 ounces) frozen corn kernels, thawed and patted dry
Directions
  1. Preheat oven to 425 degrees, with rack in upper third. Butter 24 mini muffin cups; set aside. In a medium bowl, whisk together flour, cornmeal, sugar, baking powder, salt, and baking soda.
  2. Make a well in center of flour mixture. In well, whisk together egg, sour cream, and corn. Mix with flour mixture just until incorporated (do not overmix).
  3. Dividing evenly, spoon batter into prepared muffin pan. Bake until tops have browned and a toothpick inserted in the center of a muffin comes out clean, 10 to 15 minutes. Let stand 5 minutes in pan; turn out onto a cooling rack. Serve, or cool completely and store at room temperature in an airtight container, up to 2 days.


Roasted Cauliflower and Carrot Couscous Salad

This vegetarian dish can stand alone as the main meal, or it can be served as a side dish.  I served this alongside some grilled chicken.  When I asked Ben if he’d be OK eating a vegetarian dinner or if he wanted chicken, well, you know what he said.  If I were to serve this as a side again I might leave out the chickpeas.  It seemed too substantial as a side with them.  It can be eaten warm, at room temperature, or cold (which is how I’ve enjoyed it for dinner and lunch the last couple days).

Yes, I made yet another meal with couscous.  I like couscous.  My grocery store had whole wheat this time, so I grabbed 2 boxes just in case they decide to stop carrying it again.  This is an incredibly simple meal to prepare.  The only bad part is having the oven not only on, but on at 450°F to roast the vegetables.  It’s in the triple digits outside, so it does seem a little crazy to make it even hotter inside.  I do love the flavor that roasting vegetables produces, so it’s worth it.  The combination of rich roasted vegetables with the cumin and the bright flavor of the lemon is wonderful.

This recipe came from my dear friend Martha Stewart.  I played with it a little bit, but will not say that I “adapted” it at all.  I used baby carrots, omitted the arugula completely, and then the dressing I just mixed up without measuring.  I used about a tablespoon of olive oil, the zest and juice of one large lemon, and salt and pepper.  I’ve said this before, I do not like things to be overdressed or sauced.  You can always add more, but you can’t take any away.  It’s like cutting bangs, sort of.  Some of you know what I mean.  Anyway, start by adding a little dressing, taste, and then add more to your liking.  The recipe below reflects my changes.  The original can be found here.  Enjoy!

Roasted Cauliflower and Carrot Couscous Salad

Courtesy of marthastewart.com

Ingredients

  • 1 pound carrots, sliced 3/4 inch thick on the diagonal (or halved baby carrots)
  • 1 head cauliflower (3 pounds), cored and cut into florets
  • 1 1/2 teaspoons ground cumin
  • 2-3 tablespoons olive oil
  • Coarse salt and ground pepper
  • 1 cup whole-wheat couscous
  • 1 lemon, zested and juiced
  • 1 can (15 ounces) chickpeas, rinsed and drained
  • 6 scallions, thinly sliced
Directions

  1. Preheat oven to 450°F. Place carrots and cauliflower on a rimmed baking sheet; toss with cumin and 1-2 tablespoons oil. Season with salt and pepper.  Roast until browned and tender, 25 to 30 minutes, rotating sheet and tossing halfway through. Cool to room temperature.
  2. Meanwhile, in a medium saucepan, bring 1 1/4 cups salted water to a boil. Stir in couscous; cover and remove from heat. Let stand until tender, 5 minutes. Fluff with a fork; set aside to cool, uncovered.
  3. Make dressing: In a small bowl, whisk together lemon zest and juice and remaining tablespoon oil; season with salt and pepper.
  4. In a large bowl, combine roasted vegetables with couscous, chickpeas, and scallions.  Toss with dressing.

Pear, Pecan and Cranberry Salad with Honey Goat Cheese Dressing

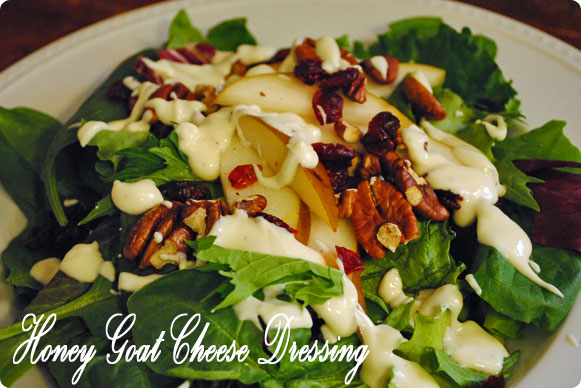
Whenever I eat goat cheese I wonder why I don’t use it more often.  I love its tang and creaminess.  Even the tiniest of crumbles of the stuff can transform a dish.  The honey goat cheese dressing on this salad was so tasty, and took an already great salad to another level of deliciousness.

My mother in law turned me on to skinnytaste.com after making two meals for us with recipes from the site.  Both tasted great and were pretty healthy.  If you do Weight Watchers, then you’re in luck because Gina includes the points.

I added some grilled chicken to this salad to make it a meal.  Instead of apples I used pears, which I think pair better with the other ingredients.  You must, must, must toast the pecans.  The flavor of any nut is improved by a quick toasting in the oven or in a dry skillet on the stove.  Do the same when you are adding pecans, walnuts or almonds to baked goods.  They just taste better.  So take the extra 5 minutes.  You’ll be glad you did.

This salad recipe used measurements for the apples and cranberries, but I just added what I wanted.  This probably messes with the points, so here is the link to Gina’s original recipe.  If you don’t care so much about counting out how many cranberries or slices of apple you can use, then just pile on a plate the following ingredients and top with the dressing.

  • Spring mix or baby spinach
  • Dried cranberries
  • 1 Bosc Pear, sliced
  • Toasted pecans, halves or pieces
  • Grilled chicken, sliced (optional)

The dressing was a little on the thick side when I made it, so I added a little more water, lemon juice and a touch of olive oil to loosen it up a bit.  After storing the leftover dressing in the fridge it was no longer pour able, so either let it warm up at room temp before you plan to use it again, or zap it in the microwave for a few seconds and stir it up.  Enjoy!

Honey Goat Cheese Dressing

Courtesy of skinnytaste.com

Ingredients

  • 4 oz goat cheese, room temperature
  • 1 1/2 tbsp honey
  • 2-3 tbsp extra-virgin olive oil
  • 2 tsp apple cider vinegar
  • 1/2 lemon, juiced
  • 1-2 tbsp water
  • Kosher salt and freshly ground black pepper
Directions
  1. In a small blender, combine goat cheese, honey, olive oil, vinegar, lemon juice, water.
  2. Season to taste with salt and plenty of freshly ground black pepper.
  3. Add more lemon juice, water, or oil to create desired consistency.


Potato, Corn, Tomato and Basil Salad

This tasty potato salad is one of the sides we had on the Fourth of July.  While I do have a special place in my heart  for a nice mustard potato salad, this one was lighter and fresher in flavor than the traditional yellow side dish.

When dressing this salad I didn’t use the measurements in the original recipe.  I don’t like to overdo it on the oil, so I just drizzled a little olive oil, squeezed the juice of one large lemon, sprinkled some salt and pepper, tossed, then tasted.  At this point you can add more of whatever it needs.  I added a little more lemon, salt and pepper.

This is a nice, simple summer side.  Fresh ingredients make such a huge difference, so it’s the perfect time of year to make this salad.  I used a combination of red potatoes and baby Yukon golds that came fresh from a garden.  The light and lemony dressing make this potato salad a healthier option than those with mayonnaise based dressings.  If you like a creamier dressing, I think adding some yogurt would be a good option.  Enjoy!

Potato, Corn, Tomato and Basil Salad

Recipe from Dave Lieberman, foodnetwork.com

Ingredients

  • 1 pound baby red potatoes, scrubbed
  • 5 medium ears of corn (about 3 pounds)
  • 1 pint grape tomatoes, halved lengthwise
  • 1 small red onion, peeled and sliced thinly (about 1/2 to 3/4 cup)
  • 1 large bunch fresh basil, rinsed, dried, and leaves picked
  • 1/4 cup extra-virgin olive oil
  • 2 large lemons, juiced
  • 1 teaspoon kosher salt
  • About 15 grinds freshly ground pepper

Directions

  1. Place the potatoes in a large pot of salted water and bring to boil. Cook until just fork tender, about 15 minutes. Fish out the potatoes with a spider or slotted spoon and place them in a bowl of ice cold water to stop them from cooking.
  2. Shuck the corn and break each ear in half. Cook in the same boiling water for 5 to 7 minutes until tender but not soft. Remove the cooled potatoes to a dish-cloth to drain. Immerse corn in the same ice bath until cool. Cut each potato into quarters and place in a large bowl.
  3. Remove corn from water and also let drain. Use a chef’s knife to cut the kernels off each ear. Add kernels to bowl. Add grape tomatoes, onion, and whole basil leaves. Add olive oil and lemon juice and toss gently to combine. Season, to taste, with salt and pepper. Serve immediately.

Southwest Quinoa Salad

When spring and summer arrive there is a need for fresh and light side dishes to serve with all of your freshly grilled foods.  This quinoa recipe is perfect next to fajitas, fish tacos, chicken, steak, or all by itself.  It is even better after sitting in the fridge overnight.  So, you can make it the day before and make getting the meal on the table easier.  Or you can make more than you need and have leftovers.  I’ve had this for lunch the past two days and it is so nice not to have to prepare anything and still get something really nutritious.

Quinoa (pronounced keen-wah) is a really amazing food.  It is loaded with protein.  It has a good amount of fiber and it is gluten free.  It is also incredibly simple to prepare.  It takes about as long as white rice, and is much better for you.  The downside to quinoa is that is is a bit pricey.  I paid $6 for a 1 pound bag.

This recipe came from My Kitchen Addiction.  Here is the link.  As with most recipes I try for the first time, I followed this one almost exactly.  Here are my minor changes.

  • I used a can of corn instead of fresh.
  • I cut back the olive oil by 1 tablespoon with fine results.
  • I substituted honey for the agave syrup since that is not something I have in my pantry.
  • The second time I made this, a mere week later, I added some dried oregano and a dash of cumin.

This is a great salad that I’m going to play with some more.  The possibilities seem almost endless!  I might try a quinoa salad with diced cucumber, red onion, tomatoes, feta, fresh parsley, mint and a vinaigrette of olive oil, red wine vinegar, lemon juice and Greek oregano…quinoa tabouli! Yum.

Southwest Quinoa Salad

Ingredients

  • 1 cup quinoa
  • 2 cups water
  • 15 ounce can of black beans, rinsed and drained
    (or about 2 cups cooked black beans)
  • 3 ears of steamed corn, cut off the cob
    (or 2 cups frozen corn kernels, thawed OR 1 can, drained)
  • 1 red bell pepper, diced
  • 1/2 red onion, chopped
  • Handful of fresh cilantro, chopped (about half a cup)
  • 1 lime, zested then juiced
  • 2 tablespoons extra virgin olive oil
  • 1 tablespoon red wine vinegar
  • 1 teaspoon chili powder
  • 1 teaspoon dried oregano
  • 1/2 teaspoon cumin
  • 1 tablespoon agave syrup or honey
  • Kosher salt
  • Freshly ground black pepper

Directions

  1. Combine quinoa and water in a saucepan.  Bring to a boil, cover, then reduce the heat to low and cook for 20 minutes.  Remove from the heat and let sit, covered, for 5 minutes.  Fluff with a fork.
  2. While quinoa is cooking, combine beans, corn, red onion, red bell peppers and cilantro in a large bowl.
  3. For the vinaigrette, whisk oil, vinegar, honey, lime juice and zest, spices and salt and pepper to taste.
  4. Combine cooked quinoa with vegetables, then mix in vinaigrette.  Serve room temperature or refrigerate.