Breads and Muffins

Daring Bakers: Dutch Crunch Bread

This month I was confronted by my fear of bread baking with this Daring Bakers challenge.  Thankfully it was a successful baking experience that resulted in a tasty sandwich and picnic lunch with my little family.

Sara and Erica of Baking JDs were our March 2012 Daring Baker hostesses! Sara & Erica challenged us to make Dutch Crunch bread, a delicious sandwich bread with a unique, crunchy topping. Sara and Erica also challenged us to create a one of a kind sandwich with our bread!

I had never heard of dutch crunch bread.  One of the reasons I really like being a part of Daring Bakers is the exposure I get to foods in other countries and other regions of the U.S. that I would have otherwise gone my whole life without knowing anything about. Making this bread made me want to go try the real thing sometime.  Whenever I find myself in Northern California I will make sure to keep an eye out for it.

We were given a couple of bread recipes to use as the vehicle for the dutch crunch topping.  I chose a simple soft white bread that I made into rolls.  The dough was so easy, smooth and lovely.  It made me really happy.  And that makes me a little weird, I know.

The topping struck me as strange when I mixed it up and did not look like the recipe said it should.  As I spread it (or tried to) on top of the risen rolls I had some serious doubts.  But they baked up beautifully and the topping lived up to its title of dutch crunch, but wasn’t striped like it should have been.  The topping adds great visual appeal and texture to the finished product.  I realized in rereading this recipe that I should have added more water to my topping to make it less stiff and easier to spread.  I used most, but not all of the topping.  Turns out I should have made half a recipe of the topping since I was only making 6 rolls!  I promise that I really do read a recipe all the way through before I start cooking, but sometimes I miss things.  Can I blame pregnancy brain for this even if it happened before I was pregnant?  Luckily there was no harm done and my kitchen didn’t explode as a result of my oversights.

Rolls Before Baking

My sandwich was not exactly one-of-a-kind, but it was simple and good.  Honey ham, white cheddar, whole grain mustard, mayo and spring mix.  I wrapped them up in parchment, packed them in my rarely utilized picnic basket along with some other goodies and picked Ben up from work last Friday and we had a nice family picnic in the park.  So even though the sandwich wasn’t groundbreaking, the experience was really wonderful.  Why don’t we picnic more often?

Below are the recipes for the bread and the topping.  Here is the link to the pdf with more detailed instructions.  Other than the rice flour (which was not hard to find at my well stocked HEB in Houston) you will have most of these ingredients or be able to get them easily.  The rolls I might make again and divide into 8 or 10 because some of the sandwich rolls I ended up with were really massive.  Thanks, Sara and Erica!

Dutch Crunch Topping

Can be halved for the roll recipe below.

Ingredients

  • 2 tablespoons (2 packets) (30 ml) (15 gm/½ oz) active dry yeast
  • 1 cup (240 ml) warm water (105-115º F) (41-46°C)
  • 2 tablespoons (30 ml) (30 gm/1 oz) sugar
  • 2 tablespoons (30 ml) vegetable oil
  • ½ teaspoon (2½ ml) (3 gm) salt
  • 1½ cups (360 ml) (240 gm/8½ oz) rice flour (white or brown; NOT sweet or glutinous rice flour) (increase by 1 cup or more for home-made rice flour)
Directions
  1. Combine all ingredients in a large bowl and beat with a whisk; beat hard to combine. The consistency should be like stiff royal icing – spreadable, but not too runny. If you pull some up with your whisk, it should drip off slowly. Add more water or rice flour as necessary. Let stand 15 minutes.
  2. Coat the top of each loaf or roll with a thick layer of topping. We tried coating it with a brush but it worked better just to use fingers or a spoon and kind of spread it around. You should err on the side of applying too much topping – a thin layer will not crack properly.
  3. Let stand, uncovered, for any additional time your recipe recommends. With the Soft White Roll, you can place the rolls directly into the oven after applying the topping. With the Brown Rice Bread, the loaves should stand for 20 minutes with the topping before baking.
  4. When baking, place pans on a rack in the center of the oven and bake your bread as you ordinarily would. The Dutch Cruch topping should crack and turn a nice golden-brown color.

Soft White Rolls

Makes 6

Ingredients

  • 1 tablespoon (1 packet) (15 ml) (7 gm/ ¼ oz) active dry yeast
  • ¼ cup (60 ml) warm water (105-110º F) (41-43°C) (No need to use a thermometer – it should feel between lukewarm and hot to the touch).
  • 1 cup (240 ml) warm milk (105-110º F) (41-43°C) (We’ve tried both nonfat and 2%, with no noticeable difference)
  • 1½ tablespoons (22½ ml) (20 gm/ ⅔ oz) sugar
  • 2 tablespoons (30 ml) vegetable oil (plus additional olive or vegetable oil for greasing bowl during rising)
  • 1½ teaspoons (7½ ml) (9 gm/⅓ oz) salt
  • Up to 4 cups (960 ml) (600 gm/21oz) all purpose flour

Directions

  1. In the bowl of an electric mixer or large mixing bowl, combine yeast, water, milk and sugar. Stir to dissolve and let sit for about 5 minutes (The mixture should start to bubble or foam a bit and smell yeasty).
  2. Add in vegetable oil, salt and 2 cups of flour. Using the dough hook attachment or a wooden spoon, mix at medium speed until the dough comes together.
  3. Add remaining flour a quarter cup at time until the dough pulls away from the sides of the bowl, as shown in the photo below (For us, this usually required an additional 1½ to 2 cups of flour).
  4. Turn out onto a lightly floured surface and knead for about 4 minutes, until smooth and elastic.
  5. Place in a lightly greased bowl and cover with plastic wrap. Let rise for 1 hour, or until doubled
  6. Once the dough has risen, turn it out onto a lightly floured surface and divide it into 6 equal portions (if you’d like to make rolls) or 2 equal portions (if you’d like to make a loaf) (using a sharp knife or a dough scraper works well). Shape each into a ball or loaf and place on a parchment-lined baking sheet (try not to handle the dough too much at this point).Cover with plastic wrap and let rise for 15 minutes while you prepare the topping.
  7. Coat the top of each roll or loaf with the topping as described above. While the original recipe recommends letting them stand for 20 minutes after applying the topping, I got better results by putting them directly into the oven.
  8. Once you’ve applied the topping, bake in a preheated moderately hot 380ºF/190°C/gas mark 5 for 25-30 minutes, until well browned. Let cool completely on a wire rack before eating.


Easy Pita Bread

Indian food is one of those things I rarely if ever make at home, unless it’s “Indian spiced” or something that only tastes something like Indian food but is nothing like the palak paneer, tikka masala, samosas or naan you can get from your favorite Indian restaurant.  Last night I made Indian food.  I tried a chicken tikka masala recipe in the slow cooker and it turned out to be pretty tasty.  As it was cooking I realized I’d forgotten bread at the store.  So, I decided to make my own.

I know I should have made naan.  I know that pita is typically not served at Indian restaurants, but that naan or roti are the breads on the menu.  But as I started looking for recipes, pita just seemed simpler, and I desperately needed something simple.  This recipe is from an about.com article about Middle Eastern Food.  Here is the link.

The dough had me in doubt from the very beginning.  It never came together or pulled away from the sides of the bowl, so I had to add more flour.  After adding about 1/2 cup I deemed it worthy to come out of the mixer and start rising.  Still incredibly sticky.  I managed to get it safely into its bowl, covered and ready to rise, but had to do some serious hand and fingernail scrubbing to get the sticky dough cleaned up.  It rose nicely but still looked sticky, so I floured my surface very generously.  Good thing, because I still needed to have my flour jar close at hand while I rolled out the dough into a long rope and then as I rolled the 10 pita breads.

After that though, the baking was a breeze and the results were rewarding and well worth the messy hands.  I would try this recipe again with more flour from the outset, but not too much.  You can always add flour as you’re rolling out your dough, but you can’t take it away.

Pita dough balls before rolling.

 Puffed pitas in the oven. 

The only special tool you may need is a pizza stone.  You can use a regular baking sheet, but at high temps a pizza stone is the best choice.

I am thrilled about the fact that these came out so well!  Ben will tell you that I commented on this more than once last night during dinner.  A package of pitas, while convenient, isn’t nearly as yummy or as cheap as these guys.  Another benefit is that since these are hand rolled you have a much more exciting variety of shapes than those boring circles you get in the package!

Easy Pita Bread

Ingredients

  • 1 package yeast
  • 1/2 cup warm water
  • 1 1/2 teaspoons sugar
  • 3 1/2-4 cups flour (plus more for dusting)
  • 1 1/4 teaspoon salt
  • 1 cup warm water

Directions

  1. Dissolve yeast in 1/2 cup of warm water. Add sugar and stir until dissolved. Let sit for 10-15 minutes until water is frothy.
  2. Combine flour and salt in large bowl or the bowl of a stand mixer fitted with a dough hook.  Make a small well in the middle of the flour and pour yeast water in the well.
  3. Slowly add 1 cup of warm water, and stir with wooden spoon or rubber spatula until elastic.
  4. Place dough on floured surface and knead for 10-15 minutes OR mix on medium speed until dough starts to pull away from the sides of the bowl. When the dough is no longer sticky and is smooth and elastic, it has been successfully kneaded.  (This may not quite happen for you, add a bit more flour but you can just transfer it to the bowl to rise, it will be fine.)
  5. Coat large bowl with vegetable oil and place dough in bowl. Turn dough upside down so all of the dough is coated.
  6. Allow to sit in a warm place, covered with a clean towel for about 3 hours, or until it has doubled in size.
  7. Once doubled, roll out in a rope, and pinch off 10-12 small pieces. Place balls on floured surface.  Let sit covered for 10 minutes.
  8. Preheat oven to 500°F and make sure rack is at the very bottom of oven. Preheat your pizza stone in the oven.
  9. Roll out each ball of dough with a rolling pin into circles. Each should be about 5-6 inches across and 1/4 inch thick.
  10. Bake 3 circles at a time for 4 minutes until the bread puffs up. Turn over and bake for 2 additional minutes.
  11. Remove each pita with a spatula from the stone and add additional pitas for baking. Take spatula and gently push down the puff.  Keep baked pitas covered with a clean towel while you bake the rest.

Daring Bakers: Jalapeño, Bacon and Cheese Beer Bread & Blueberry Almond Streusel Bread

Oh, how I love quick breads.  They are delicious, easy and, most importantly, quick.  This month’s challenge was quite versatile and so fun.  I was able to make one loaf of savory bread to serve with dinner and then a sweet loaf a couple days later for breakfast.  Getting started on this challenge more than a day before the posting date was immensely helpful and I hope I can do the same thing next month.  But we shall see…I have a history of acknowledging how great it was to work on something and get it done early and yet still managing to go back to my old ways of procrastination.

The Daring Bakers’ February 2012 host was – Lis! Lisa stepped in last minute and challenged us to create a quick bread we could call our own. She supplied us with a base recipe and shared some recipes she loves from various websites and encouraged us to build upon them and create new flavor profiles.

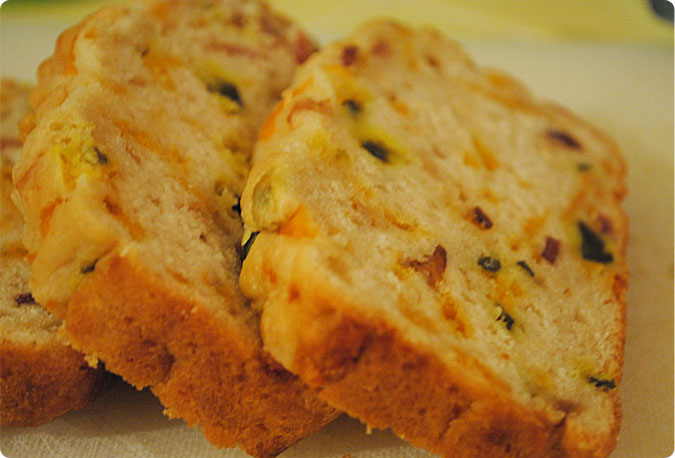
This jalapeño bread was a big hit.  I made a meal of barbecued chicken, creamed corn and cole slaw (all recipes I’d never used before and all of which were flops) and then this bread.  My husband told me the bread was the best part of the meal, and he was right.  I used a sharp cheddar cheese, pickled jalapeños, crumbled bacon and a bottle of Shiner.  We ate it with dinner warm from the oven and the next couple of mornings toasted with butter. I’m bummed it’s all gone, so I’ll probably have to make another loaf.

Jalapeño, Bacon and Cheese Beer Bread

Ingredients

  • 3 cups flour
  • 3 tablespoons sugar
  • 2 teaspoons baking powder
  • 1 teaspoon coarse salt
  • 1/2 cup chopped pickled jalapeños
  • 1/2 cup bacon, cooked and crumbled
  • 1 cup grated cheese
  • 12 ounces beer
  • 1/4 cup butter, melted

Directions

  1. Preheat oven to 375°F and grease a 9×5 loaf pan.
  2. Measure and then sift the flour, baking powder, sugar and salt into a mixing bowl.
  3. Mix in the the chopped jalapeños, cheese and bacon.
  4. Pour one can of beer into the mixing bowl and mix until blended.
  5. Pour mixture into the loaf pan, then pour half of the melted butter over the top.
  6. Bake for 30 minutes, then pour remaining butter on top of the loaf.  Bake for another 20-30 minutes or until golden brown.
  7. Cool for 5-10 minutes, then remove from the pan and cool an additional 10 minutes.

The blueberry almond bread recipe came from Joy the Baker.  She used raspberries in her bread, and I might try that next time, or maybe a mix of berries.  I used frozen blueberries that I’d thawed out and drained, and dried as much as I could on paper towels.  I added a buttery almond streusel to the top of this bread that was so delicious, sweet and crunchy.  It might have been my favorite part of the loaf.

Blueberry Almond Streusel Bread

Streusel

Ingredients
  • 1/3 cup flour
  • 1/4 cups sliced almonds, toasted
  • 1/4 cup cold butter, cut into small chunks
  • 1/4 cup brown sugar
  • 1/4 cup sugar
Directions
  1. Mix together all ingredients except for almonds and butter.
  2. Cut butter into flour mixture with a pastry blender or two knives until the butter pieces are mostly the size of small pebbles with some larger pieces, then mix in the almonds.  Refrigerate until ready to use.
Bread

Ingredients

  • 2 cups flour
  • 1 teaspoon baking powder
  • 1 teaspoon baking soda
  • 1/2 teaspoon salt
  • 1/2 cup (1 stick) unsalted butter, room temp
  • 1 cup sugar
  • 1/2 teaspoon pure almond extract
  • 2 eggs
  • 2 tablespoons sour cream
  • 1 cup blueberries, fresh or thawed and drained if frozen
  • 1/3 cup slivered almonds, toasted

Directions

  1. Preheat oven to 325°F.  Grease and sugar a 9×5 loaf pan.
  2. In a medium bowl, whisk together the flour, baking powder, baking soda and salt. Set aside.
  3. In a large bowl, using an electric mixer, cream the butter, sugar and almond extract until light and fluffy, about 3 minutes. Beat in the eggs one at a time, beating well after each addition. Mix in the flour and sour cream. Fold in the crushed fruit and almond slivers.
  4. Spoon the batter into the prepared pan, then top with streusel.  Bake in the center of the oven for 55 to 60 minutes, or until a cake tester inserted into the center comes out clean.
  5. Cool the bread in the pan for 20 minutes, then invert onto a wire rack, turn right side up and cool completely.

You Can Make Your Own: White Bread

This is not going to be impressive to you bread aficionados.  Who can’t make simple white bread, you ask?  Me.  That’s who.  Well, until now.  Feast your eyes on my first decent loaf of white bread.

I have only recently begun to feel more comfortable using yeast.  Pizza dough really gave me my initial confidence with trusting something to rise, and I haven’t been too afraid of it for a good while now.

However, after my first trial with making some simple white sandwich bread this past week I was yet again fooled by that tricky micro organism!  I guess I knew it was going to be a flop before I even started.  I bought a jar of yeast at the store because they were out of packets.  I thought, “Well, this is nice.  A big jar I can measure from instead of cutting open those pesky packets.”  I first opened and used the yeast a week ago in pizza dough which rose beautifully.  Then guess what I did.  I put it in the cabinet.  Because that’s where I always keep yeast.  I pulled it out this past week to make this bread and noticed a little, ok fine, a rather large, note on top of the jar that gave a simple instruction.  “Refrigerate after Opening”  Oops.  So what did I do?  I kept on working.  Mixing everything together thinking that by some miracle it would work.  Well, it didn’t.  I plopped the unrisen dough ball into the trash.  It was sad.  I hate throwing food away.

The next day I tried again with new yeast from a package.  It still didn’t rise to double its original size each time like the recipe stated it should, but the end result was a nice, slightly dense white bread of which half a loaf is gone a mere 24 hours later.  So I think I am going to work on perfecting this bread.  It is simple and yummy.  Nothing too complex about it.  It is just good white bread.  This morning we made cinnamon toast with it and it was breakfast bliss.  I think this would make excellent grilled cheese sandwiches and spectacular turkey or ham and cheese, or just simple toast with butter and jam.

This recipe comes from a Houston Junior League cookbook that my friend Megan gave me.  Thanks, Megan!  This cookbook is a lot of fun to browse through since it was originally printed in 1968.  This recipe caught my eye with its title “Old Fashioned White Bread”.  Some recipes don’t get better or improve tremendously over time, and I think basic bread it one of them.  I only changed one ingredient, I used butter instead of shortening, and I changed the instructions a bit since I have the luxury of owning a stand mixer.

If you have any great recipes for white bread, please share them!  While I loved this bread, I always love to try recipes others swear by and also would love any tips you have for bread baking.  I am just a beginner and I know that good bread bakers are made, not born.

Old Fashioned White Bread

Houston Junior League Cookbook

Ingredients

  • 1 package dry yeast
  • 1/3 cup warm water
  • 1/4 cup butter, melted and cooled
  • 1/2 cup sugar
  • 1 tablespoon salt
  • 2 cups lukewarm water
  • 6 cups bread flour
  • Egg Wash: 1 egg whisked with 1 teaspoon of water or milk

Directions

  1. Dissolve yeast in 1/3 cup warm water.
  2. In the bowl of a stand mixer fitted with a dough hook, combine sugar, butter, salt and 2 cups lukewarm water.  Add yeast and mix.
  3. Mix in flour and run the mixer on slow speed for 2 minutes, then on medium speed for 4-5 minutes.  Dough will be sticky.
  4. Oil a large bowl and turn dough out into the bowl, turn to coat with oil.  Cover and let rise for 1-2 hours until doubled in size.
  5. Sprinkle hands with flour, punch down dough and turn onto a lightly floured surface.  Cut dough in half and shape into 2 loaves.
  6. Place dough into 2 greased loaf pans, cover and let rise for 45 minutes, until doubled in size.
  7. Brush loaves lightly with egg wash.  (You will not use it all.)
  8. Bake at 350°F for 40-45 minutes until tops are lightly browned.
  9. Let cool for 5 minutes in the pan, and then completely on wire racks before cutting.


Daring Bakers: Scones (And By That I Mean Biscuits)

Today is January 27, 2012.  The posting day for Daring Bakers!  It is always the posting day for Daring Bakers.  But just yesterday, on the 26th of January, I decided I was going to get back on the Daring Bakers wagon and start participating again after a long hiatus.  I signed in to the site , read the challenge.  Scones.  I can do scones.  Then I started checking the ingredients, added a few special things to my grocery list, and then I checked the posting date and I thought, “I’ll have a few days to crank these out.”  Then I checked my calendar.  It was the 26th.  How did this happen?  How can I be so out of touch with reality to think it was somehow earlier than this?   Does this happen to anyone else?  The end of the month totally sneaks up on you and you’re left feeling like life is passing you by?  That’s a little dramatic, but I really did have that moment of, “WHAT?” when I figured out it was almost the end of January.  Basically, I am just an absent minded mess these days.  I was in pajamas until 1pm on Wednesday of this week…it’s no wonder I don’t know what day it is.

Audax Artifex was our January 2012 Daring Bakers’ host. Aud worked tirelessly to master light and fluffy scones (a/k/a biscuits) to help us create delicious and perfect batches in our own kitchens!

Scones, as I know them anyway, are those nice, slightly sweet triangular shaped breads, a little crunchy outside, soft and crumbly inside.  Sometimes plain, sometimes full of fruit, sometimes glazed, sometimes sugared, and always wonderful.  That is not a scone by English definition.  What Daring Bakers were challenged to do this month was to make what the Australian and the English call scones, and that is what we North Americans call biscuits!  Thanks you, Daring Bakers!  I don’t make biscuits often, so having an excuse to make myself a batch or two was going to be a wonderful way to spend the afternoon.

Tender, flaky,so high they’re rising to the heavens biscuits are so very special and wonderful because they are so stinkin’ hard to achieve.  I made two batches, and I wish I’d had the time to make more because I could have figured out the secret to the perfect biscuit.  I’m going to have to keep making these until I get it right.  I don’t think anyone in my house will have a problem being the taste testers.  It is the ingredients, but it’s also very much the process.  Laminating, or folding, the dough gives the tender flaky layers I most associate with a good biscuit.  And be gentle with the dough.  You don’t want to overwork it.  At the same time, you don’t want to underwork it.  I know, that’s confusing.  But make a batch or two (or ten) and you’ll start to figure it out.

Here are my first and second batches together (first batch on top).  This experience made me so excited about baking!  I know this makes me a food nerd, but I like that just changing a few things can yield totally different results.

For my first batch I tried what is called an Australian Scone Ring, which is a nice little ring of biscuits.  The recipe uses less butter than the basic dough and the fat is worked into smaller pieces.  Total fail.  I worked the dough too much, and rolled them out too thin.  They didn’t rise much at all and they were a non attractive pale color with no semblance of biscuit texture.  Some of the differences are of course due to the differences in the ingredients and process, but I still think I screwed these up.

So I looked at some of the other variations and opted for a Buttermilk Biscuit.  Now these are biscuits, and good ones.  Still not with the height that I would have liked them to have, but with a great flaky texture, buttery flavor and a nice golden brown hue on top and bottom.  They also smell divine.  They are on the counter next to me at the moment and every time I get a whiff I want to eat another one.  With twice the fat of the basic recipe, buttermilk instead of plain milk and a folding process instead of a kneading one, these came out much more to my liking.

Below I am including the recipe and instructions for the buttermilk biscuits.  The basic recipe can be found here.

Buttermilk Biscuits

Ingredients

  • 1 cup flour
  • 2 teaspoons baking powder
  • 1/4 teaspoon baking soda
  • 1/4 teaspoon salt
  • 1/2 cup whole milk (+ 1/2 tablespoon apple cider vinegar to make sour milk) or use buttermilk
  • 4 tablespoons butter, chilled in the freezer

Directions

  1.  Preheat oven to 475°F
  2. Triple sift the dry ingredients into a large bowl. (If your room temperature is very hot refrigerate the sifted ingredients until cold.)
  3. Rub the frozen butter into the dry ingredients until it resembles very coarse bread crumbs with some pea-sized.  (I used a pastry cutter to get it started, then used my fingers to get the right sized butter pieces.)
  4. Add nearly all of the liquid at once into the rubbed-in flour/fat mixture and mix until it just forms a sticky dough (add the remaining liquid if needed). The wetter the dough the lighter the scones (biscuits) will be.
  5. Turn the dough out onto a lightly floured board, lightly flour the top of the dough.  Knead very gently once (do not press too firmly) then fold and turn the kneaded dough about 3 or 4 times until the dough has formed a smooth texture. (Use a floured plastic scraper to help you knead and/or fold and turn the dough if you wish.)
  6. Pat or roll out the dough into a 6 inch by 4 inch rectangle by about ¾ inch thick (15¼ cm by 10 cm by 2 cm thick). Using a well-floured 2-inch (5 cm) scone cutter (biscuit cutter), stamp out without twisting six 2-inch (5 cm) rounds, gently reform the scraps into another ¾ inch (2 cm) layer and cut two more scones (these two scones will not raise as well as the others since the extra handling will slightly toughen the dough). Or use a well-floured sharp knife to form squares or wedges as you desire.
  7. Place the rounds just touching on a baking dish (I used a cast iron skillet) if you wish to have soft-sided scones or place the rounds spaced widely apart on the baking dish if you wish to have crisp-sided scones. Glaze the tops with milk if you want a golden colour on your scones or lightly flour if you want a more traditional look to your scones.
  8. Bake in the preheated oven for about 10 minutes (check at 8 minutes since home ovens at these high temperatures are very unreliable) until the scones are well risen and are lightly coloured on the tops. The scones are ready when the sides are set.
  9. Immediately place onto cooling rack to stop the cooking process, serve while still warm.


Gooey Pecan Overnight Breakfast Rolls

This is as easy as it gets folks.  Well, unless you buy a pan of Sister Schubert’s cinnamon rolls and pop those in the oven.   That would be easier.  But these breakfast rolls are truly simple, and incredibly indulgent and delicious.  With an ingredient list of 5 items, the luxury of preparing them the night before, leaving them on the counter all night, then baking for a mere half an hour the rewards are much greater than the work that’s put into them.

I’ve made these twice now, and was more pleased with the second batch.  The first time I used only 1/2 cup of pecans, and this time I just covered the bottom of my dish and probably used close to a full cup.  It was great to have the extra sugary coated guys to snack on from the pan.  Feel free to use less or you could use walnuts.  I used vanilla pudding the first time, and butterscotch the last time.  Both were good, so use what you like.

A 9×13 pan is fine for these, but I used a smaller baking dish, 10×10, this last time.  A smaller area meant more gooey goodness which is never a bad thing in my opinion.  I only used 12 rolls for the smaller pan.  If I do these again in a 9×13 I would add a little more butter and sugar.  Because if you’re already going to eat these, what’s wrong with a little more fat and calories?  Enjoy!

Gooey Pecan Breakfast Rolls

Ingredients

  • 1/2-1 cup pecans, chopped
  • 18 frozen dinner rolls
  • 1 small box (3.5 ounces) Cook and Serve pudding
  • 1 stick butter
  • 1/2 cup brown sugar
Directions
  1. Spray a 9×13 pan with cooking spray and spread pecans on the bottom of the pan.
  2. Place rolls on top of pecans, spacing evenly.
  3. Sprinkle pudding mix over the top of the rolls and pecans.
  4. Cook butter and sugar in a saucepan over medium heat until sugar has dissolved, stirring frequently to avoid burning or boiling over.
  5. Pour butter mixture over the top.
  6. Cover with plastic wrap and let sit overnight, 8-10 hours.
  7. Preheat oven to 350°F, remove plastic wrap and bake for 20-30 minutes.
  8. Let cool for 5-10 minutes, then invert onto a platter or serve from the pan.

Mini Cornbread Puddings

In preparing for our move to Houston I am trying to get rid of things.  I have a stack of old Everyday Food magazines that I’ve kept on a bookshelf for years, but haven’t used them for recipes in quite some time.  I decided to go through them, rip out recipes I could see myself making (or have made before), and then throw the rest away.  This recipe for mini cornbread puddings came from one of the many pages torn from one of those magazines.

They were a cinch to prepare, a little tough to remove from from the pan (despite being greased) and a pleasure to eat, warm and at room temperature the next day.  They could maybe use a kick from some cayenne pepper, chopped jalapenos or green chiles.  These little treats are much more  moist than your regular corn muffin, and I am sure could be done in a regular sized 12-cup muffin tin with some changes in cooking time and temperature.

Mini Cornbread Puddings

Courtesy of Martha Stewart Everyday Food 

Ingredients

  • 1/2 cup all-purpose flour, (spooned and leveled)
  • 1/2 cup yellow cornmeal
  • 2 tablespoons sugar
  • 1 teaspoon baking powder
  • 1 teaspoon salt
  • 1/4 teaspoon baking soda
  • 1 large egg
  • 1 1/2 cups sour cream
  • 1 package (10 ounces) frozen corn kernels, thawed and patted dry
Directions
  1. Preheat oven to 425 degrees, with rack in upper third. Butter 24 mini muffin cups; set aside. In a medium bowl, whisk together flour, cornmeal, sugar, baking powder, salt, and baking soda.
  2. Make a well in center of flour mixture. In well, whisk together egg, sour cream, and corn. Mix with flour mixture just until incorporated (do not overmix).
  3. Dividing evenly, spoon batter into prepared muffin pan. Bake until tops have browned and a toothpick inserted in the center of a muffin comes out clean, 10 to 15 minutes. Let stand 5 minutes in pan; turn out onto a cooling rack. Serve, or cool completely and store at room temperature in an airtight container, up to 2 days.


Cinnamon Sugar Peach Cake

When I came across this recipe I practically ran to the kitchen to begin making it.  I took out a stick of butter, 2 eggs and buttermilk to bring them to room temperature.  Since my little guy was asleep, I couldn’t make it to the store to get the one ingredient I lacked…fresh peaches.  So I used…canned peaches.  Did you just cringe?  I’m embarrassed, especially when there are fresh, juicy peaches available about a mile from my house.  While I am sure fresh peaches would have been better, the cake still turned out wonderfully.  That means you can make this in the dead of winter, when peaches aren’t so abundant.

Thanks to Ina Garten, one of my favorite Food Network people, for this recipe.  Her recipe calls for sour cream, which I did not have.  I substituted 3/4 cup of buttermilk and 1/3 cup softened butter.  I think it would have been fine to use 1 cup of buttermilk without the additional butter.

This cake can be eaten for dessert with a scoop of vanilla ice cream, or for breakfast.  Enjoy!

Cinnamon Sugar Peach Cake

Courtesy of Ina Garten, foodnetwork.com

Ingredients

  • 1/2 cup + 1/3 cup of softened butter
  • 1 cup + 1/2 cup sugar
  • 2 eggs
  • 3/4 cup buttermilk
  • 1 teaspoon vanilla
  • 2 cups flour
  • 1 teaspoon baking soda
  • 1 teaspoon baking powder
  • 1/2 teaspoon salt
  • 1 teaspoon cinnamon
  • 1 large can of peaches, drained and rinsed
  • 1/2 cup pecans
Directions
  1. Preheat the oven to 350° F. Grease a 9-inch-square baking pan.
  2. In the bowl of an electric mixer fitted with the paddle attachment, beat the all the butter and 1 cup of the sugar for 3 to 5 minutes on medium-high speed, until light and fluffy. With the mixer on low, add the eggs, one at a time, then the buttermilk and vanilla, and mix until the batter is smooth.
  3. In a separate bowl, sift together the flour, baking soda, baking powder and salt. With the mixer on low, slowly add the dry ingredients to the batter and mix just until combined.
  4. In a small bowl, combine the remaining 1/2 cup sugar and the cinnamon.
  5. Spread half of the batter evenly in the pan. Top with half of the peaches, then sprinkle with two-thirds of the sugar mixture.
  6. Spread the remaining batter on top, arrange the remaining peaches on top and sprinkle with the remaining sugar mixture and the pecans.
  7. Bake the cake for 45 to 55 minutes, until a toothpick inserted in the center comes out clean. Serve warm or at room temperature.

Buttermilk Berry Muffins

Most weekday mornings Ben is out of the house before I even roll out of bed.  He almost always has a bowl of cereal for breakfast.  He always uses one of our green soup bowls.  He is a creature of habit, and I love that about him.  But I changed up his routine this weekend.

This past Saturday I was up first and managed to throw together these muffins for breakfast.  They came together so quickly!  Buttermilk makes these muffins wonderfully moist.  The berries provide a burst of tart sweetness.  A little sprinkle of raw sugar gives a nice crunch without the extra work of making a streusel.  Yes, I am too lazy to make a simple steusel.

I used a combination of fresh raspberries and blueberries, about a cup of each.  Blackberries would also be delicious.  This recipe comes from The Joy of Baking.  Enjoy!

Buttermilk Berry Muffins

Ingredients

  • 2 1/2 cups flour
  • 3/4 cup sugar
  • 2 teaspoons baking powder
  • 1/2 teaspoon baking soda
  • 1/2 teaspoon salt
  • zest from 1 lemon
  • 1 egg
  • 3/4 cup buttermilk
  • 2/3 cup canola oil
  • 1 teaspoon vanilla
  • 2 cups fresh berries
  • 1/4 cup raw/turbinado sugar
Directions
  1. Preheat oven to 375°F.  Prepare 18 regular size muffin cups with muffin cups or grease and sugar cups.
  2. Whisk flour, sugar, powder, soda, salt and lemon zest in a large bowl.
  3. In a separate bowl whisk buttermilk, oil, egg and vanilla.
  4. Gently fold wet ingredients into the dry ingredients until just combined.
  5. Fold in berries, being careful not to mash them too much.
  6. Fill each muffin cup almost full of batter.
  7. Sprinkle each with a little of the raw sugar.
  8. Bake for 20 minutes until just browned.

.

Cinnamon Bread

If you bake at all, then you can bake this bread.  Not only is it incredibly easy, but the ingredient list makes me oh so very happy.  I almost always have every single item in my kitchen.  Glorious!  The only thing that I didn’t have was buttermilk and we all know how easy it is to make your own buttermilk, don’t we?  If not, see this blog.  I do love Smitten Kitchen.  Her blog makes me hungry.

Back to the cinnamon bread.

I made this for a neighbor who I made some cinnamon Amish friendship bread for a while back.  He kept asking me to make more of it, but I’d let my starter die and couldn’t do it.  I found this to be a great substitute and I can make it without having to keep feeding the friendship starter and making more loaves than I could ever hope to eat.

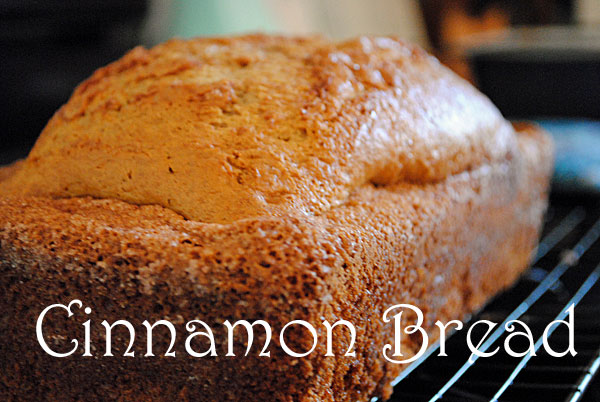
The recipe is from allrecipes.com, here is the link to the original recipe.  I changed the method for mixing the batter together to something I was more comfortable with.  I doubt it makes much of a difference, if any.  For the topping I used 2 tablespoons of melted butter and about 3 tablespoons of cinnamon sugar I already had mixed up.  Maybe this mixture swirled on top of the batter made it rise up all weird in the center but not on the edges?  I don’t know.  It isn’t pretty, but it is good.  Enjoy.

Cinnamon Bread

Courtesy of allrecipes.com

Ingredients

  • 2 cups all-purpose flour
  • 1 cup white sugar
  • 2 teaspoons baking powder
  • 1/2 teaspoon baking soda
  • 1 1/2 teaspoons ground cinnamon
  • 1 teaspoon salt
  • 1 cup buttermilk
  • 1/4 cup vegetable oil
  • 2 eggs
  • 2 teaspoons vanilla extract
  • 3 tablespoons white sugar
  • 1 1/2 teaspoon ground cinnamon
  • 2 tablespoons butter, melted

Directions

  1. Preheat oven to 350 F. Grease and sugar one 9×5 inch loaf pan.
  2. Beat the oil and sugar, then add in eggs and vanilla.
  3. Mix flour, baking powder, baking soda, 1 1/2 teaspoons cinnamon, and salt then mix into wet ingredients, followed by the buttermilk.  Beat 3 minutes. Pour into prepared loaf pan. Smooth top.
  4. Combine 3 tablespoons white sugar, 1 1/2 teaspoon cinnamon and butter. Drizzle topping over smoothed batter. Using knife, cut in a light swirling motion to give a marbled effect.
  5. Bake for about 50 minutes. Test with toothpick. When inserted it should come out clean. Remove bread from pan to rack to cool.