About Carrie Zinnecker

Posts by Carrie Zinnecker:

Phyllo Rolls with Beef and Kale

When quarantine began I made a list of things I already had in my pantry and freezer so that I could make an attempt at smart meal planning. For some reason I had two boxes of phyllo dough. No doubt I’d planned on making these spanakopita but never got around to it.

After I made that list I started brainstorming and looking for recipes that used those ingredients. Pasta sauce for lasagna, italian sausage and sundried tomatoes for this simple skillet pasta, cream of chicken soup for Poppyseed chicken, etc.

As I was browsing I found this recipe from Fine Cooking that could use up some of the phyllo. I have now made it twice and we love these rolls! The second time I added some finely chopped kale to the filling. The kale had come in a produce delivery and I needed to use it quickly! I love being able to sneak in veggies.

The recipe says to serve with either tzatziki or marinara sauce. The warm weather calls for a cool and tangy tzatziki in my opinion, plus I just love a yogurt based sauce, but I can see how these would be good with either sauce.

Give yourself time to make these, they’re slightly time consuming with the phyllo layering. Once you can socialize with others again, grab a friend to help and then you can assembly line these babies. You can make the filling ahead of time, up to a couple of days if you want to. Make sure to keep your phyllo covered when you’re not using it so that it doesn’t dry out, but don’t get it too wet or it will get sticky and tear. Phyllo is high maintenance. The best way I’ve found to do this is to unroll your phyllo on its original paper, cover with a sheet of waxed paper or parchment (I find plastic wrap to be a bit of a pain) and then cover that with a damp (not soaking) tea towel. Uncover to get what you need, then cover right back up.

Here are some step-by-step pics if you find that helpful.

Lay out the phyllo layers then cut into 4 equal rectangles.

Place 1-2 tablespoons of filling on the long edge of one rectangle.

Roll it up…then repeat and repeat…

Place seam side down on the baking sheet, brush with egg wash and sprinkle with salt.

Bake until a lovely golden brown.

These were a huge hit with Ben and me, and even the kids ate them (which is a big deal if you know my kids!). If you have leftovers, they reheat really well in the oven on a pizza stone.

Phyllo Rolls with Beef and Kale

From Fine Cooking

Ingredients

For the filling

  • 1 tablespoon olive oil
  • 1 small onion, finely chopped
  • 1 clove garlic, minced
  • 1 pound ground beef
  • 1 small bunch of kale, trimmed and very finely chopped
  • 1/2 teaspoon ground cumin
  • 1/2 teaspoon ground cinnamon
  • 1/4 teaspoon paprika
  • salt and pepper

For the rolls

  • 18 sheets phyllo dough (9×14 inches), thawed if frozen
  • 4-6 tablespoons unsalted butter, melted
  • 1 egg
  • Flaky sea salt
  • Tzatziki Sauce or Marinara for dipping

Directions

Make the filling

  1. Heat the oil in a medium skillet over medium heat.
  2. Add the onion and garlic, and cook, stirring occasionally, until softened, about 5 minutes.
  3. Add the ground beef and cook, stirring occasionally and breaking up any chunks, until cooked through, about 4 minutes.
  4. Add the kale and cook, stirring, until kale becomes bright green, a couple of minutes.
  5. Add the cumin, cinnamon, paprika and 1 tablespoon water and cook, stirring occasionally, for another 2 minutes. Add in 1 teaspoon of salt and pepper to taste.
  6. Let cool slightly before using.

Assemble and Bake the Rolls

  1. Heat oven to 400°F. Line a large rimmed baking sheet with parchment.
  2. Set up your sheets of phyllo on a clean work area covered with the damp cloth. Have a large cutting board, knife or pizza cutter, filling and melted butter ready to go.
  3. Remove 2 sheets of phyllo and place them on the cutting board.
  4. Lightly brush the top sheet with melted butter. Cover with a third sheet of phyllo and brush with melted butter.
  5. Using a pizza cutter or pastry wheel, cut the layered phyllo in half lengthwise and then cut crosswise into fourths, creating eight equal-size rectangles.
  6. Working quickly, spread a heaping tablespoon of filling along the top of one of the long sides of each of the phyllo rectangles.
  7. Roll up the phyllo and gently press each end to seal. Transfer seam side down to the baking sheet.
  8. Lightly beat the egg with 1 tablespoon of water to make an egg wash. Brush the egg wash on top of each roll and then sprinkle with the flaky salt. Repeat with the remaining sheets of phyllo and filling.
  9. Bake until golden brown, about 14 minutes.
  10. Allow to cool slightly, then cut each roll in half on a bias.

Croatian Easter Bread

This says Easter bread, but there’s no need to wait until 2021 to make it! I’m thinking this would be nice for Mother’s Day brunch…as long as mom doesn’t have to make it for herself!

Over the past few years my desire and drive to cook and bake and then blog about it has really dwindled…hence the years with no blog posts. Most of the cooking or baking I’d do would be out of pure necessity. I didn’t often find myself seeing some new recipe and excitedly deciding to make it without it serving some purpose. It just always felt like it would be more work than it was worth. I’ve been tired y’all.

I am slowly regaining the desire to cook/bake unnecessary things thanks in large part to having a life that has less structure these days. I marked this recipe for Easter morning and it was a terrific decision. Once this came out of the oven I was reminded of just how much fun it is to make something new, to see the transformation from simple ingredients to something not only edible but also beautiful and delicious. Everything about this bread, from the making to the eating, was pure joy…except for the dishes. I think Ben handled a lot of those! Thanks, babe.

Fine Cooking had a section in the April/May 2020 issue on Easter breads using one basic master dough and a few different types of breads using that dough. I chose this one because it seemed like the whole family would enjoy it…but more importantly because I had all of the ingredients! I had to make one substitution and use raisins in place of the golden raisins and it worked out well. I soaked the raisins in amaretto instead of the rum/amaretto mixture called for. Also totally fine.

The dough was pretty straightforward and I didn’t have any problems with rising. My new favorite place to let things rise is nestled in or on a pile of warm towels in the dryer. Works like a dream! I just make sure to tell everyone in the house that there’s dough in there and not to start the dryer…not that anyone in the house ever does the laundry but me or that anyone would start the dryer without looking in there. But I just know that if I don’t tell them, then that’ll be the time when someone does randomly start the dryer and then there’s a big ol’ mess.

When I first read through the instructions on shaping this bread I felt a bit daunted, but once I got started it wasn’t bad. Here’s how it breaks down. Step-by-step pics in the Fine Cooking article are very helpful.

  1. Divide risen dough in half.
  2. Divide each half into thirds.
  3. Roll each third into a long rope.
  4. Fold each rope in half and then twist it up and stretch it out.
  5. Connect three twists into a spiral shape, pinching the ends together as you go, then tuck the last bit underneath.
  6. Repeat with the other half of the dough.

I love that this makes two loaves! We were able to keep one and give the other away. I made these on a Saturday, stored in an airtight container and then reheated in a low oven on Sunday morning. Only then did I drizzle the icing. Really the icing is optional as the bread is delicious on its own or with a little spread of butter. It does make for a lovely presentation, I think. You definitely need to enjoy this warm, it is so much better that way.

You can go directly to the Fine Cooking recipe here.

Croatian Easter Bread

From Fine Cooking

Ingredients

For the dough

  • 1/2 cup milk (I used 2%)
  • 13 ounces (3 cups) bread flour, extra for the counter
  • 1/4 ounce (1 packet) rapid-rise (instant) yeast
  • 3 large egg yolks, at room temperature
  • 1/4 cup granulated sugar
  • 1 stick of unsalted butter, softened
  • 1-1/2 teaspoon salt
  • 1 cup raisins (golden or regular), soaked in 1/2 cup amaretto, and 1/4 cup hot water for 20 minutes, then drained
  • 2 teaspoons pure vanilla extract
  • 1 teaspoon finely grated lemon zest
  • Nonstick cooking spray

For baking and icing

  • 1 large egg plus 1 tablespoon water for egg wash
  • 1 cup powdered sugar
  • 1 teaspoon pure vanilla extract
  • 2 tablespoons milk; more as needed

Directions

Make the Dough

  1. In a small saucepan over medium heat, bring the milk to a boil. Let cool until just warm (110°F), about 30 minutes. Meanwhile, combine 1 cup of the flour with the yeast in the bowl of a stand mixer. Stir in 1/2 cup very warm water (about 120°F), and form into a ball. Cover the bowl lightly with plastic wrap. Set the bowl in a warm spot until the mixture has visible bubbles on its surface, about 30 minutes.
  2. Put the bowl in the mixer stand, and fit the mixer with the dough hook. On medium speed, beat in the egg yolks, sugar, butter, and salt, scraping the bowl occasionally. With the mixer running, add the milk and continue to beat until combined (it’s fine if there are a few lumps), about 2 minutes. Gradually add the remaining 2 cups flour. Raise the speed to medium-high, and knead until the dough is smooth, about 5 minutes. The dough will be soft and may not form a ball. Stop the mixer, add the raisins, vanilla extract, and lemon zest, and continue to mix until incorporated, 1 minute.
  3. Lightly coat a bowl with the cooking spray. Transfer the dough to the bowl and cover with plastic. Let rise in a warm place until the dough is doubled in size, 60 to 75 minutes.

Shape the Dough

  1. Stack two large rimmed baking sheets, and line the top pan with parchment. (Stacking the pans will prevent the bottom of the bread from overbrowning.)
  2. Gently scrape the dough onto a lightly floured surface (try not to use more than 1 to 2 tablespoons of extra flour). Divide the dough in half, setting one of the pieces aside. With a bench scraper, divide the first piece of dough into three sections.
  3. Roll and stretch each section to a 14-inch length, then fold it in half to make it 7 inches long.
  4. Twist and stretch each section so that it’s 10 inches long.
  5. Starting with one of the dough twists, twirl the dough into a round, attaching the other dough twists to continue building a round loaf. (For a taller, fuller bread, allow the dough to build up into two layers of twists near the center.) Tuck the final end under the dough. Repeat this process with the reserved dough to make a second loaf. Carefully transfer the two dough rounds to the prepared baking sheet. Cover loosely with plastic wrap, and set in a warm place until the dough rises by 50 to 75 percent, about 50 minutes.

Bake and Ice the Bread

  1. Position a rack in the center of the oven, and heat the oven to 375°F.
  2. Just before baking, whisk the egg with the water in a small bowl, and use a pastry brush to brush the dough with the egg wash.
  3. Bake until a wooden skewer inserted into the center of the bread comes out with only dry crumbs and the top is a deep golden amber, 25 to 35 minutes. (If the loaves start browning too deeply during baking, cover them with foil halfway through.) Let cool 20 minutes.
  4. Put the powdered sugar in a small bowl, and stir in the vanilla. Add enough of the milk to make a glaze. Drizzle the glaze over the warm bread. Store in an airtight container at room temperature for up to 2 days. (Unglazed breads are good stored in an airtight container at room temperature for up to 3 days.)

Betsy Bakes: Confetti Cake

Each of my kids has chosen a baked good that they’d like to master during our time in quarantine. Carson has brownies, Betsy has cakes and Christopher has claimed cookies.

Originally Betsy chose a Brooklyn Blackout cake. As we were writing down ingredients to add to our grocery list she says “I don’t really like chocolate”, so we went back to the cookbook, Layered by Tessa Huff, and she stopped at this one. Of course she did! It’s such a happy cake! I made this for my birthday a few years ago…back when I was making sprinkles, taking much better food pics and making animated GIFS. Ummm, where did THAT girl go?!

This time around we just made the white cake layers and I used my favorite buttercream instead of the fancier Swiss meringue buttercream she uses in the book. This frosting is my go-to. I only needed a half batch for this cake.

I did NOT make my own sprinkles this time. Not because it’s hard, but because I am just too lazy and it is time consuming! Also because I have a huge bag of sprinkles in my pantry and I wanted to seize the opportunity to use them.

The recipe calls for 2 6-inch cake pans. I used these small cake pans and they worked perfectly for the amount of batter. Only problem with so many layers is getting everything to stand up straight…a problem I have encountered more than I care to admit. But thankfully this cake was just for us to enjoy so there was no need to make it perfect or worry about its askew angle.

This cake is solidly good. It’s substantial but not heavy, sweet but not overly so which makes it a great base for the sugary sweet frosting!

I am so glad that we got to try this cake again, and I can see myself going back to it for sure. Quite frankly I’m surprised (and embarrassed) that I haven’t made it again until now. Thanks for reintroducing me to it, Bets!

Confetti Cake

From Layered by Tessa Huff

Ingredients

  • 1 1/2 cups plus 2 tablespoons cake flour
  • 1 1/2 teaspoons baking powder
  • 1/2 teaspoon salt
  • 1 stick butter, room temp
  • 1 cup sugar
  • 1 1/2 teaspoons vanilla extract
  • 1/2 teaspoon almond extract
  • 3 egg yolks, room temp
  • 3/4 cup milk, room temp
  • 1/2 cup sprinkles

Directions

  1. Preheat oven to 350F.
  2. Grease and flour the cake pans, line with parchment if you know your pans tend to stick.
  3. Whisk together flour, baking powder and salt and set aside.
  4. Beat the butter for 2 minutes, then add the sugar and beat until light and fluffy, about 5 minutes. Scrape down the bowl a few times as you mix.
  5. Add in the egg yolks and extracts and beat to combine.
  6. Add in 1/3 of the flour mixture, beat to just combine, then pour in half of the milk and beat again just to combine. Repeat flour, milk and flour until just combined. Gently fold in the sprinkles.
  7. Divide the batter evenly among the pans and bake for 15-25 minutes depending on how deep your pans are. The thin pans I used baked up in about 17 minutes. Check for doneness by sticking a toothpick in the center of the cake, it should come out clean.
  8. Let cool in the pans for about 10 minutes, then let cool completely on wire racks.
  9. Frost with your favorite recipe or the one below!

Vanilla Buttercream

AKA My Favorite Frosting and just a half batch

From Magnolia Bakery

Ingredients

  • 1/2 cup unsalted butter, softened
  • 4-6 cups powdered sugar, sifted
  • 1/4 cup whole milk
  • 1 teaspoon clear vanilla
  • pinch of salt
  • 1/2 to 3/4 cup of sprinkles

Directions

  1. Beat the butter until creamy.
  2. Beat in 2 cups of the powdered sugar, the milk, salt and vanilla until very smooth and creamy.
  3. Add the remaining sugar, one cup at a time, beating well, until it reaches the desired consistency.
  4. Gently fold in the sprinkles.

Egg Roll Bowls with Spicy Sesame Mayo

This has been a favorite of ours for a while now, and I’m so happy to be sharing it! The original recipe is from Paleo Running Mama and is (surprise!) paleo, as well as Keto and Whole 30. Those are not things that we do here, so I’ve made some small changes to this recipe that make it work for us and uses what we have in the house. If you need those restrictions, head over to her blog! There are so many yummy and healthy things to drool over.

Because of Covid we are all making adjustments to our lifestyles in countless ways. Food and cooking is such a big part of my life that adjusting the way in which I meal plan and feed the family has been a challenge. It’s forced me to get creative, to find substitutes for things in recipes or go in to dinner with no recipe at all, just an idea and random ingredients! I’ve shared the recipe below as I usually make it, but I did have to make a few changes based on what I could get my hands on. Thankfully this is a forgiving recipe!

I love how versatile this dish is. Use whatever combination of vegetables you have or you like. Most if not all of them you can buy pre-cut, so this comes together really quickly. I usually use chicken breasts for this, but couldn’t get any, so I used half of a rotisserie chicken and I gotta be honest, I did not mind that shortcut! You could easily use ground pork, beef, chicken or turkey. Or skip the meat altogether. I like to use red cabbage, but I’d bought a huge bag of cole slaw mix at Sam’s and put that to good use here. To stretch this dish you can serve it on top of rice. However you decide to make it, DO NOT SKIP THE MAYO! It absolutely makes the dish.

Ginger tip! Often when I’m cooking something with fresh ginger I end up having part of it left over. If you freeze the piece on its own it gets a weird texture when it thaws that makes it hard to grate. So I tried freezing it already grated and THAT has been such a fantastic way to have ginger on hand. Just buy a big hunk of it, peel it, grate it (on a microplane if you have one) and freeze in tablespoon portions in small snack bags. You’re welcome.

Chicken Egg Roll Bowls with Spicy Sesame Mayo

From Paleo Running Momma

Ingredients

  • cooking oil (olive, avocado, vegetable)
  • salt and pepper to season chicken
  • 1-2 pounds chicken breasts or thighs, cut into thin strips (can also use shredded rotisserie chicken, or ground beef, pork, etc.)
  • 1 bag shredded carrots
  • 1 bag shredded brussels sprouts
  • 1 small bag red cabbage
  • 1 small bag coleslaw mix
  • 4 tablespoons soy sauce
  • 2 tablespoons sesame oil
  • 2 teaspoons sriracha sauce
  • 4 cloves of garlic, minced
  • 2 teaspoons fresh ginger, grated
  • sliced green onions to garnish (optional)
  • Cooked white or brown rice

Spicy Sesame Mayo

  • 1/2 cup mayo
  • 3 teaspoons lime juice
  • 2 cloves garlic, minced
  • 1 teaspoon fresh ginger, grated
  • 2 teaspoons sesame oil
  • 2-3 teaspoons sriracha

Directions

  1. Make the Mayo: Whisk all ingredients together until smooth. Refrigerate. Can be made hours or days ahead of time and stored in a sealed container.
  2. Make the Chicken and Veggie Mix: Heat a generous drizzle of oil over medium high heat in a large skillet.
  3. Season chicken with salt and pepper and add to the pan. Cook fully, stirring so that it cooks evenly, 5-8 minutes depending on the thickness of the chicken pieces. Remove chicken from pan and set aside. *Skip this if you’re using pre-cooked chicken.
  4. Add a little more oil to the pan. Once it’s hot, add all of the vegetables to the pan. Cook, stirring frequently, until vegetable begin to soften.
  5. Add in the garlic and ginger and cook for 1-2 minutes, stirring to combine everything.
  6. Stir in the soy sauce, sesame oil and sriracha.
  7. Add the chicken back to the vegetables and stir everything together.
  8. Taste and season with salt, pepper, soy sauce and sriracha if needed.
  9. Serve with a drizzle or dollop of the spicy mayo as is or over rice. Enjoy!

Carson Bakes: Basic Brownies

Hey, friends! It’s been a minute. Or a couple of years. No matter. What’s important here is that I’m actually posting! Only took a pandemic and a quarantine to make it happen. Not what I would’ve planned, but I don’t get to make these decisions.

I’ve had a blog post in my drafts for months but didn’t really even like the recipe I was planning to share and what I’d written felt more like a diary entry than a food blog post. So I didn’t post it and it got all sad and dusty.

Over the weekend when I jokingly mentioned this being the time to get back to the blog, Ben encouraged me to just start posting. So here we go. Bear with me! It will most certainly be a little rocky as I find my footing again. The pics I thought I’d loaded on to my computer are somehow not there, and of course I cleared my memory card after loading them. So it’s iphone photos for you this time!

When we found out that school would be out for weeks I asked the kids what they’d like to do, what they’d like to make, what they’d like to learn, etc. Carson said he’d like to learn how to make brownies from scratch instead of from a box, so we started looking at cookbooks.

We chose this recipe from America’s Test Kitchen Family Cookbook as our basic starting point. Carson wanted to add all kinds of things, but I convinced him that a basic brownie was the best place to begin.

Carson helped every step of the way with this, and I think he could’ve done most of it on his own except for chopping the chocolate. We got to talk about basic baking techniques; proper measuring, lining a pan with foil, greasing the foil, melting stuff in the microwave without burning it, slowly stirring in flour and checking for doneness. We also got to practice cracking eggs…there was one casualty. Thankfully I kept my cool. As many of you know, eggs are not the easiest thing to come by right now! I am really being picky about what we bake next since I only have a dozen at the moment. What I wouldn’t give to have a few chickens right now!

These baked up nicely. They were dense and sturdy, not at all gooey and not actually all that fudgy. They seemed more cakey to me. We did bake them on the longer side of the suggested time so that was probably why. Warm from the pan with a little ice cream is how we liked these best.

We’ll be exploring more brownie recipes and if I can let go of some of my control you’ll be seeing some of Carson’s creative brownie ideas soon!

Stay safe everyone! Hug your family if you can, pray for our world, and go bake something.

Ultimate Fudgy Brownies

From America’s Test Kitchen Family Cookbook

Ingredients

  • 5 ounces bittersweet chocolate, chopped
  • 2 ounces unsweetened chocolate, chopped
  • 1 stick of butter (8 tablespoons)
  • 3 tablespoons cocoa powder
  • 1 1/4 cups sugar
  • 3 eggs
  • 2 teaspoons vanilla
  • 1/2 teaspoon salt
  • 1 cup flour

Directions

  1. Preheat oven to 350F.
  2. Line an 8 inch square pan with foil, leaving overhang on all sides, spray with nonstick cooking spray or grease with shortening.
  3. Combine chocolates, butter and cocoa in a microwave safe bowl. Microwave on high power in 30 second increments, stirring well in between, until thoroughly melted.
  4. Whisk together eggs, sugar and vanilla in a large bowl.
  5. Add in chocolate mixture and whisk to combine.
  6. Stir in flour and salt until just combined.
  7. Spread into prepared pan and bake for 30-40 minutes or until toothpick comes out with loose crumbs attached.
  8. Cool in pan for an hour, remove using the foil, cut and serve.

Baking Through Fika: Gunnebo Dreams

I was able to go out to California last month to celebrate my cousin and his wife who just the month before got married (Congratulations, Peter and Carissa!) and while there I was asked by a few of my family members if I was still baking and blogging and how this particular Fika cookbook project was coming along.  I’d kind of forgotten I even had a blog!  Why is it so hard?!  How can I feel so busy, that I’m always working on something, yet nothing ever feels complete and I just feel like I’m failing at everything?  That sounds dramatic.  But really, the minute I finish laundry there is more to do, I enjoy a clean floor for an hour before someone spills their yogurt or the dog comes in with muddy paws, and why do kids wipe their hands, faces and snotty noses on everything BUT a towel, tissue or napkin?  Why?  What you don’t know or appreciate fully until you’re in it is that being a parent (working or not, mom or dad) is just plain hard, often unrewarding (at least in the short term) and underappreciated work.  Being the cook, the maid, the social coordinator, the chauffeur, the teacher, the disciplinarian, the mediator, etc for a family is time consuming, tiring and never ending.  I didn’t spill all of that to my inquiring family, I simply said “I just haven’t been making the time to blog as much recently.”

I definitely still enjoy blogging, and of course baking, but finding a balance between it and the rest of life’s demands and responsibilities isn’t simple.  I’ve thought about having a certain day and time that I dedicate to blogging, which in theory sounds like a good plan and maybe that will be my resolution for the blog in 2017.  For now I am just going to try to finish this Fika book!  There are lots of yummy looking recipes perfect for the quickly approaching holiday season, and once I’m done this will be the first blog project I’ve actually completed, unlike others that started with the best of intentions and then fizzled out…

Here is my most recent bake from Fika!  This one puts me at 15 recipes completed and 15 to go.  Halfway!  Woohoo!  Hopefully the rest won’t take me quite as long as the first half, but don’t hold your breath.

gunnebo-dreams

gunnebo-dreams-6

Gunnebo Dreams, cookies I have never heard of before, are a basic sugar cookie but with the unexpected addition of lemon balm.  I’d put off this simple recipe from Fika this long only because I couldn’t find lemon balm (and I didn’t look too terribly hard).  My grocery store’s garden section recently had some, so I figured it was a sign.  It’s now planted in a pot in the back yard and is flourishing!  I haven’t tried it in anything else, but found this great list of what is possible with lemon balm.  The honey-lemon nighttime syrup sounds like something I could use…

This recipe comes together so quickly and is simple and straightforward.  The kids can definitely help out!  The mixture of butter and oil gives these a different texture that I quite liked.  The cookie bakes up slightly crumbly and delicate, but doesn’t fall apart, is still moist, and has lovely buttery flavor.

gunnebo-dreams-7

I didn’t find the lemon balm to be overwhelming, which was a fear I had initially.  It was just noticeable enough to add some interest to such a simple cookie.  The green specks are nice, too.  You could probably use other herbs, rosemary or thyme, possibly tarragon and mint as well.  Let me know what you try!

The recipe doesn’t call to roll these in sugar before baking, but it just felt right.  And the resulting sweet and crunchy exterior is great.

I’m trying out this new-to-me recipe feature, so bear with me as I figure it out!  And PLEASE give feedback if you have some.  If you like the feature, if not, why, how can it be better (either in appearance or ease of use) and if you use a recipe widget on our blog and you love it, again, PLEASE tell me about it!  I’m all trial and error over here and basically always need help 🙂


Print Recipe


Gunnebo Dreams

Lovely little sugar cookies with a light, airy, dreamy texture and the subtle flavor of lemon balm.

Course Cookies
Cuisine Swedish

Cook Time 12-15 minutes per batch

Servings
dozen


Ingredients

Course Cookies
Cuisine Swedish

Cook Time 12-15 minutes per batch

Servings
dozen


Ingredients


Instructions
  1. Preheat oven to 300F and line a baking sheet with parchment paper.

  2. Beat butter, sugar and oil together until light and fluffy.

  3. Add in the flour, baking soda, salt and vanilla and mix well.

  4. Fold lemon balm leaves into the batter.

  5. Roll dough into small balls (a rounded teaspoon is a nice size) then roll in sugar and place on baking sheet, leaving a little room between the cookies.

  6. Bake for 12-15 minutes, until just slightly golden. Remove from cookie sheet and allow to cool on wire racks.


Share this Recipe

DIY Sprinkle Success & Birthday Cake…Attempt

If you have any interest in cakes (making, eating or both) and you haven’t picked up a copy of Layered by Tessa Huff yet go order it right now!  It’s a truly lovely book with great cake baking and decorating tips complete with some helpful step-by-step photos.  While I’ve only tried a couple cakes so far, I love it and can’t wait to try more of her recipes.  Go now and order a copy.  Go.

To me a birthday is not complete without a cake.  Another dessert can serve as a substitute if need be, but cake!  Birthdays were made for cake!  I decided to make a cake for my birthday this year, and the strawberry and confetti cake from Layered was the obvious choice.

I encountered some problems when I made this, and originally I was calling this cake a “fail” but it wasn’t.  After all was said and I done we stuck candles in it, sweet friends sang “Happy Birthday” and we all ate it and enjoyed it.  What it was was imperfect and a good learning lesson.  I am so glad I tried this cake, even though it wasn’t as amazing as I thought it would be!

The first step for this cake was making your own sprinkles.  By hand.  Yes.  Did you even know this was possible?!  I didn’t.  It was time consuming, but not hard.  I would do it again for sure.

Confetti Cake-20

Confetti Cake-24

There are few things that make the sprinkle process easier:

  • Make sure your frosting tip isn’t too small.  My hand was worn out after using a Wilton #3 tip.  #4 was way easier.  And if you used an even bigger one that should be fine, the size of the spinkle has more to do with how much you pipe.  A bigger tip means you pipe less, a smaller tip means you pipe more.  I don’t know if that makes sense now, but if you’ll know what I mean if you try it.

Confetti Cake-21

  • If you can stand it, use up all of the sprinkle batter!  I was so tired and ran out of cookie sheets, so I stopped.  When I went to make the cake I didn’t have quite enough.  So, make it all, even if it means you’ll have a semi-permanent claw hand.
  • If you want bold colors, go a bit darker than you think you should.  I felt that mine dried slightly less bright than the original color.

Confetti Cake-19

  • Have a small bowl of water handy to dip your finger in to press down any peaks that form on the sprinkles.  There is a sweet spot for the amount of water.  If you get too much water they’ll ooze and take a much longer time to dry.  Too little and they’ll stick to your finger.  You’ll learn pretty quickly what works best.
  • If you get tired of piping dots, pipe long strips, let them dry, and break them up to make jimmies!  I like the look of both the circles and jimmies together, anyway.

Confetti Cake-22

Confetti Cake-23

DIY Sprinkles and Jimmies

From Layered

Ingredients

  • 2 large egg whites
  • 4 cups powdered sugar
  • 1/2 teaspoon vanilla extract
  • gel food coloring

Directions

  1. Fit a stand mixer with the whisk attachment and pour the egg whites in to the bowl.
  2. Mix on medium low until foamy.
  3. Gradually add the powdered sugar and gradually increase the speed until you’ve added all the sugar and the speed it at medium high.
  4. Whisk until the mixture has smooth, stiff and glossy peaks.  Add in the vanilla and beat just to incorporate.
  5. Divide the sprinkle batter in to as many bowls as colors you plan to make.  Color with gel color, being sure to mix completely (a small spatula is good for this).
  6. Place each color of icing into a piping bag fitted with a round tip.
  7. Line cookie sheets or your counter top (as long as no one in your household likes to climb on to the counter or pull stuff off the counter) with parchment paper or non-stick silicon mats.  Pipe small circles onto the paper and use a damp fingertip to flatten down any pointy peaks that form.
  8. Repeat, repeat, repeat, repeat…
  9. Let dry for AT LEAST 2 hours (the longer the better) before using.

Now the rest of the cake had a lot of components, but I wasn’t worried about my competence in the kitchen to get it done and have it look beautiful.  I read through all of the recipes, and had a good plan on how to carry it all out flawlessly.  I had an entire blog post in mind to show off this cake!  Hello, humility.  We’ve met before…

I made everything the day before, 2 kinds of cake, strawberry puree, strawberry cream filling and an Italian meringue buttercream.  Once my kids were in bed for naps on the following day, I set up my tripod in the light filled corner of my kitchen and got to work.  I tinkered with the settings on my camera and had everything ready to hopefully create a lovely step-by-step assembly animated GIF.  Everyone would be so impressed.  Ugh.  Overconfidence can kill, guys.

As I started layering the cakes with the strawberry cream I realized my dreams of perfection were dashed.  The cream was oozing out the sides and on to the cake plate and the cake was beginning to tip over.  5 layers!  Of course it was falling over!  I am not a cake decorator.  I did not think through this whole process as well as I should have.  I also didn’t think to have my AC running to counteract the July heat and humidity we have here in Houston.  Taking pictures in the light filled corner didn’t help, either.  The cake was melting.  I had a, “Well, now what?!” moment, probably cursed a little bit, and then grabbed some skewers from a drawer in the kitchen and tried to straighten everything out.  From there I stuck it in the fridge and hoped for the best.

Please notice the second to the last image in this GIF.  I’ve already said this, but it reminds me of the cake in Sleeping Beauty.  Just about ready to topple over and be supported by a broomstick.

cakelayers

I’d already whipped up the frosting and folded in the sprinkles (bad call), so I had to put that all back in the fridge.  I was not at all sure what back and forth from the fridge would do to an Italian meringue buttercream…but I didn’t really have another option.

Here it was it all of it’s glory, nice and white with pops of sprinkles.  This is when it should have gone on to the cake but instead was sent back to the fridge.

Confetti Cake-28

Since we had dinner plans I had to wait until the next day to finish.  I pulled the cake out of the fridge.  The skewers had done the trick to straighten the cake out, and everything still held tight when I removed them.  I do wish I’d done that to start, although it wouldn’t  have helped the oozing strawberry cream…

Now the buttercream.  I let it sit for a while, then whipped it up again, no doubt damaging many of those sprinkles and creating a nice grey hue to the icing that should’ve been white.  The texture was also off.  Awesome.  I had an ok time getting the cake iced, even with the uneven layers.  Thankfully I’d saved some icing without sprinkles for decorating the edges, and some of those precious sprinkles for the final touch.


IMG_6786

Now, what really matters is how it tasted.  And it was delicious!  Especially the confetti layers.  My daughter turns 4 next month and I am seriously considering the confetti cake recipe for either a cake or cupcakes.

Thank you, Tessa, for getting me to try new things!  Can’t wait to attempt to conquer more of your lovely cakes ; )

IMG_6461


Chicken Taco Cornbread

When I went to visit my sister last fall I bought a magazine at the airport that she later made fun of me for buying, a Cast Iron Cooking magazine!  Of course she had reason to poke fun.  I should’ve bought some beauty, design or gossip mag like normal women do.  But this magazine has already produced two very tasty meals, so I don’t mind so much.

Chicken Taco Cornbread

They call this a “twist on taco salad” which is a great description and makes this a meal that doesn’t really require a side dish since it’s the main dish and the veggie side.

Chicken Taco Cornbread-8


You don’t need to do too much prep, just some chopping of vegetables.  And everything is done in one skillet.  You can shred the cheese, or buy pre-shredded.  The recipe calls for shredded rotisserie chicken, but if you have leftover cooked chicken that would be perfect, or you could poach chicken breasts if you have the time.  A can of tomatoes and green chile is on the ingredients list, but if you want to skip the green chile or can’t find it a partially drained can of diced tomatoes will do just fine.

Chicken Taco Cornbread-4

Chicken Taco Cornbread-3

The dressing is something quite close to Chuy’s creamy jalapeno so be sure to save whatever it left over and use it as a dip for tortilla chips!

The recipe uses a blend of mozzarella and cheddar.  Any cheese you’d use for tacos or fajitas would work, monterery jack, colby, cheddar, or the Mexican cheese blend they sell in bags.

Chicken Taco Cornbread-7

Chicken Taco Cornbread-6

The cornbread base has tortilla chips baked in.  I had some very thin tortilla chips that weren’t the best in this situation, they lost their crunch.  A nice thick corn chip would be better here and hold up nicely.  I’ll definitely be sure to do that next time.  And there will be a next time because there is so much room for modification here.  Adding in black beans or corn, using ground beef instead of chicken, or leftover fajita meat which we often have after cooking up fajitas for friends…we always overbuy!

Chicken Taco Cornbread

Ingredients

Dressing

  • 1 cup cilantro leaves
  • 1/2 cup ranch dressing
  • 1/2 cup salsa verde

Filling

  • 2 tablespoons olive or vegetable oil
  • 1/2 cup chopped onion
  • 1/4 -1/2 cup chopped red bell pepper
  • 1 tablespoon finely chopped jalapeno
  • 2 cups shredded rotisserie chicken
  • 1 can (14 ounces) diced tomatoes with green chiles OR 1 can diced tomatoes and a couple tablespoons diced green chiles
  • 3 tablespoons chopped cilantro
  • 1/2 teaspoon salt
  • 1/4 teaspoon black pepper
  • 1 teaspoon cumin
  • 1 teaspoon chili powder

Crust

  • 1 egg
  • 1 7-ounce package of cornbread mix
  • 1/2 cup milk
  • 3/4 cup crushed tortilla chips

Toppings

  • 1/2 cup shredded mozzarella
  • 1/2 cup shredded cheddar
  • 2-3 heads of romaine lettuce, chopped
  • 1 cup chopped tomatoes
  • chopped cilantro


Directions

Dressing

  1. Combine cilantro, ranch dressing and salsa in a food processor and mix until well blended.  Cover and chill until ready to use.

Filling

  1. Heat oil over medium heat in a 10-inch cast iron skillet.
  2. Cook onion, bell pepper and jalapeno until softened.  Stor in chicken, tomatoes, cilantro and seasonings.  Cook for about 5 minutes, taste and season more if needed.
  3. Transfer filling to a bowl, wipe out skillet and grease with crisco.

Crust

  1. Preheat oven to 400°F.
  2. In a bowl beat egg, milk and cornbread mix just until combined.
  3. Put chips in the greased skillet, then pour batter over the chips.
  4. Spoon chicken mixture over the cornbread batter and sprinkle with cheeses.
  5. Bake for 15-20 minutes, let cool briefly before cutting in to slices.

Toppings

  1. Top slices of cornbread with shredded lettuce, tomatoes and cilantro.
  2. Drizzle with dressing and serve.


Almond Cilantro Pesto and Yogurt Dip

Sometimes I am a good meal planner.  I look through the fridge, freezer and pantry to see what we have, what needs to be used, etc. and plan our week of meals out that way.  Other times I find myself on Tuesday mornings after I drop the kids at school (this is when I like to grocery shop since I only have one child to accompany me) with no idea what we have in the fridge and pantry which leaves me searching for recipes on pinterest and making a grocery list while in the parking lot of HEB.

Thanks to my inabilty to plan, I sometimes come home and discover we already had 8 cans of tomatoes, or goat cheese, or couscous, or a dozen chicken breasts I could’ve thawed out, etc.  Herbs are tricky.  Often all you need is a few tablespoons for a recipe.  Thankfully I’ve managed to keep rosemary and thyme alive in the back yard, but parsley and cilantro are another story and so I have to buy them.  They’re not expensive, but when you don’t need much they often get forgotten in the bottom of the produce drawer.  I bought cilantro for a recipe because I thought rather confidently “I know that I have parsley at home, but no cilantro.”  Not the case!  I had two almost completely full bundles of cilantro at home already, so when I unloaded groceries I now had three bundles.

What am I going to do with all of this cilantro?!  A while back I made a peanut and cilantro pesto, so that’s what I thought of first.  I didn’t have any peanuts.  But I did have almonds…

IMG_8626

Cilantro Almond Pesto-2

At this point I had no plan for the pesto I’d just made, but I knew that I could save it.  Freezing pesto in tablespoons to have on hand for later is a trick I am so glad I learned.  Having something on hand in the kitchen is nice, but having pesto on hand is especially nice because you can incorporate some fresh herby-ness to a meal even when you don’t have fresh herbs or if they’re out of season.

The best way I’ve found to freeze pesto (this also works well for tomato paste) is to line a baking sheet with parchment, use a cookie scoop or tablespoon to divide up the pesto, and then pop the pan in the freezer.  Once frozen solid you can put all the pesto balls into a freezer bag (I learned that labeling your bag is very helpful!) and take one or more out as you need them.  They thaw out pretty quickly.

Cilantro Almond Pesto-9

Of course I wanted to try some of the pesto right away.  I ate some on a chip and it was good, but strong (like most pesto) and needed to be cut if I was going to eat it as a dip.  Plain Greek yogurt seemed like the perfect choice.

Cilantro Almond Pesto-7

I played around a little with the ratio but found a 2:1 yogurt to pesto was pretty good.  Of course you could start there and add more yogurt or more pesto depending on your tastes.

Cilantro Almond Pesto-6

The same thing could be done with mayo to make a nice sandwich spread.  You could also spread the pesto on chicken breasts before baking, stir in to hot pasta, use as a dipping sauce for grilled meats or serve with grilled vegetables.  Excited to try some of those out as summer and grilling season get underway!

Cilantro Almond Pesto-4

Almond Cilantro Pesto

Ingredients

  • 2 cups packed cilantro leaves, rinsed and dried
  • 1 cup almonds, raw, skin on, toasted if desired
  • 2-3 large garlic cloves
  • 2/3 cup grated Parmesan cheese
  • 1/3 cup olive oil (up to 1/2 cup if desired)
  • 1/2 teaspoon salt, more to taste
  • ground pepper to taste

Directions

  1. Combine cilantro, almonds and garlic in a food processor and puree until smooth.  Scrape down the sides of the bowl.
  2. Add the Parmesan and salt and pulse a few times to combine.
  3. With processor running, drizzle in the oil and process until smooth.
  4. Season with salt and pepper to taste.

Cilantro Pesto Yogurt Dip

How much of the ingredients you need depends on your taste and how much dip you want to make.  Below are the amounts I used to make dip for 2-4 people as an appetizer serving.  Increase or decrease as desired.

Ingredients

  • 4 tablespoons (1/4 cup) cilantro almond pesto
  • 8-10 tablespoons (1/2 cup plus 2 tablespoons) plain Greek yogurt (full fat or 2%)
  • salt and pepper to taste
  • Tortilla chips, pita chips, grilled bread

Directions

  1. Combine both in a bowl and mix well to combine.
  2. Serve immediately or chill until 5-10 minutes before serving, it gets thick when chilled so let it warm up at room temperature for a bit before serving.

Baking Through Fika: Mini Victoria Sandwich Cakes

So far in Baking through Fika I’ve not done anything beyond the stated recipe.  But every other recipe has been pretty straightforward without much room for creative license.  This is a simple sponge cake with lots of ways to play!  So I decided to do a Victoria sandwich type cake, but in mini form.  I blame by recent binge of The Great British Baking Show during which I cried more than once.  It’s so wonderful.  Go watch it now.

These sweet little cakes were a great way to come back from the disappointment I experienced with my first attempt with this sponge cake.  See instagram post for those beauts…

Mini Victoria Sponge-20

There is little doubt in my mind that my sponge cake was imperfect.  I don’t know what perfect sponge cake should be like, but having made it only twice I am certain that I do not have the skills to make it perfectly.  Should it have all those bubbles?  Should it have risen more?  Should I have baked it longer?  Or less?!  How’s the flavor?  I would love (and at the same time hate) to have Mary and Paul in my kitchen telling me what I’ve done wrong and how to fix it.  But this cake certainly tasted delicious, and for me that’s what matters most.

With sweet quick breads like banana and zucchini I like to grease and sugar my pans instead of greasing and flouring them.  I like the bit of sweet crunch from the sugar.  I decided I’d try that with my jelly roll pan for the sponge cake and it worked very well.  The cake rounds were easy to cut and remove from the pan with only a few bits that stuck.  But would Paul and Mary approve?!?

Mini Victoria Sponge-2

This one pan of sponge gave me 35 1 1/2 inch diameter rounds.  If you don’t have a set of biscuit cutters, go get some.  They have many uses beyond biscuits!

Mini Victoria Sponge-3

So what is a Victoria Sandwich?  It is simply two layers of sponge cake with raspberry jam in the middle dusted with powdered sugar.  It became popular in England during the reign of Queen Victoria, and I’ve read that it was her favorite tea time treat.  But I’ve also read that that is not in fact true.  So who knows.  Not sure when cream cake in to the mix, but I am happy it did.

Mini Victoria Sponge-5

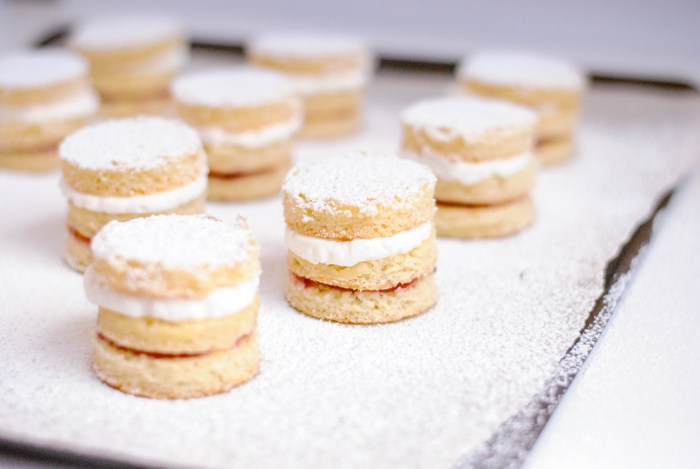
Since my sponge cake wasn’t very tall I made three layers instead of the two that I’ve seen in a Victoria sandwich.  I like the way they look with the three layers, but if you want to stretch the number of these you can make from one batch of cake, then two layers would be perfectly fine.

I used raspberry jam, but any kind would work.  I also played it safe with the amount of jam, just a thin layer.  It could’ve used a bit more, but I would rather them have too little jam than to have it oozing down the sides.

Mini Victoria Sponge-6

Mini Victoria Sponge-7

After the layer of jam another cake layer is added and sweetened whipped cream is piped on.  I add a little powdered sugar, a little almond and a little vanilla extract to mine just because that’s how my mom does it.  But go unsweetened, or without either of the extracts of you’d like.

Mini Victoria Sponge-8

Mini Victoria Sponge-9

Mini Victoria Sponge-10

Atop the cream goes one last sponge layer.

Mini Victoria Sponge-11

Mini Victoria Sponge-12

Mini Victoria Sponge-13

Pardon all the pics!  I kind of loved taking pictures of these photogenic little bits of sweetness.

Mini Victoria Sponge-14

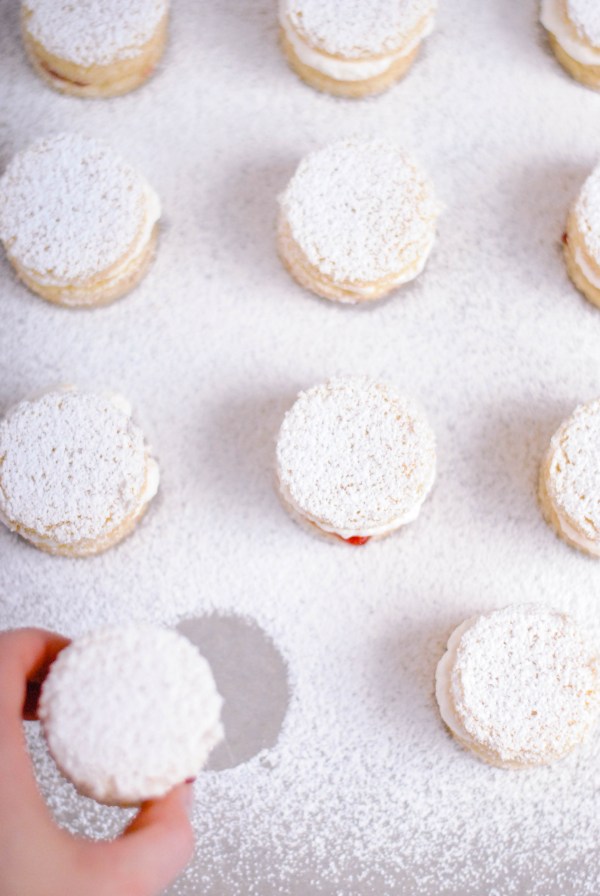
Now dust generously with powdered sugar and serve to your lucky guests!

Mini Victoria Sponge-15

If you plan to refrigerate these don’t do the powdered sugar.  Save that for right before serving.  It will soak into the cake and make it kind of gooey.  Still delicious, just not as lovely.

Mini Victoria Sponge-16

Mini Victoria Sponge-17

I’m kind of hoping my daughter will want a tea party for her 4th birthday because I can see these being a terrific addition to the spread.

Mini Victoria Sponge-19

Mini Victoria Sponge-18

Mini Victoria Sandwiches

From FIKA

Sponge Cake

Ingredients

  • 2 eggs
  • 3/4 cup sugar
  • 1 1/4 cup flour
  • 2 teaspoons baking powder
  • pinch of salt
  • 1 3/4 ounces melted butter
  • 1/2 cup milk (2 % is fine)
  • 1 teaspoon vanilla extract
  • 1/4 teaspoon almond extract

Directions

  1. Grease and sugar a jelly roll pan (rimmed baking sheet) and preheat oven to 350°F.
  2. Beat eggs and sugar until pale, about 5 minutes.
  3. In a separate bowl whisk flour, baking powder and salt.
  4. Combine milk, melted butter and extracts in a small bowl.
  5. Add flour mixture to the egg and sugar mixture, stirring just to combine.  Add the milk mixture and fold together into an even batter.
  6. Spread into pan and bake for 10-15 minutes.  It will be light in color and when pressed lightly in the center should spring back.
  7. Let cool slightly before cutting in to rounds, then let rounds cool completely before moving on.

Assembling Sandwiches

Ingredients

  • rounds of sponge cake (since I had 35 total rounds I used 33 and ate the others!)
  • raspberry jam
  • sweetened whipped cream
  • powdered sugar

Directions

  1. Arrange 1/3 of the rounds on a cookies sheet.
  2. Spread each with a thin layer of jam.
  3. Top with another layer of cake.
  4. Pipe on a nice bit of sweetened cream.
  5. Top with another layer of cake.
  6. Dust with powdered sugar.
  7. Eat.