Breakfast

Chocolate Almond Biscotti

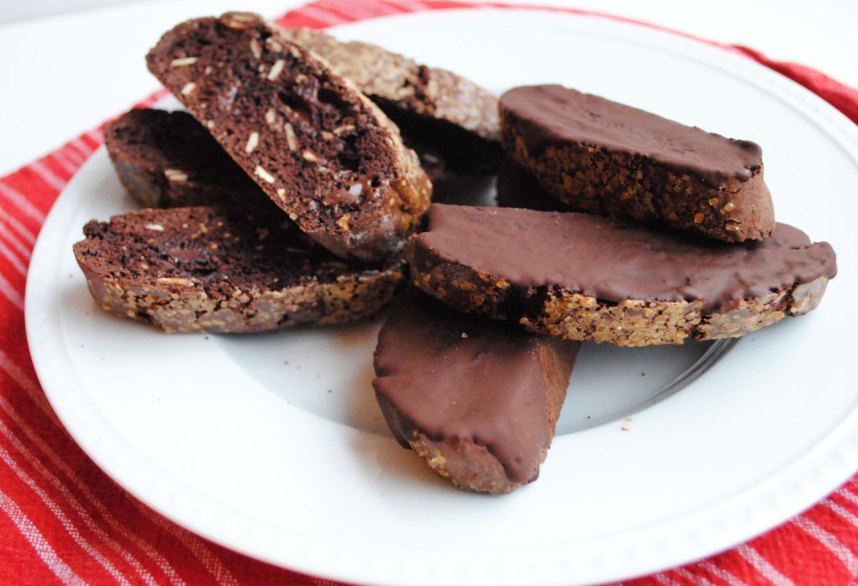
Happy February!  Earlier in the week I shared this flourless chocolate cookie recipe and declared that I would be sharing more chocolate recipes as we get closer and closer to Valentine’s Day, a day that should be full of chocolate.  The name of this blog is Hottie Biscotti, but I’m fairly confident that I’ve only shared one biscotti recipe.  So I thought it only appropriate to make some chocolate biscotti.

chocolatebiscotti1

Biscotti means “twice-baked”.  The dough is baked once in a log, allowed to cool slightly, then sliced into pieces and baked again creating a crunchy cookie that begs to be dipped into your hot beverage of choice.  Coffee is mine, but tea or hot chocolate would do just fine.  And they’re delicious eaten just as a cookie without any dipping.

chocolatebiscotti2

This biscotti is full of almonds and chocolate chips, but isn’t too sweet, making it the perfect morning or afternoon snack.  They would be wonderful crumbled up over a bowl of vanilla ice cream.  They’d also make great little gifts.

chocolatebiscotti4

This recipe is from Dave Lebovitz, a pastry chef whose blog I started reading a few months ago.  It’s a great mix of recipes, stories about life in Paris, cooking tips and restaurant reviews.  It’s been a fun change of pace in blog reading for me, since very few of the blogs I read are written by chefs, most are home cooks like myself.  Check it out and drool over some French food and wine, learn some things you didn’t know and grab some great recipes.

Chocolate Almond Biscotti

From Dave Lebovitz

Makes about 26 cookies

Ingredients

For Biscotti

  • 2 cups flour
  • 3/4 cup good cocoa powder
  • 1 teaspoon baking soda
  • 1/4 teaspoon salt
  • 3 large eggs, at room temperature
  • 1 cup sugar
  • 1 teaspoon vanilla extract
  • 1/2 teaspoon almond extract
  • 1 cup sliced almonds
  • 3/4 cup chocolate chips
  • 1 egg for glaze
  • raw sugar or coarse sugar for sprinkling

For Chocolate Dipping

  • 4 ounces bittersweet or semisweet chocolate
  • 2 teaspoons vegetable oil

Directions

  1. Preheat oven to 350°F and line a cookie sheet with parchment paper.
  2. In a medium bowl sift together flour, cocoa powder, baking soda and salt.
  3. In the bowl of a stand mixer combine eggs, sugar and extracts and mix until well combined.
  4. Add in the dry ingredients and mix until just combined, then add in almonds and chocolate chips and mix until evenly distributed.  The dough will be very stiff.
  5. Turn dough out onto a lightly floured work surface.  Divide dough in half and form each half into a log, about 8 or 9 inches long and 3/4 inch high.
  6. Transfer each log to the parchment lined baking sheet.
  7. Whisk egg and brush tops of each log, then sprinkle with sugar.
  8. Bake for 25 minutes.  Remove from the oven and let cool for 15 minutes.  Move logs to a cutting board and slice on the diagonal into 1/2 inch pieces.  A serrated knife works well for this.
  9. Place slices back on the parchment lined cookie sheet and return to the oven for 15-20 minutes, then flip cookies over and cook for another 10 minutes.  Remove from the oven, transfer to a cooking rack and let cool completely.
  10. You can coat one side in chocolate if you’d like to or leave them plain.  To coat in chocolate: melt chocolate and vegetable oil over low heat, stirring constantly until chocolate has just melted.  Remove from the heat and spread chocolate onto one side of the biscotti in a thin layer.  Move to a clean piece of parchment and allow the chocolate to set.


Basic Buttermilk Waffles

When I searched for a waffle recipe on Pinterest an abundance of things popped up, but most were flavored in some way, fancified to make them stand out and beg for a repin or a like.  Salted caramel waffles, bacon waffles (which actually sound wonderful to me) pumpkin waffles, bacon and cheddar waffles, cinnamon roll waffles, gingerbread waffles and some others.  Is no one satisfied with a simple basic waffle?  That’s all I wanted.  So I searched somewhere else.  Somewhere unaffected by current food trends and the hope for a repin or a retweet or a re-something or other.  A cookbook that was given to me by my mother called Rice Farmers Kitchen 2, printed in 1996, that includes recipes from my grandmother, my aunts, my mom and some other relatives and friends of relatives from Richvale, a small rice farming town in Northern California where my mom grew up.  I enjoy cookbooks like this where the name of the recipe submitter is included and, in this case, it’s extra special to know some of those people.

buttermilkwaffle1

This is a really basic waffle recipe and one I will go to in the future on mornings that I feel making something special for breakfast that doesn’t take a lot of time.  I had the batter mixed up and the first set of waffles cooking in 10 minutes.  These waffles have good flavor and a nice crisp exterior that makes it hard not to tear a piece to taste after you take them off the iron.  I’d forgotten how much I loved waffles!  I’ll take them over pancakes any day.

I made some plain, a few with mini chocolate chips, just sprinkled them on top of the batter before I shut the top, and tried one with dollops of peach jam…it didn’t work out very well.  A big burnt mess.  I’d imagined it turning out better than that.  Oh well!

Top these with whatever your heart desires.  After cooking would’ve been a better time for jam!  The kids ate them plain, a little syrup for Carson.  I like mine with butter, berries, and a little powdered sugar.  If you’re really feeling ambitious, fresh sweetened whipped cream and berries makes for a super wonderful and amazing breakfast…or dessert…or afternoon snack.

buttermilkwaffle2

I used a classic round waffle iron, this one to be exact.  It hasn’t gotten a lot of use in it’s 7.5 years in my possession (it was a wedding gift) but I see myself using it more often now since it really isn’t much more trouble than pancakes.  Mine cleaned up easily since I used nonstick spray for each waffle.  I also used the wet paper towel trick, which I use on the panini press, after I was done.  So other than the effort to take it out of the cupboard, there isn’t much extra work involved.  I do lust after a Belgian waffle maker, but I wonder if it makes a whole lot of sense to own both.  I might have to open a weekend brunch spot in order to justify it.  Thoughts?

A special thanks to Betsy who helped me with the waffle photo shoot.  I let her have some after I was done photographing.  How could anyone say no to this face?!  She was way into the whipped cream.  Definitely my daughter.  Enjoy!

buttermilkwaffle3

Basic Buttermilk Waffles

From The Rice Farmers Cookbook

Ingredients

  • 1 3/4 cup flour
  • 2 teaspoons baking powder
  • 1 teaspoon baking soda
  • 1/2 teaspoon salt
  • 1/2 cup vegetable oil
  • 1 1/2 cups buttermilk
  • 3 eggs
  • 1 teaspoon vanilla
  • Butter, syrup, berries, chocolate chips, powdered sugar, cinnamon sugar, etc. for topping

Directions

  1. Heat waffle iron.
  2. Whisk dry ingredients together in a large bowl.
  3. Beat wet ingredients together in a bowl until well combined.
  4. Pour the wet ingredients into the dry and mix just until combined and all the flour is moistened, be sure to scrape the bottom of your bowl.
  5. Spray waffle iron with nonstick spray, then pour about 1/2 cup of batter into the center of the plate.  It should cover about 2/3 of the surface.  This depends on the size of your waffle iron, err on the side of too little the first time to test the waters.  Too much batter and you have a big mess.
  6. Close waffle iron and cook according to manufacturers instructions.  Serve immediately.  Can be reheated in a toaster or toaster oven.

Cranberry Coconut Muffins


Happy Friday!  Just have to point out that this is my 3rd post of the week!  I don’t anticipate every week being this productive, but I am glad to start the year off tackling some of my blogging goals.  Now for a yummy, fast and simple recipe for your weekend…crancoconutmuffin2

With half a bag of cranberries still in my fridge, and some ideas brewing for what to do to this muffin recipe, I whipped these up during nap time.  Using pineapple juice in the last muffins led me to the thought of coconut and I just so happened to have both coconut oil and coconut milk in my pantry.  Just like last time I wished I’d had a can of crushed pineapple to add in.  Maybe I’ll get around to making a tropical cranberry muffin one of these days.  But that would involve me buying another bag of cranberries and then having leftovers after making the muffins which would then require me to make something else with cranberries.  I might have to put it on hold until next holiday season.  I might be muffin-ed out.

crancoconutmuffin

I’ve sung the praises of coconut oil before.  This zucchini bread is one of my favorite things.  Coconut oil behaves pretty much the same as oil and butter in a baked good.  But it’s rock hard at temps at which vegetable oil is liquid and butter is spreadable.  It remains solid until is reaches temperatures above 76°F.  I warmed it in the microwave before using it in this recipe.  I keep muffins and breads in the fridge unless I know they’re going to be eaten within a couple of days to keep them from going bad.  With the coconut oil in the muffins they come out of the fridge very hard.  A quick warm up in the microwave and they become nice and soft and ready to devour.  I found some great information on this blog about using coconut oil and its health benefits.  I’d never thought about cutting in to pastry dough!

Coconut is a main and noticeable ingredient in these muffins.  There’s coconut oil, milk and flakes.  So the coconut averse may not be into these.  If you do want the benefits of the coconut oil, just sub milk or buttermilk and leave out the coconut flakes.  The coconut oil alone shouldn’t make a coconut hater turn up their nose, but I don’t find coconut oil alone to be too coconutty, especially after being baked into something.  Correct me if I am wrong!

On another note, I got this wonderful spreader for Christmas from my mother-in-law.  “No such things as too much butter” is definitely something I find to be true.  You can get your own at For Such a Time Designs on Etsy.  She hand stamps pieces of flatware and I’ve been perusing her site quite a bit lately.  Check her out!

crancoconutmuffin4

Coconut Cranberry Muffins

Ingredients

  • 1 1/2 cups flour
  • 3 teaspoons baking powder
  • 1/2 teaspoon salt
  • 1/4 cup sugar
  • 1/4 cup coconut oil, warmed to liquid
  • 3/4 cup lite coconut milk, shake the can before opening and measuring
  • 1 egg
  • 1 cup fresh cranberries, roughly chopped
  • 1/2 cup sweetened flaked coconut

Directions

  1. Preheat oven to 400°F.
  2. Grease and sugar a 12-cup muffin tin.
  3. Combine flour, powder and salt in a small bowl and set aside.
  4. Beat sugar and coconut oil until combined, then beat in coconut milk and egg.
  5. Add flour mixture to the liquid ingredients and mix just to combine.
  6. Fold in the cranberries and flaked coconut.
  7. Divide batter equally among the cups.  Sprinkle with raw sugar or flaked coconut.
  8. Bake for 15-20 minutes until a toothpick comes out clean.  Let cool for a few minutes in the pan before transferring to a rack to cool completely.

Cranberry Pineapple Muffins

Happy New Year! Can I still say Happy New Year a week into it?  I think so.  One of the things I want to do in 2014 is to blog more here on Hottie Biscotti.  I did a photo a day project on the Baby Z blog in 2013 and love that it gave me a purpose in blogging and a goal to achieve for the year.  I have a lot of ideas for this blog; weekly recipes, cookbooks to cook through, kid friendly meals, dinners for busy moms/dads, vegetarian meals, and a few others.  But I know that if I say I’m going to do all of that I will be overwhelmed, will start to get my priorities out of order, end up disappointing myself and not be a good wife, mom and friend.  So I’m just going to set a goal of blogging once a week.  Maybe I’ll start some series, maybe I’ll blog more than once in a week, maybe I’ll end up cooking more out of my library of cookbooks.  But if I don’t, and all I have is 52 blog posts in 2014, I can say I’ve accomplished my goal.

Anyone else out there buy a bag of fresh cranberries over the holidays and find themselves with an unopened bag of them in need of being used?  Anyone?  I did.

cranberry-pineapple

Of course what I found when I searched for “cranberry muffins” were a bunch of recipes involving orange juice and orange zest.  I know cranberry and orange are good together.  But I’m not super crazy about the combination.  And I never have orange juice around.  I took this muffin recipe, used pineapple juice instead of orange, used up some of my cranberries, and wound up with a tasty batch of muffins.

cranberry-pineapple-muffins

I really loved the pineapple juice in these.  They smell spectacular and taste wonderful, especially warm with a little spread of butter.  The cranberries are perfectly tart and give a beautiful pop of color.  I think a small can of drained, crushed pineapple mixed in would make them phenomenal.  Now that I’m thinking about it, I will probably make these again with some other add ins…stay tuned.

These come together quickly and have a super simple ingredient list.  If you don’t have juice, I think you could get away with milk or buttermilk instead.  Blueberries, strawberries or raspberries would be great if you have some around.  Happy baking!

Cranberry Pineapple Muffins

From allrecipes.com

Ingredients

  • 1 1/2 cups flour
  • 3 teaspoons baking powder
  • 1/2 teaspoon salt
  • 1/4 cup white sugar
  • 1/4 cup vegetable oil
  • 1 egg, beaten
  • 6 ounces pineapple juice (1 small can)
  • 1 heaping cup fresh cranberries, roughly chopped

Directions

  1. Preheat oven to 400°F.  Grease and sugar a 12-cup muffin tin.  Set aside.
  2. Whisk together flour, baking powder and salt in a small bowl.
  3. In a large bowl whisk oil and sugar together until light in color.  Beat in egg, then pineapple juice.
  4. Stir flour mixture into the wet ingredients until just combined, then fold in cranberries.
  5. Divide evenly among the muffin cups.
  6. Bake for 15-20 minutes, until tops are lightly browned.


Carrot and Coconut Scones

During my first sit down with this cookbook from Baked I saw this recipe and knew I had to try it.  Two (plus) years later and I’ve finally gotten around to it!  I am glad I did.  While these little gems were baking my house smelled incredible and I was instantly in a better mood.  Baking does that to me a lot of the time, but there was something about the sweet carrot, toasting oats and coconut that was more magical than usual.  We all have a special thing that makes a bad day better, and baking (and the promise of something delicious) is mine.

carrotcoconutscones2

I put off making these most recently because of the ingredient “carrot puree” and the extra step of making it.  Turns out it’s one of the easier parts of the recipe and should not deter you.  It will make a mess of your microwave, so next time I might try it on the stove top.  Also, don’t worry about it being super duper smooth.  Mine was a little chunky and it worked out fine.  I used baby carrots, about a handful, and had no issues.  I pureed them in my mini food processor, and think a stick blender might be a better choice.  Looking into getting one of those…

As with all scones, you don’t want to overwork the dough.  And if you don’t overwork the dough, the dough will be delicate, so be careful when transferring it to the baking pan.  Use a wide rigid spatula to move them so they don’t fall apart.

carrotcoconutscones

Scones are best the day they’re made.  Day 2 or 3 is still ok, especially after a nice warm up in the microwave or quick toast in the oven and with a nice smear of softened butter.  Day 4, you’re about to cross the line into hard as a rock and inedible.  I kept mine in a sealed container in the fridge after the first day and we ate them in a few days with the exception of one scone who was sadly tossed out.  You could easily freeze these and warm them up one at a time or warm the entire batch for company.  If you do freeze them, glaze them just before serving.  Enjoy!

Carrot and Coconut Scones

Courtesy of Baked Explorations

Makes 8 scones

Ingredients

Carrot Puree

  • 1 medium carrot, peeled and cut into chunks (or a handful, 6-8, baby carrots)
  • 1/4 cup orange juice

Scones

  • 2 3/4 cups flour
  • 1/2 cup sugar
  • 1/2 cup rolled oats
  • 1 tablespoon baking powder
  • 1/4 teaspoon salt
  • 1 cup sweetened shredded coconut
  • 1/2 cup cold butter, cut into 1/2 inch chunks
  • 1 large egg
  • 3/4 cup buttermilk
  • 1 tablespoon vanilla extract
  • 1/4 cup carrot puree
  • 1 egg white, beaten (for egg wash)

Citrus Glaze

  • 1 tablespoon lemon juice
  • 2 tablespoons orange juice
  • 1 cup powdered sugar

Directions

Carrot Puree

  1. Place the carrot and the orange juice in a medium microwave safe bowl, cover and microwave for 5 minutes on high.  Check that carrot is fork tender.  If it’s not, microwave for 30 second intervals until it is.
  2. Blend the carrot and orange juice until smooth and set aside.

Scones

  1. Preheat oven to 400°.  Line a baking sheet with parchment.
  2. Whisk together flour, sugar, oats, baking powder, salt and coconut in a large bowl.
  3. Add the butter and use your fingertips to work it into the flour until the butter is pea sized and the mixture is coarse, not worked too much.
  4. In another bowl, whisk the egg, buttermilk, vanilla and carrot puree.  Pour the wet ingredients into the dry and stir until the dough just comes together.  Turn it once in the bowl and knead gently once or twice to bring it together.  Be careful not to overwork the dough!
  5. Lightly sprinkle a clean surface with flour and turn the dough out of the bowl.  Sprinkle the top of the dough with flour if it looks sticky.  Flatten the dough into a disk about 1 3/4 inches high.
  6. Cut the disk like a pizza into 8 slices and transfer the scones to the parchment lined baking sheet.
  7. Whisk egg white with  1 tablespoon of water and brush the tops of the scones with the egg wash.
  8. Bake for 18-20 minutes, rotate baking sheet after 10 minutes, until a toothpick inserted into the center comes out clean and the tops are slightly browned.
  9. Cool scones completely on a wire rack.

Glaze

  1. Sift powdered sugar (to get rid of any lumps) into a bowl, then whisk in the juices until smooth.
  2. Drizzle the glaze over the cooled scones and allow it to set before serving.

Apple Cinnamon Baked Donuts

I gave in and bought a donut pan.  It was 30% off at Sur la Table.  How was I supposed to resist?  It’s just this simple one from Wilton and will only set you back $10.

I’ve made fried cake donuts a couple of times, but frying makes such a mess.  The worst part, in my opinion, is dealing with the oil afterward. Baking donuts eliminates the mess AND makes you feel a little bit better about eating the donut.  I must admit something, though.  And it should come as no surprise.  They’re not as good as fried.  Frying gives such a lovely crunch to the exterior that you just cannot duplicate in the oven.  They are still good, just not as good.

applecinnamondonuts

Originally I tried the recipe printed on the wrapping of the pan for basic baked donuts.  They looked lovely, especially after a good coating of powdered or cinnamon sugar.  But they weren’t fantastic.  They were dry, crumbly and close to tasteless.  So I went on the search for a moister cake donut recipe and found this one for sour cream blueberry donuts.  I adapted it a little and turned it into an apple cinnamon sour cream donut.  The kids and I have been reheating and enjoying these for breakfast, but they really are best the day they’re made.  They are super moist and the grated apple provides just a little texture.

This recipe makes about 10 donuts.  Be careful not to overfill your pan because you will have half donut, half muffin top type things.  I tried both brown sugar and white sugar with the recipe below.  Not a huge difference, but I did prefer the white sugar.  I also tried more sour cream and less applesauce, and liked the variation with more applesauce thinking it added more apple-ness to the final product. Definitely do use a plastic bag to pipe the batter into the pan.  You’ll have a mess on your hands otherwise.  Enjoy!

Apple Cinnamon Baked Donuts

Adapted from Baked Blueberry Donuts

Makes 10 donuts

Ingredients

  • 1 cup flour
  • 1/4 teaspoon baking soda
  • 1/2 teaspoon baking powder
  • 1/2 teaspoon salt
  • 1/2 teaspoon cinnamon
  • 1/4 cup sour cream (regular or low fat)
  • 1/2 cup applesauce
  • 1/3 cup white sugar
  • 1 teaspoon vanilla
  • 1 egg
  • 1 small apple, peeled and shredded with a large grater, then pressed between paper towels to reduce moisture

Directions

  1. Preheat oven to 350°F.  Grease a 6 cavity donut pan with nonstick spray.
  2. Whisk together the flour, soda, powder, salt and cinnamon in a small bowl.
  3. Whisk the sour cream, applesauce, sugar, egg and vanilla in another bowl.
  4. Fold the dry ingredients into the wet ingredients until just combined.  Fold in the apple gently.
  5. Transfer batter to a large zip top bag and cut off a small corner.  Fill the each donut cavity just over half way.
  6. Bake for 8-10 minutes, until donut springs back when pressed with your finger.
  7. Cool for 2 minutes in the pan, then move to a rack to cool completely.
  8. Grease pan again and bake the rest of the donuts.
  9. Finish with a simple powdered sugar glaze, toss in powdered sugar or dip into melted butter and then toss in cinnamon sugar.

Coconut Oil Zucchini Bread

Me and coconut oil became fast friends once we finally got around to meeting each other.  I’ve only used it in baked goods so far, but have plans to deepen my relationship with coconut oil by using it in my morning smoothie and as a substitute for vegetable or canola oil in stir fry.  And as you probably know by now, there are like a million other uses for this trendy cooking oil.

coconutoilzucchinibread1

This zucchini bread was a hit, which was a total relief.  When I poured (scooped) the batter into the pans I was worried about it.  Coconut oil just has a different consistency and doesn’t create the same textured batter as vegetable oil does.  It’s thicker and doesn’t fill the pans on its own, it needs some help into the corners.  This being my first time using coconut oil in a quick bread, I wasn’t confident that it would come out well.  If you have the same concern, no need to worry!  The loaf does end up being on the short side, but the texture is nice and while it is dense it isn’t heavy.  The zucchini isn’t overwhelmed by the coconut, which is rather mild.  If you really like and want a more distinct coconut flavor, then add some flaked sweetened or unsweetened coconut to the batter.  Some crushed pineapple might not be a bad idea either…

I have an undying love for pecans, so that is what I used, but you can use walnuts or leave the nuts out altogether.  If you really want to go tropical, use macadamia nuts.  Yum.

coconutoilzucchinibread2

White whole wheat flour isn’t always a great substitute for all purpose, but it worked well here.  White whole wheat flour does have more texture than all purpose, so when I tried it in a pound cake a while back it wasn’t great.  I’d imagine it would work in banana bread, though.  White whole wheat flour apparently has the same health benefits of whole wheat flour, but without the stuff that gives whole wheat flour its strong flavor and darker color.  I don’t know the proper terms for all of that or the reason behind it all, but I do know that when I can sneak good stuff into my baked goods without it changing the texture or flavor too much, I am on board.  It’s all about lessening the guilt, am I right?  I have the same mentality with the coconut oil.  How can a slice of bread made with coconut oil, white whole wheat flour, and zucchini be BAD for me?  It can’t.  What sugar?  It all cancels out…  So I’ll go ahead and eat another slice smothered in butter.  Eat up and enjoy!

Coconut Oil Zucchini Bread

Adapted from Mom’s Zucchini Bread

Ingredients

  • 3 cups white whole wheat flour
  • 1 teaspoon salt
  • 1 1/2 teaspoon baking powder
  • 1 teaspoon baking soda
  • 1 cup coconut oil, softened if needed
  • 2 cups white sugar
  • 3 eggs
  • 2 teaspoons vanilla
  • 3 cups shredded zucchini, drained on paper towels for 10-15 minutes
  • 1 cup toasted pecans, cooled to room temp

Directions

  1. Preheat oven to 325°F.
  2. Grease and sugar two loaf pans.
  3. Whisk together flour, salt, baking powder and baking soda in a medium sized bowl.
  4. Combine coconut oil and sugar and whisk well.  Add in eggs, one at a time until thoroughly combined.  Whisk in vanilla.
  5. Fold flour into the coconut oil mixture until just combined, then fold in zucchini and pecans.
  6. Divide batter evenly between the two pans and bake for 45 minutes to an hour.  Check bread at 45 by inserting a toothpick into the center.  If it comes out clean, then your bread is done.  If it’s gooey, bake for another 10, then check again.  Mine baked for close to an hour.

Healthy Banana & Oat Breakfast Cookies with Cranberries and Nuts

bananaoatcookie2

I don’t really cook anything for Carson that has no added sugars or is made with only whole grains.  I don’t get locally grown organic fruits and vegetables at the farmers market.  I don’t say “no” to fast food.  I’m not anti health food and I don’t roll my eyes at people who do those things.  I make sure Carson gets fruits and veggies every day.  I don’t let the child skip dinner and then get cookies before bed.  I’m not unconcerned with healthy eating, I’m just not overly concerned with it.  But, if I see something that looks easy and healthy for my kids I will try it.  And that is what led me to try these cookies.

When I saw these cookies on Pinterest I thought, “What a simple recipe!  This person says they’re awesome!  So they must be!”  A couple of mashed bananas, oats and nuts.  No added sugar.  No butter or shortening.  I gave them a shot.  These are advertised as “cookies”.  Sorry.  They’re not cookies.  Not cookies as I know them.  I like sugar and butter, and I think they have their place.  And that place is in cookies.  So when I ate one of these after they came out of the oven I was really disappointed.  Not because they were bad, they just weren’t cookies.  I don’t know why I thought they’d taste like anything other than banana, oats and nuts.  Maybe because I fell victim to another Pinterest post and its false promises.  If there is one thing Pinterest has taught me it is to be skeptical.  And that the options for IKEA furniture are endless.  I gave one of the cookies to Carson.  He took one bite, took the bite out of his mouth and left it all on the table.  Fail.

I packed them in a tupperware after they had cooled and stashed them in the freezer because I cannot throw food away.  It almost physically hurts me to do it.  The next morning I saw them in the freezer and thought I’d try one again.  I took one out and microwaved it for 15 seconds.  It was surprisingly tasty, and a really perfect breakfast cookie.  Not too sweet.  Full of hearty oats.  Nuts for protein.  Cranberries for tartness.  A touch of cinnamon.  I ate these for breakfast the rest of the week.

So these didn’t turn out to be a great toddler cookies (not for my toddler anyway) but I enjoyed them after accepting that they were not sweet dessert cookies.  These are breakfast cookies, and a couple of them with a cup of coffee and some fruit made for a lovely start to the day.

Banana & Oat Breakfast Cookies

From Skinnytaste

Makes 12-18

Ingredients

  • 2 medium semi ripe bananas
  • 1 cup oats
  • 1/2 teaspoon cinnamon
  • 1/4 to 1/3 cup roughly chopped nuts
  • 1/4 to 1/3 cup cranberries (or other dried fruit)

Directions

  1. Preheat oven to 350°F
  2. Mash bananas until smooth.
  3. Mix in oats, cinnamon, nuts and fruit.
  4. Drop by rounded tablespoons onto cookie sheet lined with parchment paper.
  5. Bake for 15 minutes.


My Favorite Granola

Granola is one of those foods I often see on lists with titles like, “Foods you Thought Were Good for You!”  And I guess it’s true that many store bought granolas are full of sugar and other not-too-healthy ingredients.  But if you make your own, then you have control over what goes into it.  I’m not saying this is perfect health food or that it is “good for you”.  But I do know that it is delicious.

This is my favorite granola.  I brought a bag of it to Christmas with my family this year and everyone loved it.  I’m pretty sure it was gone in just a couple of days.  You can change the nuts and fruits in this to personalize it to your taste.  If you like chocolate in yours, I’d suggest dark or semi sweet chips.  My favorite combination is pecans, almonds, pumpkin seeds, cranberries, cherries and blueberries.

granola

I like to eat this granola on top of some plain yogurt.  Or I’ll mix a couple spoonfuls of it in with my Kashi cereal to make things a little more interesting.

This recipe came from a Bon Appetit magazine, probably 5 or 6 years ago.  Since I started making it I’ve changed some things, but one thing I haven’t changed is the special instruction to store it in the freezer.  By doing this the moisture from the fruit doesn’t soften the granola.  I’ve never not done this.  When I’m bringing the granola somewhere I keep the granola and the fruit separate until I find a freezer.  If you’re brave enough to try storing it at room temp, let me know how it goes.  Enjoy!

My Favorite Granola

Adapted from Bon Appetit

Ingredients

  • 3 cups old fashioned rolled oats
  • 1 cup unsweetened coconut flakes
  • 1/3 cup vegetable oil
  • 1/3 cup dark brown sugar
  • 1/4 cup honey
  • 1/2-1 teaspoon cinnamon
  • 1/4 teaspoon kosher salt
  • 1/2 cup roughly chopped pecans
  • 1/2 cup roughly chopped almonds
  • 1/2 cup green pumpkin seeds
  • 1 cup dried cherries
  • 1/2 cup dried cranberries
  • 1/2 cup dried blueberries

Directions

  1. Preheat oven to 325°F.
  2. Stir together oats, coconut, oil, sugar, honey,  cinnamon, salt and nuts in a large bowl.
  3. Spread mixture evenly on a large rimmed baking pan.  Bake, stirring occasionally, until golden, between 25 and 30 minutes.  Watch carefully after 20 minutes.  You do not want it to get too dark.
  4. Remove the granola from the oven and set the pan on a rack to cool, the granola will be soft.  It will harden up as it cools.
  5. After it is cool, stir in the fruit.  Store in a sealed container in the freezer.

Scrambled Eggs with Spinach & Feta

Breakfast for me is almost always a piece of fruit and a bowl of cereal, unless my sweet man has suggested going to pick up donuts or breakfast tacos.  When I scramble eggs for Carson I will sometimes scramble some for myself and toast up a piece of bread.  Scrambled is really the only way I like my eggs.  I cannot stand a runny yolk.  I wish I could because I want so badly to order eggs benedict simply because I find it to be a beautiful dish.  Alas, I am stuck with boring (and rather unattractive) scrambled eggs.  Eggs are good for you.  They are full of protein, and you can cook them quickly. They can be a really wonderful way to start your day.  And there are ways to dress them up and make your eggs more interesting.

My mom would make us cheesy eggs as kids.  The more cheese the better, specially if some of it got slightly crunchy on the edges of the pan.  It’s kinda like fricco!  You can’t go wrong stirring some salsa, cheese and crunched up tortilla chips into scrambled eggs for some cheater migas.  I remember once my sister made scrambled eggs for the family with feta cheese and fresh dill.   When I took out the carton of eggs a few weeks ago I saw the feta cheese and decided I’d add some to my eggs.  Then I remembered that I had some spinach that needed to get used up or else I’d have to toss it, so I took that out as well.  I wound up with quite a tasty breakfast and a nice change of pace from cold cereal.

eggsandfeta

This will serve one person, so adjust as needed for more servings.  I use one whole egg and one egg white.  Once upon a time I was scared of the yolk because that’s where that fat is!  Then I wised up and realized that not only did I need fat in my diet, but a little yolk makes scrambled eggs much tastier.  I tried making these eggs the first time by adding the raw spinach in with the eggs, but I didn’t like the way the eggs cooked.  So the next time I sauteed the spinach in a teeny bit of olive oil, took it out of the pan and let it drain a little on a paper towel, scrambled my eggs, then added the spinach back in near the end of cooking along with the feta.  I found this to be a much better method.

Spinach cooks down to practically nothing.  So be very generous with the amount of raw spinach you cook.  Better to have extra than to find yourself wishing you’d cooked more of it.  As far as the feta goes, you don’t need much.  It’s a very flavorful cheese, so a little goes a long way.  The feta is also pretty salty.  Use extra salt sparingly.

This is a great savory breakfast and a tasty way to eat more vegetables, something I am working on in my meals.  Adding some fresh herbs in with the spinach would be lovely.  Goat cheese would be a nice cheese to try instead of the feta.  And there are other veggies you can add as well, cherry tomatoes, sauteed zucchini or peppers.  Lots of options.  Let me know if you come up with a spectacular combination!  Enjoy.

Scrambled Eggs with Spinach & Feta

Ingredients

  • 2 eggs
  • a generous handful of baby spinach
  • feta cheese
  • salt and pepper
  • olive oil

Directions

  1.  Heat a medium sized skillet over medium heat.  Drizzle a tiny bit of oil in the pan, then add your spinach.  Sprinkle with a little salt and cook, stirring until spinach has just wilted.  Transfer to a plate lined with a paper towel to drain off some of the liquid.
  2. In a small bowl whisk the eggs (or one whole egg and one egg white) until they are combined and a little foamy.  I like to use a tiny whisk or a fork.  A big whisk and such a small amount of liquid doesn’t really work well.
  3. Spray your pan with non-stick spray.  Add the eggs and scramble as you like.  My mom scrambles them into small pieces.  I like them a bit bigger, so I let them cook for a little bit right when I add them to the pan, then I stir gently and infrequently until they just about done, a little undercooked.  Add the spinach and feta to the pan and stir to combine.  Season with pepper if desired and salt if needed.