Cookies

Baking Through Fika: Rustic Almond Cookies

When things don’t turn out as neat and tidy as they were intended to be you can get away with it by calling your product “rustic”.  Which is most of the time just a nice euphemism for “messy”.  These cookies aren’t messy, but they do have “rustic” in the recipe title, which means there need be no anxiety about how neat they turn out, because they’re not supposed to be perfect!  My kind of recipe.

Rustic Almond Cookies

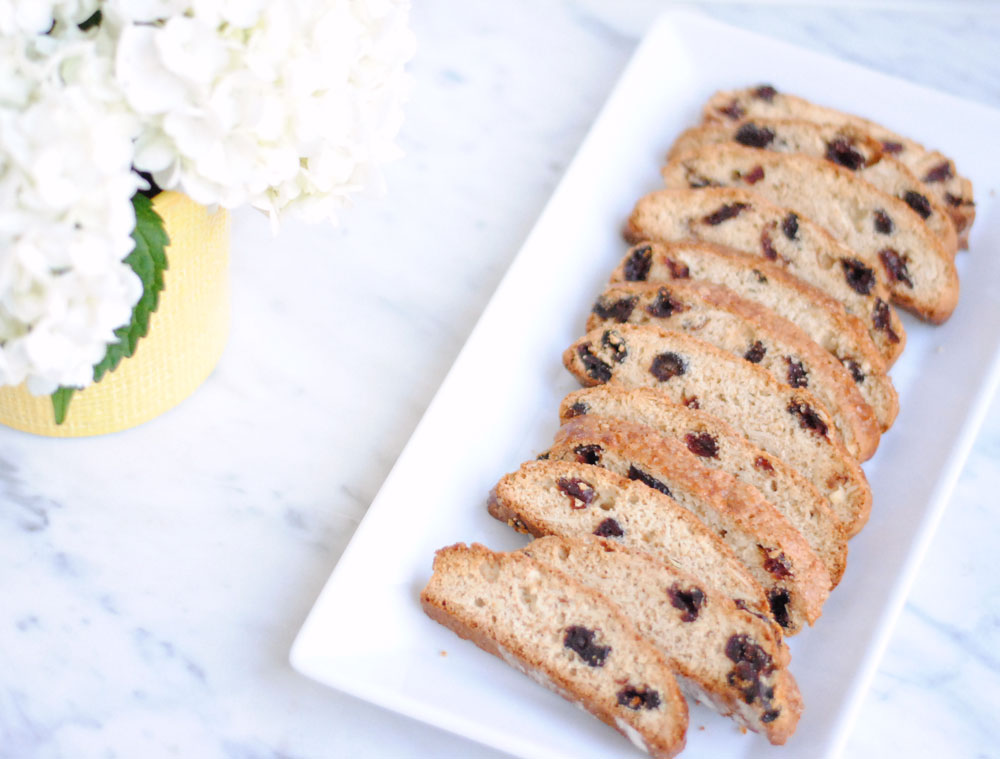
As you can see, my cookies are not the same size.  Precision is not the goal remember, they’re rustic.  So don’t worry about rolling the log into a perfect cylinder, just roughly the same thickness so that the baking time can be the same. If you want to make them perfect, though, then go for it.

These are like sweet almond butter crackers, crisp and with a nice petite size that makes for a treat that satisfies your sweet tooth without making you feel guilty.  As with many recipe in this cookbook they’re perfect with a cup  of coffee.  I stashed what we didn’t eat in the first few days in the freezer.  I simply take a couple out in the afternoon, let them thaw a bit (or not) and enjoy them during the few minutes of calm I get at nap time with my reheated coffee from the morning.  Such is my glamorous life, guys.

This is one of those recipes in FIKA that only has a few ingredients (all of which I almost always have) and has very little hands-on time, making it perfect for a quick treat that can be completed quickly.  Start to finish these take under 2 hours including the hour of chilling time.

Rustic Almond Cookies-4

Another benefit to a short ingredient list is the simplicity of this cookie, which may be another reason it’s called rustic.  Simple ingredients and a simple baking method.  I sometimes feel like if I don’t make something extravagant that’s loaded with a million special and indulgent ingredients that no one is going to care.  But I think there is something refreshing in simplicity in the kitchen, especially in a world where people are making hamburgers with donut buns.  I’m not knocking them, though. I’m from Round Rock originally, and the next time I get a chance I will probably try this hamburger if it’s still on the menu.  I’ll eat the crazy food, I’m just not going to make it.

Rustic Almond Cookies-5

Rustic Almond Cookies

From FIKA

Ingredients

  • 4 ounces butter, room temperature
  • 1/3 cup sugar
  • 1 tablespoon corn syrup
  • 1 1/4 ounces almonds (blanched whole or slivered) finely chopped in a food processor
  • 1 cup flour
  • 1/2 teaspoon baking soda
  • 1/4 teaspoon salt

Directions

  1. Beat together butter, sugar and corn syrup until thoroughly combined.
  2. Whisk together flour, almonds, salt and baking soda in a small bowl.
  3. Add flour mixture to the butter mixture and beat to combine.
  4. On a floured surface, roll the dough into a log about 1 inch thick.  Wrap in plastic and chill for at least 1 hour.
  5. Preheat oven to 400°F and line a baking sheet with parchment.
  6. Using a serrated knife, slice cookie log into slices between 1/4 and 1/2 inch thick.  Place on prepared cookie sheet, spacing them 1/2 inch apart.  Bake for 5-8 minutes depending on how thick you sliced the cookies.  They should be just golden on the edges.  Let cook on a wire rack.


Baking Through Fika: Pepparkakor (Gingerbread Cookies)

When I first bought the Fika cookbook and saw this recipe I knew we’d be making these for Christmas.  But as all things seem to go in my house, I almost forgot to make them!  Here they are just in time.

Pepparkakor-11

I thought it was going to be this perfect afternoon with my two older kids.  All laughter and smiles, Christmas music playing in the background, my little guy playing happily in his high chair watching us and not fussing.  But once I started getting everything together for our cookie decorating I was reminded that rarely does that perfect experience you’ve created in your head actually come to fruition.  Not only is that just the way life goes, but kids are just unpredictable.  My daughter was having a longer than normal nap, and if we wanted to get finished before dinner we had to go on without her.  My son was just impatient with the process of getting it all ready.  I had the cookies made ahead of time, but had to make frosting and gather sprinkles, and then I had to explain to him what to do when all he wanted to do was do it!  A few times while I was getting everything set up he said, “I think I’ll just go do legos/play outside/get my cars instead, mom.”

Thankfully he did sit down with me for a good while and decorate.  And he liked it! He was even bummed when we ran out of cookies to decorate.  I’d love to instill, if not a passion for cooking and baking, at the very least a good understanding of the kitchen in my kids. I recently started participating in Kids Chefs Club.  Every month you receive a cooking tool, a card with activities and recipes, and access to online content to help your child learn about being safe in the kitchen, kitchen tools, nutrition and basic kitchen skills.  The first month my son got the apron he’s wearing in the pictures below.  Every time he helps me cook he wants to put it on.  We are going on our third month.  My kids’ desire to help me with meals has increased a great deal.  That has been both very exciting and very challenging.

Pepparkakor-7

Cooking with kids takes longer and is messier than cooking on your own.  It also takes a good bit of patience and a great deal of letting go!  I like control in the kitchen, so letting my kids help has been tough, but really good for me, and it’s been great for them.  If you’re interested in trying Kids Chefs Club here is a discount code that will give you 20% off any membership plan, either 3, 6 or 12 months.  It’s valid until the end of the year, December 31, 2015!  Just use HolidayFriends15 at checkout.  If you need a last minute gift, this would be a great one.

Pepparkakor-8

Now about these cookies!  They are spiced wonderfully and I really enjoy the crunch they have…if you bake them right 😉  I forget how much I love cardamom sometimes, but then I notice it in something and am reminded of how warm and unique and wonderful it is.  These take a little time and patience.  Instead of simply creaming butter with sugar to begin, you must boil together sugar, molasses and water which you then mix into the butter. After cooling it down, you make the dough.  Then you have to chill the dough for at least 24 hours.  If I’m not in a time crunch, this type of recipe is good for me since I often don’t have the freedom to complete a recipe start to finish without interruption from the kids.  So spreading it out over a couple days was no problem!  I wasn’t stressed thinking, “Oh! I have to finish those cookies!” I was able to finish part of the recipe and think, “Now I just have to wait.  The recipe says I can take a break.  Thank, you recipe.”

My first batch was the best.  Working with a little dough at a time (since it warms up and gets soft pretty quickly) roll and cut your cookies. Bake for 4-6 minutes at 400°F, “but don’t overbake!” says the recipe. I did 5 minutes and they were a teensiest bit dark but good.  My next batch I did for 4 and a half minutes.  They were soft coming out of the oven and I just thought they’d set up nicely after they cooled.  So I did 4 and a half minutes for the rest of them.  After the first batch they did not get that nice crunch that pepparkakor should have. They still tasted great, but were on the soft side.  I tried to bake them more after they’d cooled with not much luck.  Now I know that while overbaking is bad, so is underbaking.  You basically need perfect baking time.  Good luck!  I’d rather have them a little overbaked (but not burnt) to be honest, nice and crunchy.  But that’s just me.

Pepparkakor

Pepparkakor-2

Pepparkakor-5

Pepparkakor-3

Pepparkakor-4

To decorate I used royal icing so that it would harden completely.  It isn’t the tastiest, but you get mostly spice from the cookie and a simple sweet crunch from the icing.  This recipe is what I used.  It’s more than you need, and you will have to add some water to make it more pipe-able.  Just a teaspoon at a time until you get it where you want it.

I’ve seen so many insanely beautiful holiday cookies all over blogs and on Instagram lately that I was feeling like I’d better do something awesome.  But there’s no joy in trying to do something just as or more awesome as other people.  So we had fun with these and didn’t worry about all those other people.  Enjoy and have fun with these!

Pepparkakor-12

Pepparkakor

From FIKA

Ingredients

  • 3/4 cup sugar
  • 1/2 cup molasses
  • 1/2 cup water
  • 4 1/2 ounces butter cut into pieces
  • 1 tablespoon cinnamon
  • 1/2 tablespoon (equal to 1 1/2 teaspoons) ground cardamom
  • 1/2 tablespoon ground cloves
  • 1 teaspoon ground ginger
  • 1/2 tablespoon baking soda
  • 3 cups flour plus more for rolling

Directions

  1. Combine sugar, molasses and water in a small saucepan and bring to a boil over medium heat.  Stir to make sure the sugar is dissolved.  Remove from the heat and add in the butter, stir to melt completely.  Set aside to cool to room temperature.
  2. Mix flour and the rest of the dry ingredients together.  In the bowl of a stand mixer combine the wet and dry ingredients and mix to combine.  Place dough in a plastic bag and chill for 24-48 hours.
  3. Preheat oven to 400°F
  4. Work with a handful of dough at a time (return what you’re not using to the fridge) and roll out on a floured surface, cut desired shapes and move to a cookie sheet.
  5. Bake for 4-6 minutes, until cookies begin to brown on the edges.

Swedish Spritz and Christmas Cookie Trays

While I love this time of year I must admit that it stresses me out!  I start to get bogged down in the to-do lists and parties and gifts and travel arrangements and forget to savor the season and really focus on Christ and the miracle of his birth and the wonder of it all!  I’ve been trying to reinforce with my kids that Christmas isn’t just presents, Santa, cookies and Jingle Bells, but I’m not being the best example by stressing out about all of those things.  Does anyone else have this problem?!  Any advice on how to find balance?

Today is the last day of preschool before Christmas break and I’ve tried this year to keep things simple for teacher gifts.  A cookie tray and a gift card to one of their favorite stores.

Cookie Tray-2

All of the cookies on this tray can be made ahead of time and frozen for at least a couple of weeks which makes them great for the craziness of this time of year.

Here is the link for the Molasses Cookies and here is the Rosemary Pecan Shortbread.  Both of these are wonderfully spiced and amazingly delicious.  My husband does not like sweets and the molasses cookies are some of his favorites.

Cookie Tray

And here is the Spritz recipe!  It’s a family recipe that my mom, aunt and grandmother used.  These are straightforward butter cookies.  If you don’t have a cookie press you could maybe roll them in to balls and then roll them in sugar, but I haven’t tried that before.  Don’t be scared of a cookie press, though!  My mother in law passed down to me the one pictured below a few years ago and I just now worked up the courage to use it.  I wish I’d not waited so long!

20151208_230608935_iOS

A few tips:

  1. Use an ungreased cookie sheet!  I used parchment for my first batch, which was a mistake.  The dough didn’t stick to the parchment, it just stayed on the press!  Very frustrating.  There is enough butter in these that sticking shouldn’t be an issue 🙂
  2. Watch these carefully in the oven.  If they burn they’re just not very good.
  3. Place the red hots on the cookie in such a way that they’re not too close to the edge.  If they get too much heat from the metal of the pan they’ll melt.

SWEDISH SPRITZ

Ingredients

  • 1 1/2 cups butter
  • 1 cup sugar
  • 1 egg
  • 1 teaspoon vanilla
  • 1/2 teaspoon almond extract
  • 4 cups flour
  • 1 teaspoon baking powder
  • coloring (optional)
  • red hots or sprinkles

Directions

  1. Preheat oven to 400°F
  2. Cream butter and sugar together thoroughly.  Add in the egg and extracts and beat well.
  3. Whisk flour, baking powder and salt together, then add to the butter mixture and beat until combined.  At this point you can color some of the dough if you want to.  The green trees have always been a favorite of my family!
  4. Fill cookie press with dough and fit with a plate.  Force dough out according to the directions for your press on to an ungreased cookie sheet, spacing about 1 inch apart.  Press red hots into cookies if using.
  5. Bake in the preheated oven for 7-10 minutes.  You may need to rotate them if you oven bakes unevenly.
  6. Cool and serve.  These freeze very well.

Baking Through Fika: Toffee Cookies

This always happens.  After Halloween things just get a little nuts and before I know it it’s Christmas!  Anyone else feeling like that?!  In a mere 4 weeks we’ll be ringing in 2016.  Crazy.

I’ve been slacking off a little on the blog and on this Fika project.  After a couple of mishaps I got a little frustrated, so I wasn’t as excited about continuing and possibly encountering failure yet again.  And to be honest I wasn’t expecting much from this simple cookie.

Toffe Cookies-3

But these unassuming cookies are quite good and something I see myself making again, especially if I need to whip up dessert in a hurry.  These are great with a cup of coffee or tea (of course they’re included in a book called Fika!) but would also make a nice addition to a cookie platter.  They freeze nicely, so you could make them ahead of time and take them out when you need them.

Since the ingredients are so few the kind of vanilla you use is going to make a difference.  I’ve been partial to this Watkins Clear Vanilla lately, but it isn’t the same as pure vanilla extract or vanilla bean paste, both of which would be terrific.  You could add a touch of almond extract if you were feeling adventurous or play around with all kinds of extracts really…maybe peppermint and then dip these in chocolate?  I might have a weekend project to work on…

I wasn’t sure about why they were called toffee cookies at first.  But the flavor is rich and buttery like toffee.  So I guess the name is fitting.

I made these twice thinking the first time I flattened the logs of dough too much and they spread more than they should have resulting in a pancake-like cookie log.  The next time I chilled the logs and hardly flattened them at all.  There was some change, enough that I’d still chill and flatten less, but not a huge difference that I’d say you absolutely MUST chill the dough.

Toffe Cookies-2

These really are quick, simple and delicious.  This would even be a great cookie to make with young kids.  Put them to work measuring, mixing, rolling and cutting.  I sliced these with a pizza cutter which made it a quick and easy task.  I don’t know about your kids, but mine love the idea of the pizza cutter and might get a little carried away with it so I’d have to do that job myself 🙂

Toffe Cookies-5

Toffee Cookies

Adapted ever so slightly from Fika

Ingredients

  • 1 stick of butter, softened slightly
  • 1/2 cup sugar
  • 1 tablespoon corn syrup
  • 1 cup flour
  • 1 teaspoon baking powder
  • 1/2 teaspoon salt
  • 1 teaspoon vanilla extract

Directions

  1. Pre-heat oven to 350°F and line a baking sheet with parchment.
  2. Combine butter, sugar and corn syrup in a mixing bowl and beat until thoroughly combined.
  3. Add in flour, salt, baking powder and extract and beat until it the dough together.
  4. Turn dough out onto a floured surface and divide into 3 equal-sized pieces.  Roll each into a rope about as long as the baking sheet and about as thick as your thumb and carefully transfer to the baking sheet.  At this point you can chill the dough on the baking sheet for half an hour if you have the time.  If not, then just go ahead and put them in the oven.
  5. Bake for 10-15 minutes until they begin to brown.  Transfer the entire piece of parchment to a cutting surface and using a large knife or pizza cutter slice the warm cookies on an angle into pieces 1/2-3/4 inch thick.  Let cool and enjoy.

Baking Through Fika: Checkerboard Cookies

This one was harder than I thought it would be.  It had a simple ingredient list and seemingly simple instructions.  But I just didn’t really deliver on the execution.  Gotta love being humbled in the kitchen!

Checkerboard Cookies-2

As you can see, my cookies are not sweet, dainty squares divided into equally sized plain and chocolate shortbread quadrants.  They are wavy, oddly shaped, and so far from dainty.  BUT they were yummy.  So yummy, in fact, that my son who much prefers a packaged sweet to my baked goods referred to them as the “special black and white cookies” when he told me what he wanted for dessert.  I thought he meant Oreos.  When I gave him an Oreo he says, “No, mom, the special ones you made!”  It was a rare moment, and a good one.

Checkerboard Cookies-3

There is a certain amount of precision required to make these cookies look like they should.  In order to get those straight edges you must really make each part neat, and then piece everything together neatly.  I just made rough rectangles by hand and the results were a more rustic cookie.  Here are some ideas I have for making them better.  Anyone out there have good tips to share?

  • Chill the dough after dividing it so that it’s just a bit firmer.  When I used the dough it was very soft, and too malleable.
  • Use a dough scraper as your straight edge to get neat edges on each piece, then chill them separately before joining them together.
  • Use the dough scraper again after putting the pieces together, and be sure to put them together on a flat surface that you can transfer directly in to the fridge to chill again.
  • When creating the long rectangles of dough, they become long and difficult to move.  If you made two sets of long rectangles, a total of 8 (4 chocolate and 4 plain) they would be easier to move and place together.

I’ll have to give these another go and see if any of those things help!

Even though these weren’t the prettiest of cookies, they had good flavor, buttery and slightly soft with a subtle chocolate flavor.  They’re nice along side your cup of coffee or tea and would make a nice addition to a Christmas cookie plate.  Not that I’m already thinking about Christmas…

Checkerboard Cookies

Checkerboard Cookies

From Baking Through Fika

Ingredients

  • 7 ounces of butter, softened
  • 1/2 cup sugar
  • 1/4 teaspoon vanilla extract
  • 2 cups flour
  • 2 tablespoons cocoa powder

Directions

  1. Beat the butter and sugar together until combined, then add in the vanilla followed by the flour.  Mix until evenly combined.
  2. Divide the dough into two equally sized pieces.
  3. Mix the cocoa into one half of the dough until it’s incorporated and the dough is a consistent color.
  4. Divide each half in half so that you have 4 pieces, two plain and two chocolate.  If your dough is especially soft, you may want to chill it for 10-20 minutes.
  5. Form each piece into a long rectangle, about 1/2 inch thick.  Make all the pieces the same length and width.  (This is the part where dividing the dough further might be helpful.)  Place one chocolate rectangle next to one plain.  Then place a plain piece on top of the chocolate and a chocolate piece on top of the plain.  Press together lightly, wrap in plastic wrap and chill for at least an hour.
  6. Preheat oven to 350°F.
  7. Remove from the fridge and unwrap.  Slice (a large chef’s knife is good for this) into slice that are about 1/4 inch thick.  Place on a baking sheet lined with parchment.  They spread a bit, but not too much, so space them 1/2 an inch or so apart.
  8. Bake for about 10 minutes, until they are set and the edges are just beginning to brown.
  9. These store very well once cooled at room temperature in a container.  They would also freeze very well.


Crunchy Coconut and Oat Bars

Sometimes you just need to bake something.  Maybe the weather is dreary, you’ve had a bad day, or, if you’re anything like me, you just need a project that has a beginning and an end and tangible (and edible!) results because no other task you’ve attempted that day has been successfully completed.  You want something quick with very little prep and a short bake time so that you don’t have to wait long to enjoy the fruits of your labor.  These oatmeal bars meet every one of those qualifications AND they’re delicious.  They remind me a lot of the oat and honey Nature Valley bars.  Drizzle on some melted chocolate chips to make them a bit fancier, but they are really good just on their own.

Crunchy Coconut and Oat Bars | Hottie Biscotti

This recipe is from a cookbook I have baked from a lot, but it’s been a while, Rebecca Rather’s Pastry Queen.  It is one of my favorite dessert cookbooks.  Most of you probably scrounge around on the internet for recipes, like I do.  But then you browse an old cookbook and find a real gem and you tell yourself you’ll do it more often.  But you somehow find yourself going back to the computer or pinterest the next time.  I urge you to go to your cookbooks!  I have so many of them, some I have never even cooked from.  And that’s a shame.  I vow to do more cooking from physical cookbooks.  You should join me.  Back to the bars.

Crunchy Coconut and Oat Bars | Hottie Biscotti

If you bake at all, then you have everything you need for these bars.  They come together in a snap and bake up in a mere 20 minutes.  After cooling they are very crunchy, so slicing them is really more like sawing or chopping.  If you’re not so concerned with appearance you can just break them apart into pieces.  Those pieces might be amazing along with a bowl of vanilla ice cream…and some hot fudge…

Crunchy Coconut and Oat Bars | Hottie Biscotti

Crunchy Coconut and Oat Bars | Hottie Biscotti

Crunchy Coconut and Oat Bars

From The Pastry Queen

Ingredients

  • 1 stick butter
  • 1/2 cup dark brown sugar
  • 1 tablespoon corn syrup
  • 2 cups old fashioned oats
  • 1 teaspoon baking powder
  • 1/2 teaspoon salt
  • 1/2 teaspoon cinnamon
  • 1/3 cup sweetened shredded coconut
  • 1/2 cup chocolate chips (optional)

Directions

  1. Preheat oven to 350°F and grease a 9×13 pan.
  2. Melt butter, brown sugar and corn syrup over medium heat.  Stir until sugar dissolves, 1 to 2 minutes.  Remove from the heat.
  3. In a large bowl stir together oats, baking powder, salt, cinnamon and coconut.  Pour melted butter over and stir to combine thoroughly.
  4. Press firmly into the prepared pan and bake for 20-25 minutes.
  5. Cool for 20 minutes before cutting into bars.
  6. Melt chocolate and drizzle over bars or dip them.


Oatmeal Raisin Cookies

This is my husband’s favorite cookie.  I made 200+ of them as favors for our wedding guests.  After trying many recipes I found that the one on the bottom of the lid of the Quaker Oats container was my favorite.  But when I saw this one in my Test Kitchen cookbook I thought I’d give it a try.  You know, for research.  They are quite good and may give the Quaker recipe a run for its money.

oatmealraisin7

But really a fair comparison can’t be made.  I’d probably have to have them side by side to decide which is better.  These are puffier and more tender than the others, they are more full of oats and are flavored with nutmeg instead of cinnamon.  I kind of missed the cinnamon, so I’d add some the next time.  I might also add more raisins.

(more…)

Cornflake, Marshmallow and Chocolate Chip Momofuku Milk Bar Cookies

My sister gave me the Momofuku Milk Bar cookbook for Christmas and once we got home and unpacked everything I started browsing through it.  I’ve never actually been to Milk Bar, but have heard about their legendary cereal milk soft serve, compost cookies and crack pie.  My husband and I have grand plans to make a trip (maybe child-free!) up to New York City sometime in the next year to visit my sister and her family.  If we really do make it, then Milk Bar will be one of the places we have to go.

The cookbook is totally accessible with recipes for yummy things like confetti cookies, cinnamon bun pie, and brownie pie and ingredients you can buy at the grocery store like ritz crackers, corn flakes, fruity pebbles and ovaltine.  But it is intimidating in some ways.  Pretty much every recipe calls for a component that you have to make separately.  This almost always makes me steer away from a recipe.  But this time I found one that seemed doable, even with the extra steps.  These cornflake, chocolate chip, marshmallow cookies are worth every second of time they take to make.

Cornflake, Marshmallow and Chocolate Chip Momofuku Milk Bar Cookies | Hottie Biscotti Cornflake, Marshmallow and Chocolate Chip Momofuku Milk Bar Cookies | Hottie Biscotti

The component you have to make before you make the cookies is cornflake crunch.  It’s simple, really.  Crushed cornflakes, sugar, butter, milk powder and salt.  Mix it all together and toast it in a low oven.  Other crunches in the book include fruity pebble, pretzel and ritz, all similar to the cornflake crunch.  With my new found love of the cornflake crunch I see a day in my future where I make big batches of the stuff and store it all in my freezer so I can add them to all of my cookies.

These cookies are sweet, salty, rich and buttery.  They are crunchy on the edges and soft and chewy in the center.  I usually prefer a puffier cookie, but these are flat and have earned a spot as some of the best cookies ever to come out of my oven.  They are HUGE.  Like the size of your face.  And amazing.  These are so amazing.

Cornflake, Marshmallow and Chocolate Chip Momofuku Milk Bar Cookies | Hottie Biscotti

The cornflake crunch really makes these cookies special and unlike any cookie I’ve made.  I am a believer in the momofuku crunch.  And in milk powder.  It’s magical stuff.

I’ve tried to add marshmallows to cookies before, but they’ve never quite acted like the marshmallows in these cookies.  They provide a sweet, sugary, gooey, chewiness but you don’t get too much marshmallow since they kind of melt into the cookie and join with everything else is perfect baked good harmony.

Mini chocolate chips are the way to go here.  Larger ones would be too overwhelming both in appearance in the cookie and in taste.  Stick with the minis.

Cornflake, Marshmallow and Chocolate Chip Momofuku Milk Bar Cookies | Hottie Biscotti

I am so excited to try more recipes in this cookbook!  Now that I know how worthwhile it is to make the special ingredients, I’ll be much more likely to make that incredible looking birthday cake on page 104.  Drool.

Cornflake, Marshmallow and Chocolate Chip Cookies

From Momofuku Milk Bar Cookbook

Cornflake Crunch

Ingredients

  • 5 cups cornflakes
  • 1/2 cup milk powder
  • 3 tablespoons sugar
  • 1 teaspoon kosher salt
  • 9 tablespoons butter, melted

Directions

  1. Preheat oven to 275°F and line a baking sheet with parchment paper or a silpat.
  2. In a large bowl crush cornflakes with clean hands then mix in milk powder, sugar and salt.  Toss to combine.
  3. Add in the melted butter and toss to coat evenly.
  4. Spread out onto the prepared sheet and bake for 20 minutes, let cool.

Cookies

Ingredients

  • 2 sticks of butter, room temperature
  • 1 1/4 cups sugar
  • 2/3 cup brown sugar
  • 1 egg
  • 1/2 teaspoon vanilla
  • 1 1/2 cups flour
  • 1/2 teaspoon baking powder
  • 1/4 teaspoon baking soda
  • 1 1/4 teaspoon salt
  • 3 cups cornflake crunch
  • 2/3 cup mini chocolate chips
  • 1 1/4 cups mini marshmallows

Directions

  1. Beat butter and sugars on medium high for 2-3 minutes.  Scrape down the bowl and add the egg and vanilla.  Beat for 7-8 minutes.  Scrape down the bowl.
  2. Whisk together the flour, powder, soda and salt, then add to the butter mixture.  Mix on low until just combined, no longer than 1 minute.
  3. Mix in the cornflake crunch and chocolate chips on low speed just to combine, 30-45 seconds.  Then mix in the marshmallows just to combine.
  4. Using a large cookie/ice cream scoop or a 1/4 measuring cup scoop out dough into balls and place on a parchment or silpat lined cookie sheet.  You should have between 15 and 20 cookies.  No need to spread the dough balls out on this sheet.  Place the sheet into the fridge for at least 1 hour.  If you plan to refrigerate them for more than a couple hours, cover the sheet with plastic wrap.
  5. Preheat oven to 375°F.
  6. Arrange dough balls on a parchment or silpat lined cookie sheet (4 or 5 cookies per sheet) with 3-4 inches room for spreading.  Bake for 15-18 minutes until edges are beginning to brown and centers are just set.
  7. Let cool for a few minutes on the sheet, then move to a cooling rack.  Cool completely.

Weikel’s House Special Cookie Copy Cat

There is a place right off of highway 71 in La Grange, Texas, between Houston and Austin, called Weikel’s where you can stop for gas and get a snack.  If you ever make this drive you have definitely driven by and likely stopped at a similar spot called Hruska’s.  It’s right on the highway in Ellinger and impossible to miss.  But Hruska’s has nothing on Weikel’s, in my opinion.  They’re both gas stations with bakeries serving cookies, kolaches, etc.  Hruska’s, which also offers sausages and lunch/dinner items, had been my go-to stop until my in-laws brought some cookies and shortbread bars to us from Weikel’s.  I haven’t gone back since.

Weikel's House Special Cookies Copy Cat | Hottie Biscotti

Every time I stop here I get cookies for the kids, usually whatever Carson wants and plain sugar for Betsy to keep the mess to a minimum.  I also get a box of house special cookies and a cherry shortbread.  The house special cookies are indeed special and I’ve been wanting to duplicate them for some time.  I might be on my way to doing that with these!

Weikel's House Special Cookies Copy Cat | Hottie Biscotti

The house special is a crispy, crunchy cookie that has cornflakes, oats, pecans and coconut.  There is no butter on the ingredient list, only shortening.  So that could account for the difference in texture between mine and theirs.  I also left out the oats.  But the flavor is very similar and I am real excited that I won’t have to drive to La Grange to get my cookie fix!

However, if I had to choose between mine and Weikel’s I’d still choose Weikel’s.  There’s just something really special about them, and something about the experience of stopping with my kids that makes them better somehow.  And maybe it’s about having someone else make them, like how a sandwich is almost always better when someone else makes it for you than if you make it yourself.  Anyway, be sure to grab one (or a box of 6) if you ever stop by.  Then try this recipe and give me some feedback!  I’d love to truly duplicate these tasty cookies.

Weikel's House Special Cookies Copy Cat | Hottie Biscotti

Weikel’s House Special Cookie Copy Cat

Makes 18-20 cookies

Ingredients

  • 1 stick of butter, room temperature
  • 1/2 cup vegetable oil
  • 1/2 cup granulated sugar
  • 1/2 cup powdered sugar
  • 1 egg
  • 2 teaspoons vanilla
  • 2 cups flour
  • 1/2 teaspoon baking soda
  • 1/2 teaspoon salt
  • 1 cup cornflakes
  • 1/2 cup chopped pecans
  • 1/2 cup shredded coconut

Directions

  1. Beat butter until fluffy, about 2 minutes.
  2. Add in the oil, granulated sugar, powdered sugar and egg, beating between each addition.  Scrape the bottom of the bowl, add the vanilla and mix again.
  3. Add in the flour, baking soda and salt and mix just to combine.
  4. Fold in the cornflakes, pecans and coconut making sure that it is evenly mixed.
  5. Refrigerate for an hour.
  6. Preheat oven to 350°F and line 2 cookie sheets with parchment paper.
  7. Scoop into large balls (about 2 tablespoons) and place on cookie sheet (6-8 cookies per sheet) and bake for 10-12 minutes until edges are golden.  Remove from the oven and let cool for a couple minutes on the sheet then move to a wire rack.

Cherry Almond Biscotti

My mom is visiting this week and being a huge help with the kids while Ben is gone.  Along with her lovely self she brought a couple of recipes with her that she thought we could try together.  This biscotti is one of those and I am so very glad that we made them!  These are delicious.

Cherry Almond Biscotti | Hottie Biscotti


Almond is one of the flavors that I think of when I think of my mother.  That and pears.  She adores pears.  These biscotti have sliced almonds and cherries that have been soaked in amaretto which makes the almond flavor even more present and the cherries nice and plump.  I wonder how these would be with dried pears…

Cherry Almond Biscotti | Hottie Biscotti
The prep and cooking method for these is similar to most biscotti I have made.  One of the things that is different is on the second bake.  Instead of baking the sliced biscotti directly on the baking sheet you place them on wire racks in the oven to bake which I think crisps them up more evenly.  I’ll be doing this again for future biscotti. Cherry Almond Biscotti | Hottie Biscotti Try these as an accompaniment to your morning or afternoon coffee.  Or crumble them up over some ice cream.  Or just eat them, that’s the way my 2 year old seems to like them best.

Cherry Almond Biscotti

From a page torn from some Martha Stewart magazine Ingredients

  • 1 3/4 cup dried cherries
  • 1/2 cup amaretto liquor
  • 3 cups flour (more for dusting)
  • 2 teaspoons baking powder
  • 1/2 teaspoon salt
  • 4 tablespoons butter, softened
  • 1 cup sugar
  • 4 eggs (3 for the cookies and 1 for brushing)
  • 2 teaspoons vanilla
  • 3/4 cup sliced almonds
  • raw sugar for sprinkling on the tops

Directions

  1. Preheat oven to 375°F.
  2. Mix cherries and amaretto in a small saucepan and heat over medium low for about 5 minutes.  Liquid should just simmer.  Drain and reserve the liquid.
  3. Sift flour, salt and baking powder and set aside.
  4. Beat butter and sugar until thoroughly mixed, about 2 minutes.  Add in eggs, one at a time, mixing after each.  Mix in 2 tablespoons of cherry juice and vanilla.
  5. Add in the flour and mix just to combine, then add in cherries and almonds and mix to combine.
  6. Flour a work surface and turn dough out.  Divide in half and shape into two logs, about 12 inches long and 2 inches thick.
  7. Transfer to a parchment lined baking sheet.  Pat logs down to about 3/4 inch thickness, about 4 inches wide and 12-14 inches long.
  8. Brush with beaten egg and sprinkle with sugar.
  9. Bake for 25-30 minutes.  The logs will be dark, but shouldn’t be burned.  Check the bottom of the logs at 25 minutes and remove from the oven if they seem dark.  Transfer to wire racks to cool for 20 minutes.
  10. Slice logs at an angle to the thickness you like, 15-20 slices per log.  Reduce the oven temperature to 300°F.
  11.  Transfer biscotti back to the rack and lay the slices on their sides.  You will have to do this in 2 batches.  Place the rack on a baking sheet and bake for 5-7 minutes, flip biscotti over and bake for another 5-7 minutes.  Cook longer for a crispier biscotti and less for a softer one.  Let cool.  Store in an airtight container for a few days or freeze to enjoy later.