Vegetables

Rosemary and Maple Bacon Green Bean Bundles

I offered to bring a few things to Thanksgiving with my in-laws this year, including these rolls, a pie (still undecided on what I’m going to do) and a green bean dish.  I thought about doing these green bean salads, but my sister-in-law is bringing a green salad and I didn’t want to double up.  So I went in search of a green bean dish that wasn’t a rich heavy casserole, even though I love the stuff, but was still special.  These green bean bundles are the perfect compromise.

Rosemary and Maple Bacon Green Bean Bundles | Hottie Biscotti

I wanted something that wasn’t going to occupy too much stove or oven space and wouldn’t take too long.  You can blanch the beans in advance, and partially cook the bacon beforehand, which means a quick 15-20 minutes in the oven is all you need to finish these off.

The original recipe I found here on Williams-Sonoma’s site.  I changed a few things and was amazed at the results.  The bacon becomes almost candied in the butter and maple syrup sauce, so these are a bit decadent but since you’re eating vegetables you’re going to be fine.  It’s Thanksgiving after all.  Nothing wrong with candied bacon on Thanksgiving.

I think these are adorable in their little individual bundles.  It does require more work, but nothing too intense.  With all the other sides you really only need one bundle per person, but make some extra just in case.

Rosemary and Maple Bacon Green Bean Bundles | Hottie Biscotti

With Thanksgiving just a week away I wish you happy and stress free meal planning, traveling, prepping, baking and cooking.  But most of all I wish you a Happy Thanksgiving and hope you thoroughly enjoy the day with family and friends!

Rosemary and Maple Bacon Green Bean Bundles

Makes about 12 servings

Ingredients

  • 1 1/2 pounds green beans (6-8 green beans per bundle)
  • 8 strips of thick-cut bacon cut in half crosswise, 16 pieces total
  • 4 tablespoons butter
  • 3 tablespoons maple syrup
  • 1/2 teaspoon salt
  • 1 teaspoon chopped fresh rosemary

Directions

  1. Trim and blanch the green beans: Trim the end off of the beans.  Boil a large pot of water and prepare a big bowl of ice water.  Cook the beans for 3-4 minutes until crisp-tender.  Drain, then plunge into the ice water.  Remove from the water and pat dry with towels.  Proceed with the recipe or store beans in the fridge for up to 1 day.
  2. Cook the bacon: Heat a skillet over medium heat and fry the bacon partially, about 1 1/2 minutes per side.  Do not let it get crispy or you won’t be able to wrap the bacon around the beans.  Proceed with the recipe or store the bacon in an airtight container for up to 1 day.
  3. Melt the butter and whisk in the syrup, salt and rosemary.
  4. Preheat the oven to 350°F and prepare two baking sheets by lining them with parchment paper.
  5. Wrap 6-8 green beans in one piece of bacon and lay on the parchment seam side down.  Repeat with all the beans.
  6. Drizzle each bundle lightly with the butter mixture.  You may have some leftover, which you can either drizzle on the beans or toss depending on how much sauce you want.
  7. Bake the bundles for about 15 minutes, until bacon is crisp.  Move to a platter and serve.

Carrots in Pistachio Herb Butter

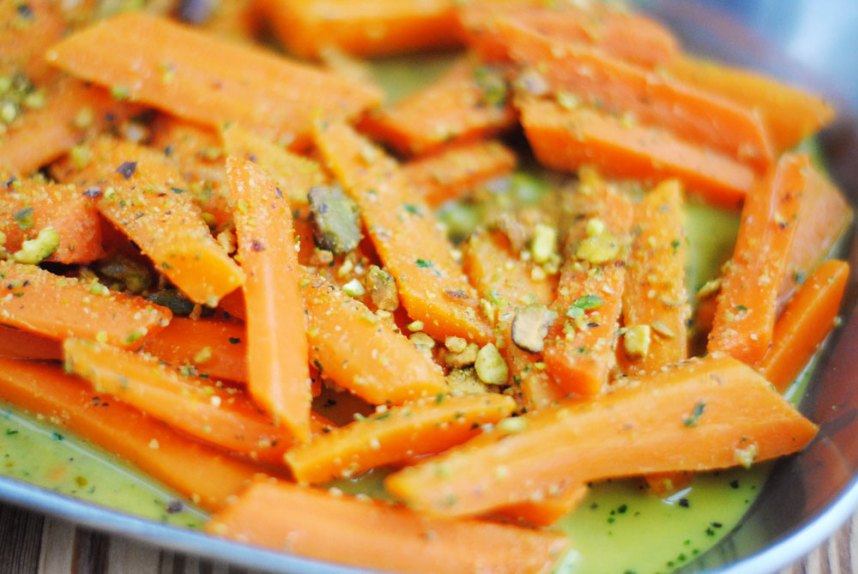
I whipped this butter up a month ago and after making a batch of these carrots I stashed it in the freezer.  Today I made another batch to serve 2 people, and next week I could use what remains of the butter to serve at least 8.  After making the butter all you have to do it cook the carrots, in small or large batches.  This is a terrific semi-make-ahead side dish.

pistachiocarrots4

The herb butter can be made well in advance which, if you’re a good planner, makes this a super simple side dish to serve at a holiday meal or on a busy weeknight.  I stored mine in the freezer for over a month and it was still great.

pistachiocarrots3 pistachiocarrots1

In addition to making the butter ahead you can prep the carrots up to two days in advance and store them in the fridge.  That makes finishing these a breeze, taking no more than 15 minutes.

I personally loved the flavors, but my husband wasn’t crazy about the combination of herbs and pistachio.  I’m still going to recommend this dish, though.  I found the flavors to be a nice change from the typical flavors in cooked carrots.  There is a slight bit of heat thanks to the hot sauce.  The crunch of the chopped pistachios on top is really nice and adds great texture contrast.  The herbs brighten things up, instead of weighing them down like brown sugar and butter do.

pistachiocarrots2

After cooking the carrots you drain the water, reserving some of it, and return the carrots to the pot.  Then you add in your desired amount of butter and some of the water to make a sauce.  The original recipe uses all of the butter for 3 pounds of carrots, but I used less and it was fine.  Add less than you think you need, stir with a little water (less is more here as well) taste and add more butter if you desire.  You may also want to season with salt.  Once in their serving dish sprinkle with the reserved pistachios.

Carrots in Pistachio Herb Butter

From Fine Cooking

Ingredients

  • 1/2 cup salted, roasted, shelled pistachios
  • 1/2 cup lightly packed fresh flat-leaf parsley leaves
  • 1 tablespoon packed fresh mint leaves
  • 1/2 stick (4 tablespoons) unsalted butter, softened
  • 1/2 ounce finely grated Parmigiano-Reggiano (1/2 cup)
  • 1 teaspoon finely grated lime zest
  • 4 to 6 drops Sriracha
  • Kosher salt
  • Carrots, peeled and cut into pieces about 2 inches long and 1/2 inch wide (1 pound serves 2-4. 3 pounds serves 6-10)

Directions

Make the Butter

  1. Coarsely chop the pistachios in a food processor. Set aside half of the nuts. Pulse the remaining nuts until they are very fine but not pasty.
  2. Add the parsley and mint, and pulse again until the herbs are finely chopped.
  3. Add the butter, cheese, zest, hot sauce, and 1 tsp. salt; pulse until well blended.
  4. If working ahead, scrape the butter onto plastic wrap, shape into a log, wrap, wrap in foil or parchment and freeze.  Seal the reserved pistachios in a small zip-top freezer bag or other airtight container and freeze.

Make the Carrots

  1. Put the carrots in a pot, add enough water to just cover them, and add a pinch of salt.
  2. Bring to a boil, cover, then reduce to a simmer and cook for 4-5 minutes until desired tenderness.
  3. Drain carrots, reserving 1/4 cup of the water.  Return to the pot and add butter (a chunk at a time adding a little water as you stir) until carrots are coated to your liking. Taste and season with salt if needed.
  4. Transfer to a serving dish and sprinkle with reserved pistachios.


Cauliflower Coconut Curry

The Fine Cooking magazine from October/November has a nice feature on cauliflower.  It includes ways to prep and prepare it along with a few recipes.  This tart is one of those recipes.  This curry is another.  I have a thing for coconut and curry, and so I was drawn to this recipe immediately.  I also love to find satisfying vegetarian dishes that we can work in to our meal schedule.  My husband didn’t miss the meat at all.  This one is a keeper.

Cauliflower Coconut Curry | Hottie Biscotti

There is quite a bit of chopping to be done, but it can all be done in advance and refrigerated until you’re ready to cook.  Once that is taken care of, this dish comes together easily.  You’re looking at 45 minutes cooking time in all, but more than half of that is simply simmering time.  Thanks to that simmering time your house will smell amazing.  The only downside there is that it will smell that way for hours, and waking up to the smells of curry you ate the night before isn’t amazing.  But it is worth it!

Cauliflower Coconut Curry | Hottie Biscotti

This reheats really well, so it’s a good choice for those of you cooking for one or two.  This will feed you for a couple of meals, and that’s definitely something I look for in a recipe these days.  I love leftover night.

The spices are warm and subtle.  The first taste is sweet and then the heat hits you at the end but is still more warm than spicy.  I didn’t have black mustard seed, so I didn’t use them and I thought this was still wonderful.  The coconut milk tones down the heat and adds sweetness as well as welcomed creaminess.  I used a whole jalapeno with a few seeds and it wasn’t overwhelming at all.  If you want it spicy make sure to use more of the seeds and membrane or even add a second jalapeno.

Cauliflower Coconut Curry | Hottie Biscotti Cauliflower Coconut Curry | Hottie Biscotti

The garnishes are necessary, in my opinion.  The yogurt is a nice cool contrast to the warm curry, the cilantro is the perfect herb to compliment the spices and the cashews add richness and crunch.  We ate this with warm naan which is perfect for soaking up the sauce.  Serving this on top of rice would also be delicious (and stretch it a bit).  I hope you try this dish!  My mouth is watering right now as I think about it and I’m considering getting some out of the fridge…and it’s 8 in the morning.  So you know it’s good.

Cauliflower Coconut Curry | Hottie Biscotti

Cauliflower Coconut Curry

From Fine Cooking

Ingredients

  • 2 tablespoons of butter + 1 tablespoon vegetable oil (use ghee if you have it)
  • 1 onion, cut into large dice
  • 2 red bell peppers (you could also use orange or yellow)
  • 1 jalapeno, chopped fine (as many or as few seeds as you’d like)
  • 1 2-inch piece of ginger, chopped fine (about 2 tablespoons)
  • 1 tablespoon curry powder
  • 2 teaspoons cumin seed
  • 1 cinnamon stick (2 inches)
  • 1 teaspoon salt
  • 1 28-ounce can diced tomatoes
  • 1/2 cup water
  • 1/4 cup raisins
  • 2 cloves garlic, smashed
  • 1 can coconut milk
  • juice of 1/2 lemon
  • 1 head cauliflower, cut into 1-2 inch florets
  • plain yogurt
  • chopped cashews
  • fresh chopped cilantro
  • naan or rice for serving

Directions

  1. Heat butter and oil in a large skillet over medium-high heat.  Add the onions, peppers, jalapeno, ginger, curry, cumin, cinnamon stick and salt.  Cook, stirring occasionally, until vegetables begin to soften and brown a bit.
  2. Add in the garlic and cook for 30 seconds, then add the tomatoes, water and raisins.  Bring to a simmer and cook for about 10 minutes.
  3. Stir in the coconut milk and 2 teaspoons of lemon juice.  Bring to a simmer, then lower the heat and cook until thickened, 10-15 minutes.
  4. Add in the cauliflower and mix together.  Cover. keep the heat on low and cook until cauliflower is tender, about 15 minutes.
  5. Remove the cinnamon stick.  Season with salt and lemon juice.  Serve with yogurt, cashews and cilantro.

Fall Vegetable Tart with Goat Cheese and Prosciutto

Fall is coming! Here in Southeast Texas we enjoyed a “cold front” this past weekend.  The mornings were slightly chilly and the days incredibly pleasant.  This week it’s humid and hot again.  But the promise of cooler weather is near.  And cooler weather means comfort food and cute coats and sweaters for my kids.

This fall tart recipe comes from the latest issue of Fine Cooking which I received last week and I’ve already made this twice.  I can see it appearing in our dinner rotation many more times in the coming months.  I love roasted vegetables.  I love goat cheese.  I love savory pie crust.  And so naturally, I love this tart.  It is incredible.

veggietart6

You can make this from start to finish in a couple of hours, or you can make the vegetables ahead of time and simply assemble and bake the tart when you’re ready.  I’ve done it both ways now.

The combination of vegetables (butternut squash, carrot, cauliflower and red bell pepper) is great.  The recipe calls for leeks, but I decided to use a yellow onion instead.  I didn’t make a great grocery list and ended up using my only onion in another dish so I left out the onion entirely.  The tart didn’t suffer a bit.  The measurements in the recipe below are from the magazine, but I didn’t really measure.  I’m sure I used a bit more, maybe heaping amounts of those listed here.

After roasting the vegetables you mix in a bunch of chopped proscuitto.  That’s magic right there.  Magic.

veggietart11

The dough is simply flour, butter, cream cheese and a pinch of salt.  It comes together in a food processor in no time and doesn’t need to be chilled before being rolled out.  However, this means you absolutely must roll it out onto parchment paper.  I made the mistake of rolling it out on the counter the first time and won’t do that again.  Since this is a rustic tart you don’t need to worry too much about how neat the edges of your dough are.

veggietart8

After you roll out your dough you spread some softened goat cheese on it.  Again, there’s magic happening in your kitchen right about now.  Be sure the goat cheese is room temperature or it will pull too much on the dough and rip it.  I know from experience.

veggietart10

On top of the cheese goes the vegetables.

veggietart1

Fold up the edges, brush with a beaten egg and bake.  I baked mine on a pizza stone the second time with great results, but a cookie sheet works well, too.

veggietart12

After cooling for a few minutes, slice and serve and enjoy.  It’s so amazing warm, but I ate a slice cold from the fridge as I was running out the door at lunchtime and it was still delicious.  As far as reheating goes you need to be prepared for a slightly soggy bottom crust.  But again, still delicious.  If you’re serving this to at least 4 people you probably won’t need to worry about leftovers, though.

veggietart9

Fall Vegetable Tart with Goat Cheese and Prosciuttio

From Fine Cooking

Ingredients

Dough

  • 6 ounces (1 1/3 cups) flour
  • 6 ounces (1 1/2 sticks) cold butter cut into chunks
  • 6 ounces cold cream cheese (low fat is fine) cut into chunks
  • 3/4 teaspoon salt
  • 1 beaten egg for egg wash

Filling

  • olive oil
  • 1 1/2 cups butternut squash cut into 1/2 inch cubes
  • 3/4 cup sliced carrots (1/2 inch thick half moons)
  • 3/4 cup sliced leek (optional)
  • 3/4 cup chopped red bell pepper
  • 3/4 cup chopped cauliflower
  • 1 tablespoon finely chopped fresh rosemary
  • 2 teaspoons chopped fresh thyme
  • kosher salt and pepper
  • 4 ounces thinly sliced prosciutto, cut in to bite sized pieces
  • 4 ounces goat cheese, room temperature

Directions

Filling

  1. Preheat oven to 375°F.
  2. Toss the vegetables together with rosemary, thyme 3/4 teaspoon salt and 1/2 teaspoon pepper and a drizzle of olive oil.
  3. Transfer to a 9×13 pan, cover tightly with foil and roast for 30-40 minutes until just fork tender.
  4. Let cool for 10-15 minutes then add in the prosciutto.

Dough

  1. Put flour, butter, cream cheese and salt in the bowl of a food processor and pulse until the dough just begins to come together.
  2. Place a large piece of parchment on the counter and sprinkle with a little flour.  Turn dough out onto the parchment and bring together with your hands, sprinkling with more flour if needed.
  3. Roll dough out onto the parchment into a roughly 16-inch round.

Assemble

  1. Preheat oven to 400°F.
  2. Transfer parchment to a cookie sheet or pizza stone and trim any excess parchment that hangs off the sheet or stone.
  3. Spread goat cheese onto the dough leaving a 1 1/2 inch border.
  4. Pile vegetable evenly on top of the goat cheese.
  5. Fold edges of the dough over the vegetables, then brush with beaten egg.
  6. Bake for 35-45 minutes.  Let cool for 10 minutes before slicing and serving.


Squash and Carrot Casserole with Feta and Parmesan

Slowly but surely I am getting back into the groove of making a proper dinner.  This dish has a pretty quick prep time and you can even put it together earlier in the day and bake it later.  It can be a side or your main dish.  So even on a busy weeknight you can have dinner together without much fuss.  And you can use up any summer squash you might have around!

Once at a pot luck dinner a friend brought this amazing, creamy, cheesy squash casserole.  She described the ingredients to me, but I never got the entire recipe.  When I saw this squash casserole on Pinterest I had to give it a try because it looked so similar. Squash and Carrot Casserole with Feta and Parmesan | Hottie Biscotti This casserole is different.  Less creamy and cheesy, more focus on the vegetables, which is really nice.  It’s flavorful, clean tasting, and delicious.  One of the main differences is that this one doesn’t use condensed cream soup, something I really have nothing against, but something that I don’t mind finding a replacement for if I can.  The original recipe calls for eggs and sour cream as the binders.  I used the eggs, but substituted greek yogurt and it turned out really well.

The feta gives a nice punch to the dish.  I mixed in some shredded carrots to add extra veggies and to help with some fridge clean out.  This is a really great side dish.  I served it with grilled pork tenderloin and bread.

The thyme is a great herb here, you can use fresh or dried.  I used a mixture of green and yellow squash, but you can use all of one type of course.  And something I think I might try next time is using goat cheese instead of feta because I love me some goat cheese.  Enjoy! Squash and Carrot Casserole with Feta and Parmesan | Hottie Biscotti

Squash and Carrot Casserole with Feta and Parmesan

Adapted slightly from Kitchen Escapades Serves 4-6 as a side dish Ingredients

  • 5-6 squash (mix of zucchini and yellow squash) sliced
  • 3-4 grated carrots
  • olive oil
  • 4 cloves of garlic, minced
  • 1 tablespoon of fresh thyme (or 2 tsp dried)
  • 2 eggs
  • 1 cup greek yogurt
  • heaping half cup of crumbled feta
  • 1/4 cup grated parmesan cheese
  • salt and pepper

Directions

  1. Preheat oven to 350°F.
  2. In a large saucepan heat a drizzle of olive oil over medium high heat.
  3. Add in the squash and cook for a few minutes.  Add in the carrots and garlic and cook, stirring to keep the garlic from burning, until the squash just begins to soften.  Season with salt and pepper and remove from the heat.
  4. In a medium bowl whisk eggs and yogurt, then stir in the feta and parmesan.  Season with a little salt and pepper.
  5. Spray a baking dish with cooking spray and layer half of the squash in the pan.  Spread half of the yogurt mixture on top, then layer again with squash and then yogurt.  Sprinkle with a little extra feta if you have some!
  6. Bake for 45 minutes until top is golden brown.  Serve warm.  This reheats well for a light lunch.

Mexican Street Corn Off the Cob

There is a taco place that originally opened in Austin called Torchy’s.  They have this incredible street corn that I get every time we go.  It is so very delicious.  The corn is crisp and flavorful.  And then there’s this ancho aioli that they put on top with the cilantro and cheese that makes this corn dish truly amazing.  Please try it if you ever find yourself at a Torchy’s in Austin, Dallas or Houston (and apparently Waco, Lubbock and soon College Station!).  And Torchy’s, I’d like that ancho aioli recipe…

I love the idea of street corn on the cob.  It’s also beautiful, all those lovely corn cobs lined up on a platter.  But I think it’s hard to eat and when I’ve had it I find that all the yummy toppings fall off and that makes me sad.  This way you can get the flavors of street corn without the mess or the sadness!

Mexican Street Corn | Hottie Biscotti

I have to honest with you.  This corn is not the same and not quite as good as Torchy’s but it’s still delicious and you can make it at home!  After looking through a few recipes for street corn, esquites, elotes en vaso, and other similar dishes with names I sound like a fool pronouncing, I came up with this recipe.  A good thing to remember when putting this together is to taste as you go and adjust the amounts according to what you like.  If you want your corn extra creamy, use more crema, if you want it more or less spicy, adjust the chipotle.  Adjust the lime juice as well.  If you use queso fresco like I did, you may need a pinch or so of salt.  If you use cojita cheese (which I unfortunately could not find) then you may not need the extra salt since it’s a saltier cheese.

Mexican Street Corn | Hottie Biscotti

Mexican Street Corn | Hottie Biscotti

As people serve themselves they can garnish with as much cilantro, chili powder and cheese as they’d like.  You can leave out the chipotle all together and serve it as a condiment as well, making sure to let everyone know that a little goes a long way!  When Ben and I were newlyweds I made a meal for him that was so heavy on the chipotle that it was almost inedible.  So be careful!

I sauteed the corn in a skillet, but you can boil it or grill it and then cut it off of the cob.  I prefer it with a little color and roasted flavor so grilling or sauteing in a hot skillet would be the best way to go.  I cut the corn off of 5 cobs and got about 2 cups of corn and it will serve about 4 as a small side dish.  Just increase or decrease the amount of corn for the people you plan to be serving.

You can make this earlier in the day, just up to the point where you mix the corn, butter, crema, chipotle and lime juice.  Refrigerate then reheat over medium-low heat until hot, stirring frequently.  Then you can serve and garnish the cups.

Mexican Street Corn | Hottie Biscotti

Street Corn Off the Cob

Serves 4

Ingredients

  • 5 ears of corn, husked and corn cut off the cobs
  • 2 tablespoons of butter
  • kosher salt
  • 2-3 tablespoons of crema mexicana (could also use sour cream or mayonnaise)
  • 1-2 tablespoons of lime juice (plus a few extra wedges for serving)
  • 1 minced chipotle pepper mixed with 3 teaspoons of sauce from a can of chipotles in adobo sauce
  • queso fresco (or cojita cheese)
  • chili powder
  • cilantro, roughly chopped

Directions

  1. Heat a cast iron skillet over high heat and add in the corn.  Cook for 3-4 minutes, stirring just a few times so that the corn has an opportunity to char a bit.
  2. Remove from the heat and add in butter and salt and stir until butter has melted.
  3. Place corn in a bowl and stir in 1 tablespoon of crema and 1 tablespoon lime juice.  Taste and add more crema and/or lime juice.  Taste and season if needed.  Stir in 1 teaspoon of the chipotle, taste and add more if needed.
  4. Divide into cups and garnish with queso fresco, a sprinkle of chili powder and a few cilantro leaves.  Serve with lime wedges.


Coca Cola Hoisin Pork Chops with Baby Bok Choy

When I read a tip that came out of America’s Test Kitchen I immediately believe it and put it to use.  When I read a recipe from America’s Test Kitchen I believe it must be amazing and have the best methods of cooking whatever it is.  I’d like to get a job there.  Or at least spend a day or two there, just observing the amount of thought, effort, time and testing that goes into everything.  It makes me kind of excited to think about it all!

They do what I only wish I had the time, money, energy and intelligence to.  Want to know the best kind of cookie sheet to buy?  Ask the test kitchen.  They’ve already put all the brands out there through a battery of tests and know which gives the best browning and texture while not warping in the oven and doesn’t cost a fortune.  Want to know the best kind of cocoa powder?  Ask the test kitchen.  They’ve already tasted and baked with them all.  You won’t have to make a bad batch of chocolate cookies that burned on your poor quality cookie sheets!  Now some people don’t like the specificity and scientific bent in their articles and think that maybe they’re too engrossed in the food or the recipe to consider the home cook.  Like who has time to check the temperature of their butter before they use it in the perfect pound cake?  I’ve made that pound cake, and I took its temperature and it was spectacular.  But does it make that much of a difference?  If the test kitchen says so, then it must.

The only reason I bring it up is that this recipe came from a cookbook from The Test Kitchen called The Six-Ingredient Solution.  What a genius idea!  I love when a recipe is uncomplicated in its ingredients.  It makes grocery shopping and life just a little bit easier.  But I guess this actually has 8 including pepper and water called for in the directions…still 8 ingredients ain’t bad.  And they turn out a stellar dinner.

photo 1 (30)

I don’t cook pork chops.  I’ll often cook a pork tenderloin in the oven or Ben will grill one.  I worry about under-cooking pork, and so in an effort to not under-cook it I end up worrying about over-cooking it and making it dry and tough.  I am happy to say that this meal yielded really delicious pork chops that were cooked pretty well.  I got the thumbs-up from Ben on it!  But I did have trouble getting it to temperature during the searing.  I did 3 minutes per side and it was only at 120°F.  Once it got to 130 I took it off and let it cook the rest of the way in the sauce, which worked well.  It’s not the way they instruct in the original recipe, but it worked for me.

I’ve never cooked bok choy before, and I think I’ve only had it once or twice.  So this was a step out of my comfort zone in more than one way.  It cooks quickly and has good amounts of vitamins A and C.  I really enjoyed it and found it to be a perfect side for this meal.  Some people may not be a fan of the texture.  Sub broccoli for the bok choy if you’d like.  Steam it and serve it on the side.

I HAVE cooked rice before.  Lots of rice.  So it was the only part of the meal I was able to put on the stove and know was going to be edible.  And, to be honest, I kind of liked the thought of a big bowl of buttered rice for dinner.  But what we had was much better and more well balanced.

The sauce is amazing, and how could it not be?  It’s delicious on the pork, bok choy and rice.  I think it would be a great sauce for chicken as well.  The sauce ingredients here are what they call for for 4 chops and 4 bok choy, so if you do decide to make this recipe for 4, I’d suggest doubling the sauce.  You might end up with extra, but it would be a shame to run out!  Enjoy!

Coca Cola Hoisin Pork Chops with Baby Bok Choy

From America’s Test Kitchen

Serves 2

Ingredients

  • 1 3/4 cups sushi (short grain) rice
  • 2 thick cut bone-in pork chops (8 ounces, 3/4 inch thick)
  • 2 heads baby bok choy
  • 1 cup coca cola
  • 1/3 cup hoisin sauce
  • 2 tablespoons vegetable oil
  • black pepper

Directions

  1. Halve bok choy lengthwise and set aside.
  2. Pat pork chops dry with paper towels, then cut 2 small slits through the fat on the side of each pork chop.  Season both sides with ground black pepper and set aside.
  3. Whisk cola, hoisin and 2 tablespoons of water in a bowl and set aside.
  4. Combine rice with 2 1/4 cups of water and a pinch of salt in a medium sized saucepan.  Bring to a boil then cover and reduce heat to low.  Simmer for 10 minutes then remove from the heat and let sit, covered, for 15 minutes.
  5. While rice is cooking, heat 1 tablespoon of oil in a large skillet over high heat.  Add bok choy, cut side down.  Watch out for oil spatters!  Cook for 1 to 2 minutes, then add 2 tablespoons of water, cover and cook for another minute until stems are just tender.  Transfer to a plate and cover.
  6. Wipe out the skillet with paper towels and adjust heat to medium high.  Heat 1 tablespoon oil in the skillet, then add pork chops and cook 3-5 minutes per side, until the temperature is 130-135, then move to a plate.
  7. Wipe out skillet again, keep heat at medium high and add the cola mixture.  Whisk until slightly thickened then add chops and any juice on the plate back to the pan.  Turn the chops to coat them with the sauce, then cover and cook for 2-3 minutes.  Check temperature of the chops, they should register 145°F.
  8. Plate chops, bok choy (pretty browned sides up) and rice.  Drizzle bok choy with sauce from the pan.  Serve with extra sauce.

Kale Salad with Roasted Beets, Cranberries, Almonds and Feta

A good friend of mine gifted me with a free local produce box from Greenling.  Greenling is an Austin based company that now also operates in the Dallas, San Antonio and Houston areas.  They make organic, local produce more easily accessible and do a great job of it.  They even delivered my box to my front door, and we live way out in the burbs.  In my lovely local box was a bunch of kale and 3 huge beets, along with some other treasures.  I immediately knew what would become of the kale and beets.

kaleandbeetsalad

I loved this salad.  We ate it as a side dish the night I made it and I ate it for lunch the next three days in a row.  Kale holds up so well that it was delicious every time, not soggy and droopy like salads can get after being dressed and stored overnight.  It was probably better after a night in the fridge, so you can always make it ahead of time.  Maybe leave out the almonds so they stay crunchy, and leave out the feta if you don’t want it to be pink!

The beets provide great color and earthiness, but if you don’t like beets add in some shredded carrots, chopped apples or pear.  Use golden raisins in place of the cranberries, toasted walnuts or pine nuts instead of the almonds.  I like to play around with the dressing also, different kinds of vinegar, honey instead of agave, orange juice instead of lemon.  Just start with a big bunch of kale and add in what you like and what you have on hand!  Enjoy!

Kale Salad with Roasted Beets, Cranberries, Almonds and Feta

Ingredients

Salad

  • 2 large beets
  • 1 teaspoon fresh thyme leaves
  • olive oil
  • kosher salt and pepper
  • 1 bunch of kale, stalks removed and leaves roughly chopped
  • 1/4 to 1/2 cup dried cranberries
  • 1/4 to 1/2 cup roasted almonds, roughly chopped
  • 4 ounces of feta cheese

Dressing

  • 2 tablespoons olive oil
  • 2 tablespoons balsamic vinegar
  • 2 tablespoons white wine vinegar
  • 1 lemon, juiced
  • 1 tablespoon dijon mustard
  • 1 tablespoon agave nectar
  • 1 garlic clove, grated on a microplane or very finely chopped
  • kosher salt and pepper

Directions

  1. Roast the Beets: Preheat oven to 400°F.  Peel the beets and cut them into 1 inch chunks.  Spread them onto a rimmed baking sheet and drizzle with olive oil, sprinkle with salt, pepper and thyme and toss to coat.  Roast for 40 minutes, turning twice, until they are fork tender.  Remove from the oven and let cool.  You can do this ahead of time and store the beets in a container in the fridge for a day or two.
  2. Make the dressing: Combine all ingredients and whisk well, season with salt and pepper and taste, adjust to your liking.
  3. Combine kale with half of the dressing and toss well (your clean hands work well for this!)  Add more dressing if it seems dry, but be careful not to overdress.
  4. Add in cranberries, beets, feta and almonds.  Toss gently so you don’t break up the feta too much.
  5. Serve immediately or let sit in the fridge for a few hours to let flavors marry and allow the kale to soften a bit.

Roasted Broccoli and Cauliflower

Roasted vegetables are fall perfection.  Anytime of the year perfection for me, really.  But fall and winter seem to be better for the rich and warm flavors and the delicious caramelization of the veggies that takes place in the oven.  One of my favorite things about them is their versatility.  You can use your favorite vegetables.  My favorite combination includes brussels sprouts, sweet potato, onion and cauliflower.  I can’t think of a better side dish, can you?  If you’re still planning your Thanksgiving menu, consider roasting a big tray of vegetables.  You can do all of your prep, including tossing with the oil and salt, the night before.  Refrigerate and roast right before dinner.

After starting this lovely dish in the crock pot I started thinking about what we would eat with it.  I decided on brown rice and salad.  But then I remembered that we had broccoli and cauliflower already cut up and just waiting to be transformed into something magical.  I was honestly pretty worried about roasting the broccoli with my normal method.  I’ve done it before and felt like the ends got too blackened and crunchy, even for me.  So I looked up a recipe for roasted broccoli and found this from Ellie Krieger.  As luck would have it, this particular recipe uses broccoli and cauliflower.  Perfect.

We loved these.  I ate the remainder of them for lunch the next day straight from the fridge.  One of the reasons they were so good is the garlic.  I smashed whole cloves and mixed them in with the vegetables.  If you cut the garlic too small, it burns.  I learned that lesson the hard way!  The garlic mellows enough through the cooking process to not be an unwelcome addition to your bite.  Cooking the vegetables covered allows them to steam before roasting, which keeps the broccoli from burning on the tips and cooking unevenly.  I will probably try this method with my normal line up of vegetables the next time I roast them.  However, I think you could get by with less covered steam cooking, maybe 20 minutes covered and 30-40 uncovered?  I’ll mess with that and see how it goes.

Roasted Broccoli and Cauliflower

From Ellie Krieger

Ingredients

  • 1 small head cauliflower (2 pounds), cut into florets
  • 2 large stalks broccoli (1 pound), cut into florets
  • 1 head garlic, broken into cloves, peeled and smashed but still intact
  • 2 to 3 tablespoons olive oil
  • 1/2 to 1 teaspoon salt

Directions

  1. Preheat the oven to 375°F.
  2. Place cauliflower and broccoli into a 9 by 13 inch baking dish, toss with the olive oil, and sprinkle with salt.
  3. Cover the dish with foil and bake for 1/2 hour.
  4. Remove the foil, stir and cook for 30 to 40 minutes more, until vegetables are tender and nicely browned, stirring occasionally.