side dish

Cauliflower & Chickpea Salad with Feta, Pine Nuts and Arugula

Fall is coming and with it the return of the roasted vegetable at our house!  Summer is just too hot to have the oven on at high temps for too long, so I rarely if ever roast veggies during the summer months.  There’s been a touch of cool weather in the mornings here recently, so it was time to bring back the glory that is the roasted veggie!  But since it is still pretty warm a cool, fresh salad is the perfect way to enjoy them.

Chickpea Salad-5

Cauliflower is not something I enjoy much in its raw state unless it is drenched in good ranch dressing. But when roasted with olive oil, salt, pepper and some garlic it is transformed in to something super amazing.  Here it also gets a tasty boost from cumin, which makes it next to impossible to resist snacking on before mixing it in with the rest of the ingredients for this salad.

Chickpea Salad-9 Chickpea Salad-10

The cauliflower gets combined with chickpeas, feta and pine nuts then tossed with a citrusy sumac dressing and peppery arugula.  Sumac is a spice I’d never heard of before reading this recipe in the most current issue of Fine Cooking.  I couldn’t find it at my grocery store and had to order it from amazon.  If you don’t have it or can’t find it, don’t worry.  It’s a nice spice and goes very well with all the flavors in the salad, but I didn’t find it to be a stand out in the dressing.  It may not be the same without the sumac, but it will still be great.

I served this along side pork tenderloin and crusty bread the night I made it.  The next couple days I ate it with some additional arugula and spring mix for a super satisfying lunch.  The arugula will get wilted, so adding in some new lettuce is a good way to keep it fresh.  If you wanted to make this ahead of time you could toss everything together except for the arugula and refrigerate it overnight.  Toss with the arugula right before serving and enjoy!

Chickpea Salad-4

Cauliflower & Chickpea Salad with Feta, Pine Nuts and Arugula

From Fine Cooking

Ingredients

  • 1 large head cauliflower (about 2-1/4 lb.), trimmed and cut into 1-inch florets
  • 5 tablespoons olive oil
  • 1 teaspoon ground cumin
  • Kosher salt and freshly ground black pepper
  • 3 tablespoons fresh lemon juice
  • 1 small clove garlic, minced
  • 2 teaspoons sumac
  • 1 can chickpeas, rinsed and drained
  • 5 ounces baby arugula
  • 3 ounces crumbled feta (1/2 cup)
  • 1/3 cup dried currants (I did not use these)
  • 1/4 cup toasted pine nuts

Directions

  1. Preheat oven to 425°F.  On a large rimmed baking sheet toss cauliflower with a good drizzle of olive oil, salt, pepper and the cumin.  Roast for 20-25 minutes, tossing halfway through, then remove from the oven and let cool.
  2. In a large bowl whisk together lemon juice, sumac, garlic, 1/2 teaspoon of salt and some fresh ground pepper, then whisk in 3 tablespoons of olive oil.
  3. Add the cauliflower, chickpeas, pine nuts, currants (if using), and feta to the dressing and toss together.  Refrigerate now to server later or toss with the arugula and serve.

Brussels Sprout Salad with Pine Nuts and Cherries

I’ve made this salad twice now.  It’s so delicious.  These pictures don’t do it justice, but trust me.  Yum!  It’s a great change of pace from the typical spring mix salad that graces out table most nights.

Brussels Sprout Salad with Pine Nuts and Cherries | Hottie Biscotti

Many side items can be made in advance, but this one requires you to make it ahead of time!  This is great for me.  I do a lot of dinner prep (or at least I try to) during nap time, and having part of the meal totally completed early in the day puts a little spring in my step.  It’s the little things, you guys!

The first time I made this I used pistachios and cherries, and this last time I used pine nuts and cherries.  Both variations were great, just depends on what you have and what you like.  You could easily leave out the nuts, use something else, and even replace the cherries with cranberries.  I wouldn’t use anything other than the parmesan, though.  The flavor is perfect with the brussels and it has a great texture that other cheeses lack.  Any hard cheese will do.  Make sure to grate it on the large holes of your grater.

The recipe is from a Test Kitchen Best of 2015 magazine I picked up at the grocery store.  The original recipe feeds 8, so I cut it in half.  While I could sit and eat the entire bowl of this by myself, it will feed 4 as a side dish.  The first time around my husband and I ate it as a side 2 nights in a row.  This last time I made it I ate it for lunch a couple days.  You need to let the salad marinate for a few hours so that the brussels soften a bit.  It is best the day it’s made, but this will last for a couple days in the fridge.

Brussels Sprout Salad with Pine Nuts and Cherries | Hottie Biscotti


Take the time to thinly slice the brussels.  Put some good music on or put something good on tv (may I suggest the Unbreakable Kimmy Schmidt?!) and get to work with your paring knife.  Sometimes tedious work like this is therapeutic for me.  Other than that, there isn’t too much work to be done.  I made the dressing in a mini food processor, eliminating the need to finely chop the shallot and garlic.

This is a great spring salad with lots of ways to make it your own.  Enjoy!

Brussels Sprout Salad with Pine Nuts and Cherries | Hottie Biscotti

Brussels Sprout Salad with Pine Nuts and Cherries

From America’s Test Kitchen Best of 2015

Ingredients

  • 2 tablespoons lemon juice
  • 1 tablespoon dijon mustard
  • 1/2 shallot
  • 1/2 garlic clove
  • salt and pepper
  • 2 tablespoons olive oil
  • 1 pound Brussels sprouts, ends trimmed, halved and thinly sliced
  • 1/4 cup pine nuts, toasted
  • 1/4 cup dried cherries, chopped
  • 1/4- 1/2 cup coarsely grated Parmesan

Directions

  1. In a mini food processor combine garlic and shallot and finely chop.  Add in the lemon juice, mustard and olive oil and pulse a few times.  Season with salt and pepper.
  2. In a large bowl toss the Brussels with the dressing, cover and refrigerate for at least an hour.  Before serving toss in the pine nuts, cherries and Parmesan.

Rosemary and Maple Bacon Green Bean Bundles

I offered to bring a few things to Thanksgiving with my in-laws this year, including these rolls, a pie (still undecided on what I’m going to do) and a green bean dish.  I thought about doing these green bean salads, but my sister-in-law is bringing a green salad and I didn’t want to double up.  So I went in search of a green bean dish that wasn’t a rich heavy casserole, even though I love the stuff, but was still special.  These green bean bundles are the perfect compromise.

Rosemary and Maple Bacon Green Bean Bundles | Hottie Biscotti

I wanted something that wasn’t going to occupy too much stove or oven space and wouldn’t take too long.  You can blanch the beans in advance, and partially cook the bacon beforehand, which means a quick 15-20 minutes in the oven is all you need to finish these off.

The original recipe I found here on Williams-Sonoma’s site.  I changed a few things and was amazed at the results.  The bacon becomes almost candied in the butter and maple syrup sauce, so these are a bit decadent but since you’re eating vegetables you’re going to be fine.  It’s Thanksgiving after all.  Nothing wrong with candied bacon on Thanksgiving.

I think these are adorable in their little individual bundles.  It does require more work, but nothing too intense.  With all the other sides you really only need one bundle per person, but make some extra just in case.

Rosemary and Maple Bacon Green Bean Bundles | Hottie Biscotti

With Thanksgiving just a week away I wish you happy and stress free meal planning, traveling, prepping, baking and cooking.  But most of all I wish you a Happy Thanksgiving and hope you thoroughly enjoy the day with family and friends!

Rosemary and Maple Bacon Green Bean Bundles

Makes about 12 servings

Ingredients

  • 1 1/2 pounds green beans (6-8 green beans per bundle)
  • 8 strips of thick-cut bacon cut in half crosswise, 16 pieces total
  • 4 tablespoons butter
  • 3 tablespoons maple syrup
  • 1/2 teaspoon salt
  • 1 teaspoon chopped fresh rosemary

Directions

  1. Trim and blanch the green beans: Trim the end off of the beans.  Boil a large pot of water and prepare a big bowl of ice water.  Cook the beans for 3-4 minutes until crisp-tender.  Drain, then plunge into the ice water.  Remove from the water and pat dry with towels.  Proceed with the recipe or store beans in the fridge for up to 1 day.
  2. Cook the bacon: Heat a skillet over medium heat and fry the bacon partially, about 1 1/2 minutes per side.  Do not let it get crispy or you won’t be able to wrap the bacon around the beans.  Proceed with the recipe or store the bacon in an airtight container for up to 1 day.
  3. Melt the butter and whisk in the syrup, salt and rosemary.
  4. Preheat the oven to 350°F and prepare two baking sheets by lining them with parchment paper.
  5. Wrap 6-8 green beans in one piece of bacon and lay on the parchment seam side down.  Repeat with all the beans.
  6. Drizzle each bundle lightly with the butter mixture.  You may have some leftover, which you can either drizzle on the beans or toss depending on how much sauce you want.
  7. Bake the bundles for about 15 minutes, until bacon is crisp.  Move to a platter and serve.

Haricots Vert Salad with Blue Cheese, Pecans and Cranberries

There is a special place in my heart for creamy green bean casserole.  The kind with the canned crunchy fried onions, and the canned cream of mushroom soup.  You know what I’m talking about, and if you don’t you should try it at least once.  But sometimes that Thanksgiving meal can be a little heavy on the creamy casseroles and you want (and likely need) something light and refreshing in the mix to balance things out.  This salad is a delicious way to provide some balance in your meal while still keeping is special.

Haricots Verts Salad with Blue Cheese, Pecans and Cranberries | Hottie Biscotti

Something about the combination of warm toasted pecans, tangy sweet cranberries and robust blue cheese just sings of the season we’re entering.  The weather is cooler and richer flavors are in order.  Although, I’d eat this salad in the summertime with no problem.

Haricots Verts Salad with Blue Cheese, Pecans and Cranberries | Hottie Biscotti

You can serve these as lovely first course salads on individual salad plates, or arrange them on a large platter and allow guests to serve themselves.  The bibb lettuce leaves hold up well, so there’s little need to worry about them tearing, unless they’ve been sitting too long so don’t prepare them all the way too far in advance.  If you’re really needing this to be a quick and painless salad you can tear up a bunch of bibb lettuce, toss in the dressed beans, cranberries, blue cheese and pecans and serve this as a large serve-yourself salad.  You might want to double the dressing if you plan to serve it that way, though.

Haricots Verts Salad with Blue Cheese, Pecans and Cranberries | Hottie Biscotti

You can cook the beans up to 2 days ahead and keep them in the fridge.  The beans also hold up well in the fridge after being dressed, so you can prepare them up to that point hours ahead of time, but not longer than a day.  Mix in the cranberries, but not the blue cheese or pecans, they’ll get soggy if they sit too long.  Sprinkle on the blue cheese and pecans right before serving.

I tend to under-dress salads when serving them to a group.  I hesitated to add all the dressing to the beans, but it was the perfect amount.  There’s just enough that drips off onto the lettuce.

Haricots Verts Salad with Blue Cheese, Pecans and Cranberries | Hottie Biscotti

Haricots Verts Salad with Blue Cheese, Pecans and Cranberries

From Fine Cooking

Serves 6

Ingredients

  • 1/2 pound haricots verts (french green beans) cut into 1/2 inch pieces
  • 1 tablespoon white wine vinegar
  • 1/4 teaspoon dijon mustard
  • 2 tablespoons olive oil
  • salt and pepper
  • 1/2 cup chopped pecans, toasted
  • 1/3 cup dried cranberries
  • 1/4 to 1/3 cup crumbled blue cheese
  • 6 large bibb lettuce leaves, washed and dried

Directions

  1. Bring a medium sized pot of water to a boil and prepare a large bowl of ice water.  Add the beans and cook until crisp-tender, 3-4 minutes.  Drain the beans, then plunge them into the ice water to stop the cooking.  Drain again, pat dry and move to a bowl.  If making ahead, place beans in an airtight container and put them in the fridge for up to 2 days.
  2. Prepare the dressing by whisking together the vinegar, mustard and olive oil.  Season with a pinch of salt and pepper.
  3. Toss beans and cranberries in the dressing to coat evenly.  You can refrigerate the beans at this point for up to 1 day.
  4. To serve: divide beans evenly among the lettuce leaves and sprinkle each with pecans and blue cheese.

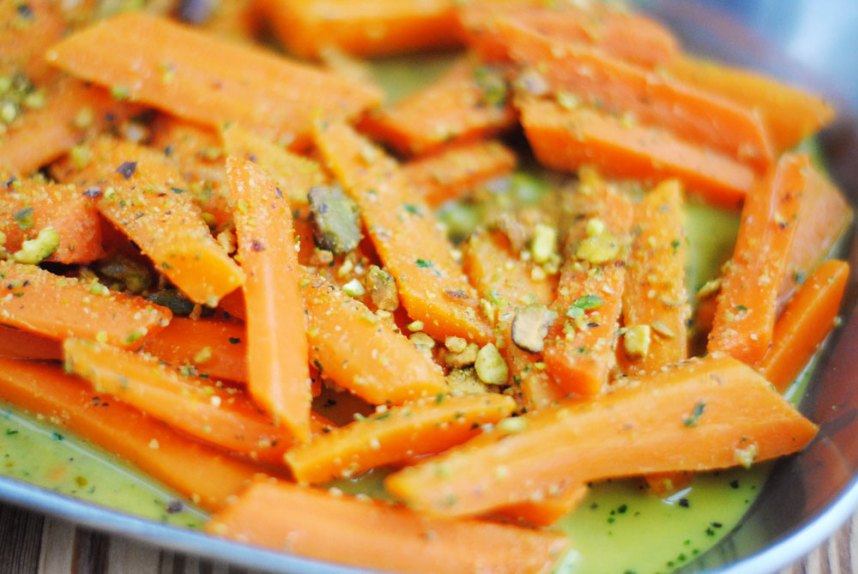
Carrots in Pistachio Herb Butter

I whipped this butter up a month ago and after making a batch of these carrots I stashed it in the freezer.  Today I made another batch to serve 2 people, and next week I could use what remains of the butter to serve at least 8.  After making the butter all you have to do it cook the carrots, in small or large batches.  This is a terrific semi-make-ahead side dish.

pistachiocarrots4

The herb butter can be made well in advance which, if you’re a good planner, makes this a super simple side dish to serve at a holiday meal or on a busy weeknight.  I stored mine in the freezer for over a month and it was still great.

pistachiocarrots3 pistachiocarrots1

In addition to making the butter ahead you can prep the carrots up to two days in advance and store them in the fridge.  That makes finishing these a breeze, taking no more than 15 minutes.

I personally loved the flavors, but my husband wasn’t crazy about the combination of herbs and pistachio.  I’m still going to recommend this dish, though.  I found the flavors to be a nice change from the typical flavors in cooked carrots.  There is a slight bit of heat thanks to the hot sauce.  The crunch of the chopped pistachios on top is really nice and adds great texture contrast.  The herbs brighten things up, instead of weighing them down like brown sugar and butter do.

pistachiocarrots2

After cooking the carrots you drain the water, reserving some of it, and return the carrots to the pot.  Then you add in your desired amount of butter and some of the water to make a sauce.  The original recipe uses all of the butter for 3 pounds of carrots, but I used less and it was fine.  Add less than you think you need, stir with a little water (less is more here as well) taste and add more butter if you desire.  You may also want to season with salt.  Once in their serving dish sprinkle with the reserved pistachios.

Carrots in Pistachio Herb Butter

From Fine Cooking

Ingredients

  • 1/2 cup salted, roasted, shelled pistachios
  • 1/2 cup lightly packed fresh flat-leaf parsley leaves
  • 1 tablespoon packed fresh mint leaves
  • 1/2 stick (4 tablespoons) unsalted butter, softened
  • 1/2 ounce finely grated Parmigiano-Reggiano (1/2 cup)
  • 1 teaspoon finely grated lime zest
  • 4 to 6 drops Sriracha
  • Kosher salt
  • Carrots, peeled and cut into pieces about 2 inches long and 1/2 inch wide (1 pound serves 2-4. 3 pounds serves 6-10)

Directions

Make the Butter

  1. Coarsely chop the pistachios in a food processor. Set aside half of the nuts. Pulse the remaining nuts until they are very fine but not pasty.
  2. Add the parsley and mint, and pulse again until the herbs are finely chopped.
  3. Add the butter, cheese, zest, hot sauce, and 1 tsp. salt; pulse until well blended.
  4. If working ahead, scrape the butter onto plastic wrap, shape into a log, wrap, wrap in foil or parchment and freeze.  Seal the reserved pistachios in a small zip-top freezer bag or other airtight container and freeze.

Make the Carrots

  1. Put the carrots in a pot, add enough water to just cover them, and add a pinch of salt.
  2. Bring to a boil, cover, then reduce to a simmer and cook for 4-5 minutes until desired tenderness.
  3. Drain carrots, reserving 1/4 cup of the water.  Return to the pot and add butter (a chunk at a time adding a little water as you stir) until carrots are coated to your liking. Taste and season with salt if needed.
  4. Transfer to a serving dish and sprinkle with reserved pistachios.


Orzo Salad with Chickpeas, Tomatoes, Herbs and Feta

I have three of the best sisters on the planet.  I was lucky enough to have two of them down to visit a couple weeks ago.  We are all different, but we all share an interest in food and cooking.  When a holiday or party is coming up we often menu plan together.  Lindsey and Sarah found this recipe for an orzo salad while they were visiting and it was the perfect side dish for the steak Ben grilled for dinner.  I made it again the following weekend when my parents were in town and it was a hit yet again!  This salad is simple and delicious and a great choice for a summer side dish.

ORZO SALAD WITH CHICKPEAS, TOMATOES, HERBS AND FETA | Hottie Biscotti

This salad comes together quickly, can be prepared ahead, and can be served room temperature or cold, making it a really convenient dish.  You can adjust the ingredients to your liking.  I used a lot of tomatoes and herbs, with a small amount of dressing and feta.  You can serve more dressing and feta on the side for guests who want more of it.  You could leave out the chickpeas if you don’t care for them, but I probably wouldn’t add anymore than the can called for.  The chickpea to orzo ratio seemed just about perfect.

The basil and mint combination make this salad bright and refreshing, the feta is a great flavor addition, the chickpeas are a nice texture surprise and the tomatoes provide lovely flavor and color.ORZO SALAD WITH CHICKPEAS, TOMATOES, HERBS AND FETA | Hottie BiscottiORZO SALAD WITH CHICKPEAS, TOMATOES, HERBS AND FETA | Hottie Biscotti

The first time my sister made the dressing I was almost out of red wine vinegar so she subbed in some balsamic to make up the difference.  The next time I made it I used all red wine vinegar and it definitely changes the dish.  I think I preferred it with a little balsamic, but both ways are quite good.

I hope this makes its way to your table this summer!  You will not be disappointed.

ORZO SALAD WITH CHICKPEAS, TOMATOES, HERBS AND FETA | Hottie Biscotti

Orzo Salad with Chickpeas, Tomatoes, Herbs and Feta

From Giada DeLaurentiis

Ingredients

Salad

  • 1 1/2 cups orzo
  • 1 15-ounce can chickpeas, drained and rinsed
  • 1 1/2 to 2 cups cherry, grape or other small tomatoes, halved or quartered depending on their size
  • 1/2 cup finely chopped red onion
  • 1/2 cup fresh basil leaves
  • 1/4 cup fresh mint leaves
  • 4-6 ounces feta cheese, crumbled
  • salt and pepper to taste

Red Wine Vinaigrette

  • 1/2 cup red wine vinegar (can sub in half for balsamic)
  • 1/4 cup lemon juice
  • 2 teaspoons honey
  • 2 teaspoons salt
  • fresh ground pepper to taste
  • 1/2 cup olive oil

Directions

  1. Whisk vinegar, lemon juice, honey, salt and pepper together in a bowl.  While whisking, drizzle in the oil.  Set aside.  Note: You won’t use all the dressing.  Save what’s left in the fridge to use on a green salad.
  2. Cook orzo in boiling water according to package instructions, until al dente.  Drain, then transfer to a serving bowl, toss and let cool.
  3. Toss orzo with the beans, tomatoes, onions and herbs.
  4. Drizzle with some of the dressing, taste and add more until you’re pleased with the flavor.
  5. Toss in the feta if serving right away, otherwise cover and chill until ready to serve.  Toss in the feta right before serving.

Blue Cheese Twice Baked Potatoes

If you have young kids, you know how hard it is to get out on “special occasions” like New Years Eve or Valentine’s Day when everyone else is wanting to get out as well, babysitters are hard to come by!  A dinner at home can be just as wonderful as a night out.  A simple steak and potato dinner was perfect for us this year.

Instead of a regular baked potato as a side for our steak dinner on Valentine’s day, I decided to get just a little fancy and make twice baked potatoes.  Since Ben and I are both big blue cheese fans, these blue cheese laden potatoes seemed like the perfect choice.

bluecheesepotato2

I fixed these earlier in the day and kept them in the fridge until it got closer to dinner time, which makes these a great make-ahead side dish.  If you haven’t made twice baked potatoes before, they’re really fairly simple and easily flavored to your liking.  Bake russet potatoes, let cool for a while, cut off the tops, scoop out the insides, mix up with whatever you like, scoop back into the potato skins and bake again.

No matter what you’re going to mix in, always mix in butter, sour cream, milk or cream and salt first.  This makes for a smooth and creamy base.  From there you can add your choice of cheese, green onion, cooked and crumbled bacon, or herbs.  Make sure to taste and season as you’re mixing up the filling so that your potatoes are not underseasoned.

The blue cheese flavor is subtle but present and is a great compliment to a nice bite of perfectly grilled steak.  I’m so thankful to be married to a man who knows how to grill a steak and is happy to do it!  I used 2 ounces of blue cheese in the potato mixture and a few crumbles on top.

The recipe below is for two, so double or triple as needed.

bluecheesepotato

Blue Cheese Twice Baked Potatoes

Serves 2

Ingredients

  • 2 russet potatoes
  • olive oil
  • 1/4 cup (4 tablespoons) butter
  • 1/4 cup sour cream
  • 1/4 cup milk
  • 1-2 teaspoons salt
  • 3 ounces blue cheese, divided
  • black pepper, optional

Directions

  1. Preheat oven to 400°F.
  2. Rinse and scrub potatoes under cold water, then pat dry.  Poke with a fork a few times, rub with olive oil then place on oven rack with a sheet of foil underneath to catch drips, and bake for 1 hour to 1 hour 15 minutes depending on their size.
  3. Let cool for 15-20 minutes.
  4. Cut off the top third of the potatoes and scoop out the insides into a large bowl, leaving some of the potato intact all around so that the skins can still hold their shape easily.
  5. Mash potatoes with butter, sour cream, milk and 1 teaspoon of salt until well combined and smooth.  Fold in 2 1/2 ounces of blue cheese, then taste and add more salt and pepper if needed.
  6. Scoop filling back into the potato skins.
  7. At this point bake the potatoes again or store covered in the refrigerator until ready to bake.
  8. Reduce oven temperature to 350°F , place potatoes on a foil lined cookie sheet, sprinkle with the remaining blue cheese, and bake for 20 minutes if baking immediately, 25-30 minutes if baking from chilled.


Kale Salad with Roasted Beets, Cranberries, Almonds and Feta

A good friend of mine gifted me with a free local produce box from Greenling.  Greenling is an Austin based company that now also operates in the Dallas, San Antonio and Houston areas.  They make organic, local produce more easily accessible and do a great job of it.  They even delivered my box to my front door, and we live way out in the burbs.  In my lovely local box was a bunch of kale and 3 huge beets, along with some other treasures.  I immediately knew what would become of the kale and beets.

kaleandbeetsalad

I loved this salad.  We ate it as a side dish the night I made it and I ate it for lunch the next three days in a row.  Kale holds up so well that it was delicious every time, not soggy and droopy like salads can get after being dressed and stored overnight.  It was probably better after a night in the fridge, so you can always make it ahead of time.  Maybe leave out the almonds so they stay crunchy, and leave out the feta if you don’t want it to be pink!

The beets provide great color and earthiness, but if you don’t like beets add in some shredded carrots, chopped apples or pear.  Use golden raisins in place of the cranberries, toasted walnuts or pine nuts instead of the almonds.  I like to play around with the dressing also, different kinds of vinegar, honey instead of agave, orange juice instead of lemon.  Just start with a big bunch of kale and add in what you like and what you have on hand!  Enjoy!

Kale Salad with Roasted Beets, Cranberries, Almonds and Feta

Ingredients

Salad

  • 2 large beets
  • 1 teaspoon fresh thyme leaves
  • olive oil
  • kosher salt and pepper
  • 1 bunch of kale, stalks removed and leaves roughly chopped
  • 1/4 to 1/2 cup dried cranberries
  • 1/4 to 1/2 cup roasted almonds, roughly chopped
  • 4 ounces of feta cheese

Dressing

  • 2 tablespoons olive oil
  • 2 tablespoons balsamic vinegar
  • 2 tablespoons white wine vinegar
  • 1 lemon, juiced
  • 1 tablespoon dijon mustard
  • 1 tablespoon agave nectar
  • 1 garlic clove, grated on a microplane or very finely chopped
  • kosher salt and pepper

Directions

  1. Roast the Beets: Preheat oven to 400°F.  Peel the beets and cut them into 1 inch chunks.  Spread them onto a rimmed baking sheet and drizzle with olive oil, sprinkle with salt, pepper and thyme and toss to coat.  Roast for 40 minutes, turning twice, until they are fork tender.  Remove from the oven and let cool.  You can do this ahead of time and store the beets in a container in the fridge for a day or two.
  2. Make the dressing: Combine all ingredients and whisk well, season with salt and pepper and taste, adjust to your liking.
  3. Combine kale with half of the dressing and toss well (your clean hands work well for this!)  Add more dressing if it seems dry, but be careful not to overdress.
  4. Add in cranberries, beets, feta and almonds.  Toss gently so you don’t break up the feta too much.
  5. Serve immediately or let sit in the fridge for a few hours to let flavors marry and allow the kale to soften a bit.

Roasted Broccoli and Cauliflower

Roasted vegetables are fall perfection.  Anytime of the year perfection for me, really.  But fall and winter seem to be better for the rich and warm flavors and the delicious caramelization of the veggies that takes place in the oven.  One of my favorite things about them is their versatility.  You can use your favorite vegetables.  My favorite combination includes brussels sprouts, sweet potato, onion and cauliflower.  I can’t think of a better side dish, can you?  If you’re still planning your Thanksgiving menu, consider roasting a big tray of vegetables.  You can do all of your prep, including tossing with the oil and salt, the night before.  Refrigerate and roast right before dinner.

After starting this lovely dish in the crock pot I started thinking about what we would eat with it.  I decided on brown rice and salad.  But then I remembered that we had broccoli and cauliflower already cut up and just waiting to be transformed into something magical.  I was honestly pretty worried about roasting the broccoli with my normal method.  I’ve done it before and felt like the ends got too blackened and crunchy, even for me.  So I looked up a recipe for roasted broccoli and found this from Ellie Krieger.  As luck would have it, this particular recipe uses broccoli and cauliflower.  Perfect.

We loved these.  I ate the remainder of them for lunch the next day straight from the fridge.  One of the reasons they were so good is the garlic.  I smashed whole cloves and mixed them in with the vegetables.  If you cut the garlic too small, it burns.  I learned that lesson the hard way!  The garlic mellows enough through the cooking process to not be an unwelcome addition to your bite.  Cooking the vegetables covered allows them to steam before roasting, which keeps the broccoli from burning on the tips and cooking unevenly.  I will probably try this method with my normal line up of vegetables the next time I roast them.  However, I think you could get by with less covered steam cooking, maybe 20 minutes covered and 30-40 uncovered?  I’ll mess with that and see how it goes.

Roasted Broccoli and Cauliflower

From Ellie Krieger

Ingredients

  • 1 small head cauliflower (2 pounds), cut into florets
  • 2 large stalks broccoli (1 pound), cut into florets
  • 1 head garlic, broken into cloves, peeled and smashed but still intact
  • 2 to 3 tablespoons olive oil
  • 1/2 to 1 teaspoon salt

Directions

  1. Preheat the oven to 375°F.
  2. Place cauliflower and broccoli into a 9 by 13 inch baking dish, toss with the olive oil, and sprinkle with salt.
  3. Cover the dish with foil and bake for 1/2 hour.
  4. Remove the foil, stir and cook for 30 to 40 minutes more, until vegetables are tender and nicely browned, stirring occasionally.

Thyme and Brown Butter Roasted Potatoes

It is grilling season, and we’ve been taking full advantage of it on the weekends.  We had dinner from the grill both Saturday and Sunday night.  Last night we even ate outside.  It was wonderful.  I love this time of year.

Saturday night Ben grilled steaks, I made these potatoes and a green salad.  If we ate this every night of the week Ben would be the happiest man on earth.  Around 5 that afternoon my plan for a side dish went about as far as potatoes, but I didn’t know exactly what I wanted to do with them.  Mashed is always a good choice to accompany steak, but I didn’t feel like something loaded with butter and cream.  So we had roasted potatoes that had been tossed with brown butter and fresh thyme.  Ben said, “We need to have this meal again.”  I think we will.

When garlic cooks and gets nice and brown it is spectacular and crunchy.  When garlic burns, it turns bitter.  I burned my garlic.  So next time I would throw the garlic in with the potatoes when they had about 20 minutes left instead of at the beginning.

Thyme and Brown Butter Roasted Potatoes

Serves 4

Ingredients

  • 2 russet potatoes, scrubbed and cut into 1-inch cubes
  • 3 tablespoons butter
  • 1 tablespoon fresh thyme leaves
  • 4-5 garlic cloves, minced
  • 1 teaspoon salt

Directions

  1. Brown butter in a small saucepan over medium heat.  Watch it closely and swirl the pan periodically to keep it from burning.
  2. Combine warm butter, thyme and salt in a large bowl.  Add in the potatoes and toss to coat.
  3. Pour potatoes onto a rimmed baking sheet lined with foil or parchment (I used Reynolds parchment/foil pan liner with great results).
  4. Bake at 400°F for 40-45 minutes, stirring the potatoes around so that all sides can get nicely browned every 15-20 minutes.  Toss garlic with potatoes when they have about 20 minutes left to cook.
  5. Let cool on the sheet for a few minutes, then serve.