chicken

Chicken Taco Cornbread

When I went to visit my sister last fall I bought a magazine at the airport that she later made fun of me for buying, a Cast Iron Cooking magazine!  Of course she had reason to poke fun.  I should’ve bought some beauty, design or gossip mag like normal women do.  But this magazine has already produced two very tasty meals, so I don’t mind so much.

Chicken Taco Cornbread

They call this a “twist on taco salad” which is a great description and makes this a meal that doesn’t really require a side dish since it’s the main dish and the veggie side.

Chicken Taco Cornbread-8


You don’t need to do too much prep, just some chopping of vegetables.  And everything is done in one skillet.  You can shred the cheese, or buy pre-shredded.  The recipe calls for shredded rotisserie chicken, but if you have leftover cooked chicken that would be perfect, or you could poach chicken breasts if you have the time.  A can of tomatoes and green chile is on the ingredients list, but if you want to skip the green chile or can’t find it a partially drained can of diced tomatoes will do just fine.

Chicken Taco Cornbread-4

Chicken Taco Cornbread-3

The dressing is something quite close to Chuy’s creamy jalapeno so be sure to save whatever it left over and use it as a dip for tortilla chips!

The recipe uses a blend of mozzarella and cheddar.  Any cheese you’d use for tacos or fajitas would work, monterery jack, colby, cheddar, or the Mexican cheese blend they sell in bags.

Chicken Taco Cornbread-7

Chicken Taco Cornbread-6

The cornbread base has tortilla chips baked in.  I had some very thin tortilla chips that weren’t the best in this situation, they lost their crunch.  A nice thick corn chip would be better here and hold up nicely.  I’ll definitely be sure to do that next time.  And there will be a next time because there is so much room for modification here.  Adding in black beans or corn, using ground beef instead of chicken, or leftover fajita meat which we often have after cooking up fajitas for friends…we always overbuy!

Chicken Taco Cornbread

Ingredients

Dressing

  • 1 cup cilantro leaves
  • 1/2 cup ranch dressing
  • 1/2 cup salsa verde

Filling

  • 2 tablespoons olive or vegetable oil
  • 1/2 cup chopped onion
  • 1/4 -1/2 cup chopped red bell pepper
  • 1 tablespoon finely chopped jalapeno
  • 2 cups shredded rotisserie chicken
  • 1 can (14 ounces) diced tomatoes with green chiles OR 1 can diced tomatoes and a couple tablespoons diced green chiles
  • 3 tablespoons chopped cilantro
  • 1/2 teaspoon salt
  • 1/4 teaspoon black pepper
  • 1 teaspoon cumin
  • 1 teaspoon chili powder

Crust

  • 1 egg
  • 1 7-ounce package of cornbread mix
  • 1/2 cup milk
  • 3/4 cup crushed tortilla chips

Toppings

  • 1/2 cup shredded mozzarella
  • 1/2 cup shredded cheddar
  • 2-3 heads of romaine lettuce, chopped
  • 1 cup chopped tomatoes
  • chopped cilantro


Directions

Dressing

  1. Combine cilantro, ranch dressing and salsa in a food processor and mix until well blended.  Cover and chill until ready to use.

Filling

  1. Heat oil over medium heat in a 10-inch cast iron skillet.
  2. Cook onion, bell pepper and jalapeno until softened.  Stor in chicken, tomatoes, cilantro and seasonings.  Cook for about 5 minutes, taste and season more if needed.
  3. Transfer filling to a bowl, wipe out skillet and grease with crisco.

Crust

  1. Preheat oven to 400°F.
  2. In a bowl beat egg, milk and cornbread mix just until combined.
  3. Put chips in the greased skillet, then pour batter over the chips.
  4. Spoon chicken mixture over the cornbread batter and sprinkle with cheeses.
  5. Bake for 15-20 minutes, let cool briefly before cutting in to slices.

Toppings

  1. Top slices of cornbread with shredded lettuce, tomatoes and cilantro.
  2. Drizzle with dressing and serve.


Hazelnut, Panko and Parmesan Crusted Chicken

Recently I’ve been in a bit of a rut when it comes to dinner.  When that happens I fall back on old recipes that can feed us for the better half of the week so I can cook less often or I really push for eating dinner out or ordering in.  This chicken dish was just what I needed, a quick a delicious dinner.  It’s simple, doesn’t have a lot of ingredients and is a lot more exciting than your typical crusted, baked chicken.

pankochicken3

The hazelnuts are a really nice surprise here and pair well with the rosemary and parmesan.  Coating the chicken with the mayo and mustard keeps the chicken moist.  Pounding the chicken out thin helps it to bake evenly without getting dry, a problem I often have with baked chicken.

Skinning the hazelnuts is by far the most time consuming (and frustrating! and messy!) part of this meal.  After toasting them for a few minutes in a 375 degree oven, place them in a large, clean dish towel and rub them together, pound them on the counter, etc to get the skins off.  Don’t worry if you don’t get all the skin off of every nut, though.  Your store sells blanched hazelnuts?!  By all means use those!  And send me some!  I am not a fan of skinning hazelnuts, and would love a little shortcut there.

I served this with steamed green beans and mashed sweet potatoes.  It made for a lovely, colorful and tasty plate of food and a meal I’d definitely like to have again.

pankochicken4

Hazelnut, Panko and Parmesan Crusted Chicken

From Fine Cooking

Serves 3-4

Ingredients

  • 3-4 chicken breasts (about 1 1/4 pounds), pounded thin
  • 2/3 cup panko bread crumbs
  • 1 tablespoon butter
  • 1.75 ounces (about 1/3 cup) toasted, skinned hazelnuts, finely chopped
  • 1/3 cup finely grated parmesan
  • 1 teaspoon finely chopped fresh rosemary
  • 1/4 teaspoon garlic powder
  • 3 tablespoons mayonnaise
  • 1 tablespoon dijon mustard
  • salt and pepper
  • cooking spray

Directions

  1. Preheat oven to 425°F.  Line a rimmed baking sheet with foil, then place a wire rack on top and spray with cooking spray.  Set aside.
  2. Heat a small skillet over medium heat.  Melt butter, then add in panko.  Stir and toss until panko begins to toast and become golden.
  3. Combine toasted panko with hazelnuts, parmesan, rosemary, garlic powder, 3/4 teaspoon of salt and a few grinds of pepper.
  4. Combine mayo and mustard in a shallow dish.
  5. Coat each chicken breast on both sides with mayo mixture then with panko mixture.
  6. Place on the wire rack and spray lightly with cooking spray.  Cook for 12-15 minutes.

Chicken, Bacon, Avocado & Swiss Panini

Sometimes I have one ingredient that I really need to use and the rest of the meal comes about because of it.  That’s exactly what happened last night.  The ingredient…BACON.

Ben bought some really amazing thick-cut bacon last week when we grilled burgers.  I had more than half of the package left and it needed to be used in the next couple of days.  I could have frozen it, but when something goes into my freezer it may never come out.  And there was no way I was going to waste good bacon!  In college my best friend used to order the chicken, bacon, ranch sandwich at Quizno’s and she’d add either avocado or guacamole.  I might have some details a little confused here, but it was something like that.  With the bacon and some leftover grilled chicken in my fridge I knew exactly what we’d be having for dinner.

chickenbaconpanini7

We eat panini a lot, and usually I’m using leftovers to make them.  It’s one of the main ways we use any leftover steak.  As with most panini recipes the ingredient list is short, and prep is simple if you’re using leftovers.  All you need is some bread (I used sourdough) some cooked chicken, a few slices of cooked bacon, avocado and swiss cheese.  You can use any kind of cheese that you like, but I thought the swiss paired well.

chickenbaconpanini1

You can spread some mayo on the bread, or if the Quizno’s addition of ranch sounds too good to pass up you can either spread some ranch dressing on the bread or dip the sandwich in it after it’s been cooked.  If you have some guacamole around, then use that instead of the avocado.

chickenbaconpanini2 chickenbaconpanini3

For a nice and crunchy exterior, and terrific color, I like to either drizzle the bread with olive oil or, if I’m feeling really crazy, spread it with softened butter.  It’s up to you.

You don’t need a panini press, but if you have one that you don’t use very often I highly encourage you to dust it off and make it a part of your life.  To make these without a press, just heat a skillet over medium high heat and while one side is cooking, press down on the sandwich with another heavy pan, then flip and do it again.  Like a smashed grilled cheese, although I guess pressed does sound better than smashed.

chickenbaconpanini4

The recipe below makes 2 sandwiches, so adjust the ingredient amounts as needed for the number of paninis you plan to make.

Ben and I both really enjoyed these panini and I can see myself planning my weekly meals with some extra chicken and bacon in the future.  Enjoy!

chickenbaconpanini5

Chicken, Bacon, Avocado and Swiss Panini

Ingredients

  • 4 slices of thick cut sourdough bread
  • 1 cooked chicken breast, sliced
  • 4 slices of cooked bacon
  • 1 half of an avocado, sliced
  • 4 slices of swiss cheese
  • mayo or ranch dressing, optional
  • olive oil or butter for grilling

Directions

  1. Preheat your panini press or a large skillet over medium heat.
  2. Set out your bread (spread with mayo or ranch) and layer 1 slice of cheese, chicken, bacon, avocado and top with another slice of cheese.  (I tear the slice of cheese so that it covers the bread.)  Repeat with remaining sandwiches.
  3. Drizzle olive oil or spread butter onto both sides of the bread.
  4. Place on the panini press or on the heated skillet and press until bread is golden brown and cheese had melted.


Poppyseed Chicken Casserole

I’ve debated over whether or not to post this recipe for some time.  And some of you are going to roll your eyes and turn up your noses at me.  But this is seriously one of the most delicious and easiest meals I’ve ever made, and one that gets the husband (and myself, to be completely honest) super excited about dinner.  A friend of mine made this for me back in college, and someone brought it to us when Betsy was born.  You might already know about the wonders of this casserole yourself and have a recipe that you like.  I’ve tried several and after some tweaking here and there I found this one to be our favorite.

This casserole is great when you don’t have a ton of time but still want something home cooked.  I know, some of you will argue that it’s not really cooking.  And you can go right on ahead and judge me, but I’m sticking to my guns here and telling you that this is really good.  Just close your eyes while you’re mixing it up…

poppyseedchicken1

The ingredient list for this casserole is short and sweet.  I typically use a rotisserie chicken (1 whole chicken is just about right) but you can use leftover chicken from another meal if you’d like.  If the chicken you use is flavored in any way that flavor will really come through.  I made this once with leftover grilled chicken that we’d marinated in Italian dressing and it was very different in flavor than when I’d used poached chicken or a rotisserie chicken.

Now you’re going to cringe, but all you need other than the chicken is a can of cream of chicken soup (I like to use reduced sodium) a 16 ounce container of sour cream (low fat is fine) a sleeve of Ritz crackers, poppyseeds and a few tablespoons of butter.  Just go with me on this one.

poppyseedchicken2

You can bake this in any dish, but I prefer one that isn’t too big and isn’t too small.  An 11×7 casserole dish is what I usually use.  An 8×8 is fine, but then the chicken and cracker layers are thicker.  If you use a 9×13 the layers will be very thin.

I always serve this with white rice.  You could use brown.  I’m sure it would be wonderful and add more heartiness to the meal.  I’ve just always used white, and so that’s what I will probably always use.  Creature of habit.

And I always serve this with steamed broccoli.  Not sure what it is I love about the combination, but getting a little sauce from the chicken onto a piece of broccoli isn’t at all bad.  Green beans, asparagus, carrots, all good options.  I will continue to serve it with broccoli.  Again, creature of habit.  Whatever side you serve, make sure it has some color.  Color typically means more nutritional value, and if you serve this with steamed cauliflower you’re serving a super neutral colored meal, which isn’t quite as lovely on your plate.

poppyseedchicken4

After baking you have a creamy casserole with a terrifically crunchy topping with just a touch of sweetness from the poppyseeds.  This is a comfort food for me.  I know the thought of cream of chicken soup and 2 cups of sour cream is hard to handle, but please, please make it.  You will not be sorry.  You might even thank me.

poppyseedchicken3

Poppyseed Chicken Casserole

Serves 6-8

Ingredients

  • 3-4 cups of cooked chicken, chopped or shredded into fairly large pieces
  • 1 can of cream of chicken soup, reduced sodium
  • 1 16-ounce container of low fat sour cream
  • 1 sleeve of Ritz crackers
  • 1 tablespoon poppyseeds
  • 3 tablespoons of butter, melted
  • cooked white rice for serving

Directions

  1. Preheat oven to 350°F.  Spray an 11×17 or 8×8 inch dish with cooking spray and set aside.
  2. In a large bowl combine chicken, cream of chicken soup and sour cream.  Mix well then spread into prepared dish.
  3. In a large zip top bag crush crackers into pieces, then pour in poppyseeds and butter.  Seal bag and then toss around until everything is mixed well.
  4. Spread cracker mixture evenly on top of the chicken.
  5. Bake for 20-30 minutes, until bubbly.
  6. Let cool for a few minutes before serving.


Grilled Caprese Chicken with Balsamic Glaze

How can something so simple be so good?  You probably have every almost every ingredient for this in your kitchen right this very moment.  Add to that the minimal amount of time it takes to get this on the table, pair with a green salad and some crusty bread and you have the perfect meal.  Make it for a casual family weeknight or for weekend company.  It’s easy to make 2 servings or 10.  This is one of those recipes to go to when your mind isn’t working well enough to think too hard about dinner (this happens to me a lot) or when you’re having last minute guests and don’t have much time to shop for or prepare dinner.  The drizzle of glaze isn’t just great for flavor but it’s also beautiful and adds a touch of fancy to an otherwise very simple dish.   I’m real excited that this chicken found its way into my life.

capresechicken

Since there are only a few ingredients, make sure they’re all fresh and of good quality.  Get the best looking tomatoes you can find.  Romas are a good choice and usually a good size.  They are what I used.  If the heirlooms at the store look good, splurge on them.  You only need 1 or 2 (to serve 2-4 people) so go for it!  Get fresh mozzarella, the kind packed in water, and make sure to slice it generously.  Now the basil.  If you have some in your garden then just grab your shears and head out the back door.  If not, get the fresh kind at the store.  Don’t use dried basil.  It will just not be the same.

This really could not be simpler.  Grill the chicken (or cook it in a pan on the stove), and in the last couple minutes place the cheese on top so it has time to melt.  If you do this in the oven you might turn the broiler on for a minute or so to melt the cheese.  Top with a slice of tomato, sprinkle with the chopped basil and drizzle with balsamic glaze.

The glaze is probably the most time consuming and complicated part about this.  It’s not hard, it just requires time and some patience.  But it’s worth it.  The recipe below makes more than you will probably need, but you can save it, keep it in the fridge, and use it for other dishes.  Drizzle on top of a caprese salad (just what you’re using in this dish minus the chicken) or as a finishing sauce for grilled pork tenderloin or other meats.

Below are the ingredients that will serve at least 4 using 4 chicken breasts sliced in half horizontally to make 8 total pieces, 2 per person.  But some of your lighter eaters may just eat one piece.  If you end up with leftovers I HIGHLY recommend reheating and serving some of the chicken on warm crusty bread with some arugula or other green to make a chicken caprese sandwich.  Enjoy!

Grilled Caprese Chicken with Balsamic Glaze

Serves 4-6

Ingredients

  • 4 boneless skinless chicken breasts, sliced horizontally into 2 pieces
  • 1-2 medium to large tomatoes, or 3 to 4 small (you want to try to almost cover the chicken with the tomato slices
  • 8 slices of fresh mozzarella (again, you want the mozzarella slice to almost cover the chicken breast)
  • kosher salt and pepper
  • fresh basil leaves, 8-10 (leave them whole or chiffonade)
  • 1 1/2 cups balsamic vinegar
  • 1 tablespoon brown sugar
  • 2 teaspoons Dijon mustard

Directions

Balsamic Glaze

  1. Pour balsamic vinegar into a small, heavy saucepan.  Bring the vinegar to a low boil over medium high heat.  Adjust heat as needed to keep it at a low boil.  Stir occasionally until vinegar begins to thicken and coat the back of a spoon, 15-20 minutes.  
  2. Stir in brown sugar and mustard and cook an additional 5 minutes, remove from the heat and let cool slightly before serving.  This will thicken a bit as it cools.

Chicken

  1. Season the chicken on both sides with salt and pepper.
  2. Grill the chicken, 4 minutes on the first side, then flip the breasts over and let cook for another minute or 2.  Place one piece of mozzarella on each chicken breast and let cook for another 3-4 minutes until chicken is done and mozzarella is melted.
  3. Transfer chicken breasts to a serving platter and immediately place basil leaves on top of the cheese followed by the tomatoes.  Drizzle lightly with balsamic glaze and serve additional glaze on the side.


Chicken and Rice Casserole with Roasted Squash and Spinach

We’re moving in 12 days!  I’m starting to wonder why we thought moving 7 weeks before my due date was a good plan!  I’m actually very excited, just anxious and stressing a bit.  My sweet mom came down and helped me for a few days last week.  We didn’t pack the entire kitchen, but that process is beginning.  I plan to have the kitchen pretty much packed away by the beginning of next week.  That last week I plan to eat easy breakfasts, freezer meals, give Carson a lot of convenience foods (and his weight in strawberries of course) and explore the take-out situation in our neighborhood.  I’ve already stocked up on paper plates, plastic utensils and cups.  I don’t want to find myself packing plates and silverware at 2 am the night before we move.

Eating restaurant food is probably going to get old after a few days.  I like cooking and knowing what goes into our meals.  So I want to cook a lot in the coming week.  The problem with that is how unprepared I have been recently when it comes to groceries.  And if I’ve forgotten something, I have little to no desire to take Carson to the store for one item.  One night last week I made dinner with what we had around, which was an adventure.  And a pretty tasty adventure.  So tasty, in fact, that I typed this recipe up right after we ate so that I wouldn’t forget it.  The picture doesn’t do it justice, but casseroles in general are just plain unattractive.

I made fried chicken earlier in the week.  Since 2 people can’t (and shouldn’t) eat an entire chicken we had quite a bit left over.  My thought for dinner began with that chicken.  I knew we had rice, but I couldn’t think of what else I was going to throw in my chicken and rice dinner.  So began the scavenging.  Squash from Farmhouse.  A shallot.  Green onions.  A half bag of spinach.  The remains of a box of chicken broth.  The rest of a carton of sour cream.  Leftover white cheddar cheese.  And a packet of Lipton chicken noodle soup mix.  This was going to be dinner.  The biggest gamble was the squash.  I roasted it and figured if I didn’t end up using it in the casserole I could snack on it and give some to Carson.  It ended up being really great and something I would definitely repeat.

Chicken and Rice Casserole with Roasted Squash and Spinach

Ingredients

  • 2-3 cups 1/2 inch cubed squash (I used patty pan and butternut)
  • 1 shallot, chopped
  • 6 green onions, chopped
  • 2 garlic cloves, minced
  • 4-6 ounces fresh spinach
  • 1 cup white medium grain rice
  • 1 1/2 cups chicken broth
  • 1 package Lipton chicken  noodle soup mix
  • 1/2 cup sour cream
  • 1/4 cup milk
  • 1/4-1/2 cup shredded white cheddar cheese (optional but delicious)

Directions

  1. Roast Squash:  Preheat oven to 400°F.  Toss seeded and cubed squash with a drizzle of olive oil and a sprinkle of salt.  Spread on a rimmed baking sheet and roast for 20-30 minutes, tossing about halfway through.  Set aside.
  2. Heat 1/2 tablespoon of olive oil and 1/2 tablespoon of butter over medium heat in a large skillet.  Once hot, add in shallot and cook for 2 minutes, add in green onion and cook 2 minutes, then add in garlic, stir and cook for about 1 minute.
  3. Stir in the rice, stir and cook for 2-3 minutes.  Add in the spinach and cook until slightly wilted.  Turn off the heat and mix in the chicken and roasted squash.
  4. Pour in the chicken broth, soup mix, sour cream and milk.  Stir until well combined.
  5. Reduce oven temperature to 375°F.  Pour into a greased 9×13 pan and sprinkle with the cheese, if using.
  6. Cover tightly with foil and bake for 40 minutes.  Remove foil and bake for 10 more minutes.  Let cool slightly before serving.

Green Chile Chicken Enchiladas with Greek Yogurt

The internet is a great place to peruse recipes and get new ideas for healthifying your meals.  I think I made that word up.  I like comfort food.  I like cheese, cream, sugar, butter, bacon, chocolate and all things bread.  Unfortunately, eating like that all the time would mean big trouble.  So I sometimes like to find ways to lighten up those calorie laden foods, even if it’s just a touch, so that we can enjoy them more often.

There are all kinds of tricks and substitutions people come up with for lightening up old favorites.  Sometimes you find something that sounds great, almost too good to be true…which a lot of the time means it is and the final product is not what you’d hoped it would be.  I once found a recipe for scalloped potatoes that used skim milk.  Skim milk!  No cream!  And it claimed to be the same creamy potato dish without all the fat.  They lied.  I ended up throwing the majority of it away.  So, I was worried about these enchiladas.  I love the idea of using non-fat greek yogurt instead of sour cream or a cream sauce, but wasn’t sure if it was going to work out.  But I’ve seen lots of recipes that make the substitution, so I gave it a try.  Thankfully this was one of those times that taking a chance worked out and we had a delicious dinner with a little less guilt than usually comes with a plateful of enchiladas.

The original recipe came from Meals and Moves, a blog I hadn’t come across until yesterday.  I changed very little, and would make just a couple additional changes when I make these again.  I used corn tortillas, because I believe there is no other way to make enchiladas.  I added cilantro, garlic, jalapeno and just a bit more cheese to the filling.  Next time I might add chopped green bell pepper to the veggies, maybe a little more chicken and the whole jalapeno, seeded for the spice sensitive (like myself these days).  But feel free to go for it with the seeds.  I’ll meet back up with you in September when I can handle it without a serious case of heartburn.  Too much information?  Sorry.

If you’re looking for a good side dish to serve with these enchiladas or any Tex-Mex meal, try this black bean and corn salad from Whole Foods.  It also makes for a good salsa and can be adapted to fit your tastes.  I like to add chopped tomatoes.

Green Chile Chicken Enchiladas with Greek Yogurt

Ingredients

  • 10 corn tortillas
  • 6-8 green onions, chopped
  • 1/2 jalapeno, diced small
  • 2 garlic cloves, minced
  • 1 can chopped green chiles (7-8 ounces total)
  • 1 teaspoon ground cumin
  • 2 cups cooked shredded chicken
  • 1 1/2 cups non fat Greek yogurt (a little more for topping)
  • 1 cup salsa verde
  • salt and pepper to taste
  • 1/2-1 cup shredded cheese (montery jack, colby jack, etc.)
  • 1/2-3/4 cup chopped cilantro (and a little extra for garnish)

Directions

  1. Heat a drizzle of oil in a skillet over medium high heat.  Add the green onions and the jalapeno and saute for 3-4 minutes.  Then add in the garlic and cook for another minute or so.  Add the green chiles, cumin and a dash of salt and cook for another 2-3 minutes.
  2. Mix the chicken into the warm vegetables and set aside.
  3. Combine the yogurt, salsa verde and cilantro in a bowl.  Add all but 1 cup of the yogurt mixture into the chicken mixture.  Add 1/4-1/2 cup of cheese to the chicken and mix to combine.
  4. Heat corn tortillas in 2 batches in the microwave, wrapped in slightly damp paper towels for about 30 seconds or until they are pliable.
  5. Coat a 9×13 pan with cooking spray.  Fill the center of a tortilla with about 1/3 cup of filling, roll up and lay seam side down in the pan.  Repeat with the remaining tortillas.  Some of your tortillas may crack, but it’s not a big deal.  (If you have extra space, extra tortillas and extra filling, cram another enchilada or 2 into the pan.)
  6. Spread remaining yogurt sauce over the enchiladas and then sprinkle with 1/4-1/2 cup of cheese.
  7. Bake for 25-30 minutes until cheese is melted and edges have started to brown.
  8. Garnish with a little yogurt and chopped cilantro.

Peanut Noodles with Chicken and Vegetables

One of the great things about having a pantry that’s on the small side is that it is next to impossible to lose track of food, only to find it years later.  I don’t have to get elbow-deep in my canned goods to find a can of tomatoes.  My small food storage also keeps me from stocking up on things I don’t need…I do have a snack bowl on top of the cabinet for my assortment of gummy candies and what remains of Carson’s Easter goodies.  But candy is a need, right?

Anyway, when I came across this recipe on Eatingwell.com I knew that I had about 3/4 of a box of thin spaghetti because I see it every time I get something from the pantry, so I added this to my meals for the week.  I was already planning to buy chicken for chicken parmesan, so I was able to buy a 4 pack of chicken breasts and know that they would all get used that week.  That makes me happy.

The recipe calls for a bag of vegetable medley, but I just used veggies that we like; broccoli, red bell pepper, snap peas, frozen edamame and carrots.  Since I was using more like 11-12 ounces of spaghetti, I increased the amount of vegetables I used to about 20 ounces.  I really like there to be a lot of vegetables in pasta dishes, so you may not want to use as much as I did.  I used 1 medium sized broccoli crown, 1 red bell pepper, 5 small carrots, 1 small bag of snap peas, and 8 ounces of frozen edamame.  I kept the sauce pretty much the same, but did end up adding more soy and a drizzle of sesame oil at the end.  The sriracha is spicy.  I like spice, so I used 2 teaspoons of the stuff and definitely felt the heat.  If you are not a fan of spicy foods, use 1/2 a teaspoon in the sauce, taste it and add more if you’d like.

A mistake I made with this was adding all of my vegetables at once.  The carrots were a little under cooked, so if you’re using carrot slices, don’t slice them too thick and make sure to give them a head start in the boiling water.  The broccoli, bell pepper, snap peas and edamame cooked easily in the 3-4 minutes of cooking time.

To make this meal even faster to fix, use shredded rotisserie chicken.  Buy bagged vegetables that are ready to go, or chop your veggies the morning of or the night before.  You can even make the sauce ahead of time and refrigerate it.  The heat from the cooked pasta and hot water will loosen it up as it will be stiff coming out of the fridge.  You can serve this warm or cold.  We ate it both ways and it was delicious.

Peanut Noodles with Chicken and Vegetables

Adapted from Eatingwell.com

Serves 6-8

Ingredients

  • 2-3 boneless skinless chicken breasts
  • 10-12 ounces thin spaghetti
  • 16-18 ounces of vegetables (broccoli, snap peas, bell pepper, carrots, edamame) carrots, broccoli and bell pepper cut into pieces
  • fresh chopped cilantro, optional

Sauce

  • 1/2 cup chunky, natural peanut butter
  • 2-3 tablespoons reduced-sodium soy sauce
  • 2 teaspoons minced garlic
  • 1-2 teaspoons chile-garlic sauce (Sriracha), or to taste
  • 2-3 teaspoons minced fresh ginger
  • 1/2-1 teaspoon sesame oil

Directions

  1. Cook the chicken.  In a medium saucepan, bring water to a boil, salt water, then add chicken, reduce heat to a simmer and cook for 20 minutes.  Remove chicken from water and let cool slightly before shredding into bite size pieces.
  2. Bring a large pot of salted water to a boil, add pasta and cook for 4 minutes, add carrots if using and cook for a minute, add the rest of the vegetables and cook for another 3-4 minutes.  Reserve about 1 cup of pasta water then drain and rinse with cool water.
  3. Make sauce by whisking peanut butter, soy sauce, garlic, ginger, sriracha and sesame oil in a large bowl.  Stir 1/2 cup of pasta water into the sauce.  Toss in pasta, vegetables and chicken.  Add in more pasta water to moisten pasta to your liking.  Mix thoroughly so that all the veggies, pasta and chicken are coated with sauce.  Garnish with cilantro if desired.

Slow Cooker Chicken Tikka Masala

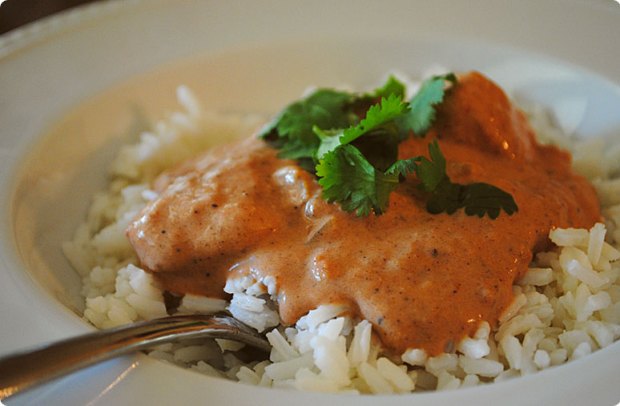
It is hard to cook for two.  This meal was yet another reminder of that fact.  After the two of us had one big (for Ben) and two small (for me) servings of this chicken tikka, it didn’t look like we’d even touched the stuff.  We will be eating this for days, and I mean that in a very good way.  I really enjoyed this and have had no problem eating it as leftovers.  Make sure to leave the jalapeno in with whatever you need to refrigerate.  This tastes even better the next day.

This recipe is from Tasty Kitchen.  I used 4 boneless skinless chicken breasts and will use 5 or 6 next time to accommodate for the large amount of yummy sauce.  The original recipe says that it serves 6, but I think it could easily serve 8.

I couldn’t find garam masala, so I made my own.  If you have a grocery store that sells spices in bulk I would recommend buying some of these spices that you don’t use very often in smaller amounts to cut the cost a bit.  I had a jar of ground cardamom already, but a new jar was going to set me back $9.00 so I’m glad I had it.  This is what I used for the garam masala.  It was exactly 3 tablespoons, so it’s perfect for this recipe.

Garam Masala

Mix together the following spices.  Use or store in a sealed container.

  • 1 tablespoon ground cumin
  • 1 1/2 teaspoons ground coriander
  • 1 1/2 teaspoons ground cardamom
  • 1 1/2 teaspoons ground pepper
  • 1 teaspoon ground cinnamon
  • 1/2 teaspoon ground cloves
  • 1/2 teaspoon ground nutmeg

The only thing I didn’t enjoy about making this meal was all the ginger I had to grate.  I do love fresh ginger, and so there was no way I was going to use less than it called for.  But peeling and grating a 3 inch piece of ginger is not a task I took forward to repeating.  But since I will be making this again, I will be peeling and grating all that ginger yet again.  You can finely chop it, but I think grating it in this recipe is a better choice because then you don’t get little pieces of ginger.  If you don’t have a microplane grater, chop it as finely as you can.  If you do grate it, watch your fingertips!  Those graters are sharp.

Other than using chicken breasts and making my own garam masala, I followed this recipe exactly.  I do think you could use less cream at the end, maybe 3/4 of a cup.  But I wouldn’t eliminate it completely.

I served this with white rice, green peas and these pita bread.  Choose just one starch if you’d like, but make sure you have at least one of them to soak up the sauce.  It is delicious.

Slow Cooker Chicken Tikka Masala

From The Tasty Kitchen

Ingredients

Chicken

  • 9 whole Boneless, Skinless Chicken Thighs
  • 1 Tablespoon Ground Coriander
  • 1 Tablespoon Ground Cumin
  • 1 teaspoon Kosher Salt
  • 1 cup Yogurt
  • 3-4 Tablespoons Butter
  • 1 whole Jalapeno Pepper, Stem Removed, Pepper Pierced Several Times With A Sharp Knife
Sauce
  • 4 Tablespoons Butter
  • 1 whole Large Onion, Peeled And Diced
  • 6 cloves Garlic, Peeled And Minced
  • 1 Tablespoon Kosher Salt
  • 3 Tablespoons Garam Masala
  • 1 piece Fresh Ginger, About 2-3 Inches, Peeled And Grated
  • 4 cups Crushed Tomatoes
  • 1 Tablespoon Raw Sugar (can Substitute White Granulated If Necessary)
  • 2 teaspoons Cornstarch Or Cleargel
  • 1-½ cup Heavy Cream
Serving
  • Hot Buttered Rice And Peas
  • Chopped Fresh Cilantro

Directions

  1. Cut the chicken into 1- 1 1/2 inch pieces. Sprinkle the coriander, cumin and salt over the chicken, then stir in the yogurt until all the pieces are evenly coated. Cover lightly and let sit for 10 minutes before proceeding.
  2. Melt 1 tablespoon the butter in a large saute pan over medium heat. Raise the heat to medium high and quickly brown about 1/4 to 1/3 of the chicken. Transfer browned chicken to the slow cooker as it is finished, using 1 tablespoon of butter per batch, and repeat until the chicken is all in the slow-cooker. Throw the pierced jalapeno in on top of the chicken.
  3. Prepare the sauce. Return the pan to the heat and melt the butter over medium high heat. Add the onions, garlic, and kosher salt, then stir. Cook, stirring frequently, until the onions begin to lightly brown around the edges.
  4. Stir in the garam masala and ginger and cook until fragrant (about 1 minute) before raising the heat to high and adding the crushed tomatoes and raw sugar. Stir well, scraping the caramelized bits from the bottom of the pan, and bring to a boil. Pour over the chicken in the slow-cooker.
  5. Cover and cook on LOW for 5 hours, or until the chicken is very tender.
  6. Use a fork or whisk to stir the cornstarch or cleargel into the heavy cream until smooth. Pour into the slow-cooker and stir gently until the colour is even. Replace the lid and let cook for 10 minutes or until bubbly around the edges.
  7. Serve over hot rice and peas, topped with a generous amount of chopped cilantro.

Curried Chicken and Rice Soup

This is a great meal if you’re looking for a nice alternative to chicken noodle soup.  This hearty chicken and rice soup is flavorful, loaded with veggies and has a nice crisp flavor thanks to the fresh herbs and lemon juice added at the end.  The curry isn’t overwhelming, but gives the soup a nice spice that makes it a unique chicken soup.  It’s great with the herbs and lemon.

We really enjoyed what was most likely the last hot soup we’ll have for a while.  I have a feeling that the weather is just not going to get cool enough for soup until October or November.  Oh, Houston.  If you live somewhere that is still experiencing or expecting a cool and rainy day, take advantage of it and give this soup a try.

I used this recipe from the Food Network kitchens as my starting point for this soup and then changed a few things to create a soup that had more of the things I like.  I’m sure it’s still great without the changes I made.  I added more carrots and celery, more broth, more rice, pureed only some of the soup instead of all of the rice mixture, added spinach and put lemon juice right in the soup instead of serving it with lemon wedges.  I also changed the cooking method a bit by doing it all in one pot instead of cooking the soup base and rice separately.

Since this was my first time to make this and I was kind of figuring it out as I went, I didn’t measure exactly how much broth and water I used.  Luckily, you can add as much or as little liquid as you want near the end of the cooking to get the consistency you want in this soup.  When I reheated this soup last night for dinner I added a little more broth since it had thickened up overnight in the fridge.  Soups are so forgiving, one of the many reasons I love them.

To make getting this meal on the table quicker and easier cook the chicken ahead of time and refrigerate it, or shred a rotisserie chicken.  If you do this, you will still need all the chicken broth and water called for below.  Slice the onion and chop the carrots and celery and store them in baggies or containers, the onion should be in its own container since it goes in before the carrots and celery.  You can chop the herbs and store them as well, but I think they lose some of their flavor if they are chopped too far in advance.  I’d recommend chopping them while the rice is cooking, but I doubt there would be much difference in flavor if they sat in the fridge for a few hours, just make sure to store them in covered containers to keep them from drying out.

Curried Chicken and Rice Soup

Adapted from Food Network Magazine

Ingredients

  • 2 bone-in chicken breast halves, skin removed
  • 5-6 cups low sodium chicken broth, divided
  • 4-5 cups water, divided
  • 2 bay leaves
  • 1 teaspoon whole peppercorns
  • kosher salt and black pepper
  • 1 tablespoon butter
  • 1 tablespoon olive oil
  • 4 large carrots, peeled and sliced into 1/4 inch coins
  • 4 large celery stalks, cut 1/2 inch slices (you may want to halve the stalks if they are very large)
  • 1 large yellow onion, halved and thinly sliced
  • 2 teaspoons curry powder
  • 1 teaspoon sugar
  • 1/2 cup white rice
  • 3-4 ounces baby spinach leaves (left whole or roughly chopped)
  • 3 tablespoons chopped dill
  • 3 tablespoons chopped mint
  • 1 large lemon, juiced

Directions

  1. In a large pot, heat 3 cups of water and 3 cups of broth over medium heat.  Once liquid starts to simmer, add chicken breasts, a pinch of kosher salt, peppercorns and bay leaves.  Bring to a boil, cover, then reduce heat and simmer for 20 minutes.
  2. Remove chicken from broth and let cool until you can handle the chicken and shred it.  Strain the bay leaves and peppercorns out of the broth and set the broth aside.
  3. In a large saucepan or dutch oven, heat 1 tablespoon of butter and 1 tablespoon of oil over medium heat.  Add the onions, sugar and a pinch of salt.  Cook, stirring frequently, until onions begin to soften.  Add carrots and celery and cook for another 4-5 minutes.
  4. Add curry powder, stir and cook for 1 minute.  Add the rice, stir and cook for about 2 minutes, then add 3 cups of the reserved broth.  Bring to a boil, cover, reduce heat and simmer for about 20 minutes.
  5. After rice is cooked, take about 2 cups of the soup and puree it in a blender or food processor until smooth.  Add it back to the soup along with the chicken.  At this point you can add more liquid to achieve the consistency you’d like in your soup.  I added equal amount of broth and water, probably a cup of each to start with, but you can do what looks right to you.  More broth for a soupier soup, less broth for a more stew-like soup.
  6. With heat on medium low, stir in spinach and herbs.  Let simmer for 5-10 minutes until spinach is wilted down.
  7. Stir in lemon juice.  Taste and adjust seasoning if needed.