Cookbooks

Baking Through Fika: Gunnebo Dreams

I was able to go out to California last month to celebrate my cousin and his wife who just the month before got married (Congratulations, Peter and Carissa!) and while there I was asked by a few of my family members if I was still baking and blogging and how this particular Fika cookbook project was coming along.  I’d kind of forgotten I even had a blog!  Why is it so hard?!  How can I feel so busy, that I’m always working on something, yet nothing ever feels complete and I just feel like I’m failing at everything?  That sounds dramatic.  But really, the minute I finish laundry there is more to do, I enjoy a clean floor for an hour before someone spills their yogurt or the dog comes in with muddy paws, and why do kids wipe their hands, faces and snotty noses on everything BUT a towel, tissue or napkin?  Why?  What you don’t know or appreciate fully until you’re in it is that being a parent (working or not, mom or dad) is just plain hard, often unrewarding (at least in the short term) and underappreciated work.  Being the cook, the maid, the social coordinator, the chauffeur, the teacher, the disciplinarian, the mediator, etc for a family is time consuming, tiring and never ending.  I didn’t spill all of that to my inquiring family, I simply said “I just haven’t been making the time to blog as much recently.”

I definitely still enjoy blogging, and of course baking, but finding a balance between it and the rest of life’s demands and responsibilities isn’t simple.  I’ve thought about having a certain day and time that I dedicate to blogging, which in theory sounds like a good plan and maybe that will be my resolution for the blog in 2017.  For now I am just going to try to finish this Fika book!  There are lots of yummy looking recipes perfect for the quickly approaching holiday season, and once I’m done this will be the first blog project I’ve actually completed, unlike others that started with the best of intentions and then fizzled out…

Here is my most recent bake from Fika!  This one puts me at 15 recipes completed and 15 to go.  Halfway!  Woohoo!  Hopefully the rest won’t take me quite as long as the first half, but don’t hold your breath.

gunnebo-dreams

gunnebo-dreams-6

Gunnebo Dreams, cookies I have never heard of before, are a basic sugar cookie but with the unexpected addition of lemon balm.  I’d put off this simple recipe from Fika this long only because I couldn’t find lemon balm (and I didn’t look too terribly hard).  My grocery store’s garden section recently had some, so I figured it was a sign.  It’s now planted in a pot in the back yard and is flourishing!  I haven’t tried it in anything else, but found this great list of what is possible with lemon balm.  The honey-lemon nighttime syrup sounds like something I could use…

This recipe comes together so quickly and is simple and straightforward.  The kids can definitely help out!  The mixture of butter and oil gives these a different texture that I quite liked.  The cookie bakes up slightly crumbly and delicate, but doesn’t fall apart, is still moist, and has lovely buttery flavor.

gunnebo-dreams-7

I didn’t find the lemon balm to be overwhelming, which was a fear I had initially.  It was just noticeable enough to add some interest to such a simple cookie.  The green specks are nice, too.  You could probably use other herbs, rosemary or thyme, possibly tarragon and mint as well.  Let me know what you try!

The recipe doesn’t call to roll these in sugar before baking, but it just felt right.  And the resulting sweet and crunchy exterior is great.

I’m trying out this new-to-me recipe feature, so bear with me as I figure it out!  And PLEASE give feedback if you have some.  If you like the feature, if not, why, how can it be better (either in appearance or ease of use) and if you use a recipe widget on our blog and you love it, again, PLEASE tell me about it!  I’m all trial and error over here and basically always need help 🙂

Print Recipe
Gunnebo Dreams
Lovely little sugar cookies with a light, airy, dreamy texture and the subtle flavor of lemon balm.
Course Cookies
Cuisine Swedish
Cook Time 12-15 minutes per batch
Servings
dozen
Ingredients
Course Cookies
Cuisine Swedish
Cook Time 12-15 minutes per batch
Servings
dozen
Ingredients
Instructions
  1. Preheat oven to 300F and line a baking sheet with parchment paper.
  2. Beat butter, sugar and oil together until light and fluffy.
  3. Add in the flour, baking soda, salt and vanilla and mix well.
  4. Fold lemon balm leaves into the batter.
  5. Roll dough into small balls (a rounded teaspoon is a nice size) then roll in sugar and place on baking sheet, leaving a little room between the cookies.
  6. Bake for 12-15 minutes, until just slightly golden. Remove from cookie sheet and allow to cool on wire racks.
Share this Recipe

DIY Sprinkle Success & Birthday Cake…Attempt

If you have any interest in cakes (making, eating or both) and you haven’t picked up a copy of Layered by Tessa Huff yet go order it right now!  It’s a truly lovely book with great cake baking and decorating tips complete with some helpful step-by-step photos.  While I’ve only tried a couple cakes so far, I love it and can’t wait to try more of her recipes.  Go now and order a copy.  Go.

To me a birthday is not complete without a cake.  Another dessert can serve as a substitute if need be, but cake!  Birthdays were made for cake!  I decided to make a cake for my birthday this year, and the strawberry and confetti cake from Layered was the obvious choice.

I encountered some problems when I made this, and originally I was calling this cake a “fail” but it wasn’t.  After all was said and I done we stuck candles in it, sweet friends sang “Happy Birthday” and we all ate it and enjoyed it.  What it was was imperfect and a good learning lesson.  I am so glad I tried this cake, even though it wasn’t as amazing as I thought it would be!

The first step for this cake was making your own sprinkles.  By hand.  Yes.  Did you even know this was possible?!  I didn’t.  It was time consuming, but not hard.  I would do it again for sure.

Confetti Cake-20

Confetti Cake-24

There are few things that make the sprinkle process easier:

  • Make sure your frosting tip isn’t too small.  My hand was worn out after using a Wilton #3 tip.  #4 was way easier.  And if you used an even bigger one that should be fine, the size of the spinkle has more to do with how much you pipe.  A bigger tip means you pipe less, a smaller tip means you pipe more.  I don’t know if that makes sense now, but if you’ll know what I mean if you try it.

Confetti Cake-21

  • If you can stand it, use up all of the sprinkle batter!  I was so tired and ran out of cookie sheets, so I stopped.  When I went to make the cake I didn’t have quite enough.  So, make it all, even if it means you’ll have a semi-permanent claw hand.
  • If you want bold colors, go a bit darker than you think you should.  I felt that mine dried slightly less bright than the original color.

Confetti Cake-19

  • Have a small bowl of water handy to dip your finger in to press down any peaks that form on the sprinkles.  There is a sweet spot for the amount of water.  If you get too much water they’ll ooze and take a much longer time to dry.  Too little and they’ll stick to your finger.  You’ll learn pretty quickly what works best.
  • If you get tired of piping dots, pipe long strips, let them dry, and break them up to make jimmies!  I like the look of both the circles and jimmies together, anyway.

Confetti Cake-22

Confetti Cake-23

DIY Sprinkles and Jimmies

From Layered

Ingredients

  • 2 large egg whites
  • 4 cups powdered sugar
  • 1/2 teaspoon vanilla extract
  • gel food coloring

Directions

  1. Fit a stand mixer with the whisk attachment and pour the egg whites in to the bowl.
  2. Mix on medium low until foamy.
  3. Gradually add the powdered sugar and gradually increase the speed until you’ve added all the sugar and the speed it at medium high.
  4. Whisk until the mixture has smooth, stiff and glossy peaks.  Add in the vanilla and beat just to incorporate.
  5. Divide the sprinkle batter in to as many bowls as colors you plan to make.  Color with gel color, being sure to mix completely (a small spatula is good for this).
  6. Place each color of icing into a piping bag fitted with a round tip.
  7. Line cookie sheets or your counter top (as long as no one in your household likes to climb on to the counter or pull stuff off the counter) with parchment paper or non-stick silicon mats.  Pipe small circles onto the paper and use a damp fingertip to flatten down any pointy peaks that form.
  8. Repeat, repeat, repeat, repeat…
  9. Let dry for AT LEAST 2 hours (the longer the better) before using.

Now the rest of the cake had a lot of components, but I wasn’t worried about my competence in the kitchen to get it done and have it look beautiful.  I read through all of the recipes, and had a good plan on how to carry it all out flawlessly.  I had an entire blog post in mind to show off this cake!  Hello, humility.  We’ve met before…

I made everything the day before, 2 kinds of cake, strawberry puree, strawberry cream filling and an Italian meringue buttercream.  Once my kids were in bed for naps on the following day, I set up my tripod in the light filled corner of my kitchen and got to work.  I tinkered with the settings on my camera and had everything ready to hopefully create a lovely step-by-step assembly animated GIF.  Everyone would be so impressed.  Ugh.  Overconfidence can kill, guys.

As I started layering the cakes with the strawberry cream I realized my dreams of perfection were dashed.  The cream was oozing out the sides and on to the cake plate and the cake was beginning to tip over.  5 layers!  Of course it was falling over!  I am not a cake decorator.  I did not think through this whole process as well as I should have.  I also didn’t think to have my AC running to counteract the July heat and humidity we have here in Houston.  Taking pictures in the light filled corner didn’t help, either.  The cake was melting.  I had a, “Well, now what?!” moment, probably cursed a little bit, and then grabbed some skewers from a drawer in the kitchen and tried to straighten everything out.  From there I stuck it in the fridge and hoped for the best.

Please notice the second to the last image in this GIF.  I’ve already said this, but it reminds me of the cake in Sleeping Beauty.  Just about ready to topple over and be supported by a broomstick.

cakelayers

I’d already whipped up the frosting and folded in the sprinkles (bad call), so I had to put that all back in the fridge.  I was not at all sure what back and forth from the fridge would do to an Italian meringue buttercream…but I didn’t really have another option.

Here it was it all of it’s glory, nice and white with pops of sprinkles.  This is when it should have gone on to the cake but instead was sent back to the fridge.

Confetti Cake-28

Since we had dinner plans I had to wait until the next day to finish.  I pulled the cake out of the fridge.  The skewers had done the trick to straighten the cake out, and everything still held tight when I removed them.  I do wish I’d done that to start, although it wouldn’t  have helped the oozing strawberry cream…

Now the buttercream.  I let it sit for a while, then whipped it up again, no doubt damaging many of those sprinkles and creating a nice grey hue to the icing that should’ve been white.  The texture was also off.  Awesome.  I had an ok time getting the cake iced, even with the uneven layers.  Thankfully I’d saved some icing without sprinkles for decorating the edges, and some of those precious sprinkles for the final touch.


IMG_6786

Now, what really matters is how it tasted.  And it was delicious!  Especially the confetti layers.  My daughter turns 4 next month and I am seriously considering the confetti cake recipe for either a cake or cupcakes.

Thank you, Tessa, for getting me to try new things!  Can’t wait to attempt to conquer more of your lovely cakes ; )

IMG_6461


Baking Through Fika: Mini Victoria Sandwich Cakes

So far in Baking through Fika I’ve not done anything beyond the stated recipe.  But every other recipe has been pretty straightforward without much room for creative license.  This is a simple sponge cake with lots of ways to play!  So I decided to do a Victoria sandwich type cake, but in mini form.  I blame by recent binge of The Great British Baking Show during which I cried more than once.  It’s so wonderful.  Go watch it now.

These sweet little cakes were a great way to come back from the disappointment I experienced with my first attempt with this sponge cake.  See instagram post for those beauts…

Mini Victoria Sponge-20

There is little doubt in my mind that my sponge cake was imperfect.  I don’t know what perfect sponge cake should be like, but having made it only twice I am certain that I do not have the skills to make it perfectly.  Should it have all those bubbles?  Should it have risen more?  Should I have baked it longer?  Or less?!  How’s the flavor?  I would love (and at the same time hate) to have Mary and Paul in my kitchen telling me what I’ve done wrong and how to fix it.  But this cake certainly tasted delicious, and for me that’s what matters most.

With sweet quick breads like banana and zucchini I like to grease and sugar my pans instead of greasing and flouring them.  I like the bit of sweet crunch from the sugar.  I decided I’d try that with my jelly roll pan for the sponge cake and it worked very well.  The cake rounds were easy to cut and remove from the pan with only a few bits that stuck.  But would Paul and Mary approve?!?

Mini Victoria Sponge-2

This one pan of sponge gave me 35 1 1/2 inch diameter rounds.  If you don’t have a set of biscuit cutters, go get some.  They have many uses beyond biscuits!

Mini Victoria Sponge-3

So what is a Victoria Sandwich?  It is simply two layers of sponge cake with raspberry jam in the middle dusted with powdered sugar.  It became popular in England during the reign of Queen Victoria, and I’ve read that it was her favorite tea time treat.  But I’ve also read that that is not in fact true.  So who knows.  Not sure when cream cake in to the mix, but I am happy it did.

Mini Victoria Sponge-5

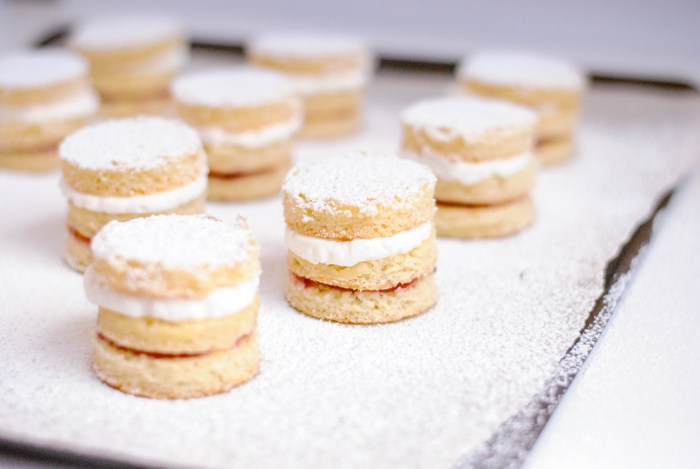
Since my sponge cake wasn’t very tall I made three layers instead of the two that I’ve seen in a Victoria sandwich.  I like the way they look with the three layers, but if you want to stretch the number of these you can make from one batch of cake, then two layers would be perfectly fine.

I used raspberry jam, but any kind would work.  I also played it safe with the amount of jam, just a thin layer.  It could’ve used a bit more, but I would rather them have too little jam than to have it oozing down the sides.

Mini Victoria Sponge-6

Mini Victoria Sponge-7

After the layer of jam another cake layer is added and sweetened whipped cream is piped on.  I add a little powdered sugar, a little almond and a little vanilla extract to mine just because that’s how my mom does it.  But go unsweetened, or without either of the extracts of you’d like.

Mini Victoria Sponge-8

Mini Victoria Sponge-9

Mini Victoria Sponge-10

Atop the cream goes one last sponge layer.

Mini Victoria Sponge-11

Mini Victoria Sponge-12

Mini Victoria Sponge-13

Pardon all the pics!  I kind of loved taking pictures of these photogenic little bits of sweetness.

Mini Victoria Sponge-14

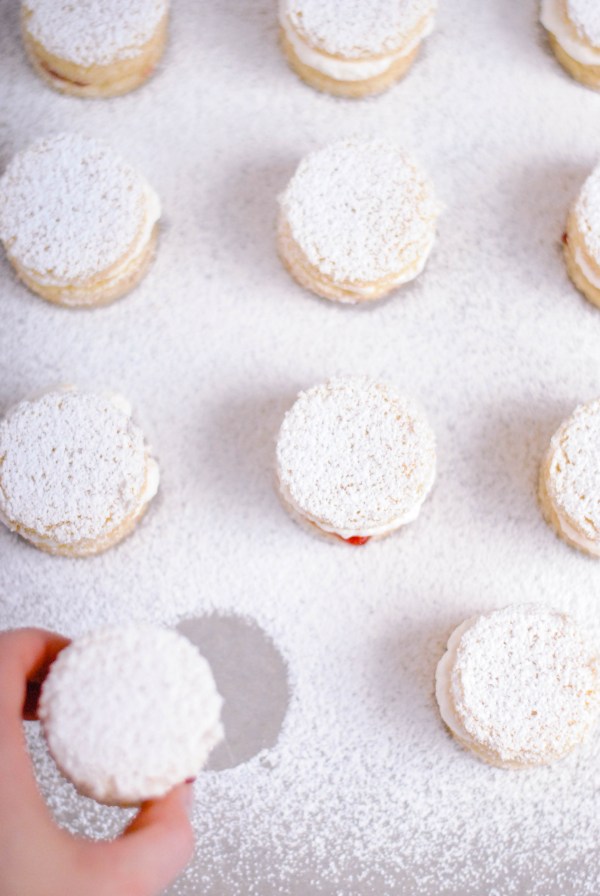
Now dust generously with powdered sugar and serve to your lucky guests!

Mini Victoria Sponge-15

If you plan to refrigerate these don’t do the powdered sugar.  Save that for right before serving.  It will soak into the cake and make it kind of gooey.  Still delicious, just not as lovely.

Mini Victoria Sponge-16

Mini Victoria Sponge-17

I’m kind of hoping my daughter will want a tea party for her 4th birthday because I can see these being a terrific addition to the spread.

Mini Victoria Sponge-19

Mini Victoria Sponge-18

Mini Victoria Sandwiches

From FIKA

Sponge Cake

Ingredients

  • 2 eggs
  • 3/4 cup sugar
  • 1 1/4 cup flour
  • 2 teaspoons baking powder
  • pinch of salt
  • 1 3/4 ounces melted butter
  • 1/2 cup milk (2 % is fine)
  • 1 teaspoon vanilla extract
  • 1/4 teaspoon almond extract

Directions

  1. Grease and sugar a jelly roll pan (rimmed baking sheet) and preheat oven to 350°F.
  2. Beat eggs and sugar until pale, about 5 minutes.
  3. In a separate bowl whisk flour, baking powder and salt.
  4. Combine milk, melted butter and extracts in a small bowl.
  5. Add flour mixture to the egg and sugar mixture, stirring just to combine.  Add the milk mixture and fold together into an even batter.
  6. Spread into pan and bake for 10-15 minutes.  It will be light in color and when pressed lightly in the center should spring back.
  7. Let cool slightly before cutting in to rounds, then let rounds cool completely before moving on.

Assembling Sandwiches

Ingredients

  • rounds of sponge cake (since I had 35 total rounds I used 33 and ate the others!)
  • raspberry jam
  • sweetened whipped cream
  • powdered sugar

Directions

  1. Arrange 1/3 of the rounds on a cookies sheet.
  2. Spread each with a thin layer of jam.
  3. Top with another layer of cake.
  4. Pipe on a nice bit of sweetened cream.
  5. Top with another layer of cake.
  6. Dust with powdered sugar.
  7. Eat.

Baking Through Fika: Rustic Almond Cookies

When things don’t turn out as neat and tidy as they were intended to be you can get away with it by calling your product “rustic”.  Which is most of the time just a nice euphemism for “messy”.  These cookies aren’t messy, but they do have “rustic” in the recipe title, which means there need be no anxiety about how neat they turn out, because they’re not supposed to be perfect!  My kind of recipe.

Rustic Almond Cookies

As you can see, my cookies are not the same size.  Precision is not the goal remember, they’re rustic.  So don’t worry about rolling the log into a perfect cylinder, just roughly the same thickness so that the baking time can be the same. If you want to make them perfect, though, then go for it.

These are like sweet almond butter crackers, crisp and with a nice petite size that makes for a treat that satisfies your sweet tooth without making you feel guilty.  As with many recipe in this cookbook they’re perfect with a cup  of coffee.  I stashed what we didn’t eat in the first few days in the freezer.  I simply take a couple out in the afternoon, let them thaw a bit (or not) and enjoy them during the few minutes of calm I get at nap time with my reheated coffee from the morning.  Such is my glamorous life, guys.

This is one of those recipes in FIKA that only has a few ingredients (all of which I almost always have) and has very little hands-on time, making it perfect for a quick treat that can be completed quickly.  Start to finish these take under 2 hours including the hour of chilling time.

Rustic Almond Cookies-4

Another benefit to a short ingredient list is the simplicity of this cookie, which may be another reason it’s called rustic.  Simple ingredients and a simple baking method.  I sometimes feel like if I don’t make something extravagant that’s loaded with a million special and indulgent ingredients that no one is going to care.  But I think there is something refreshing in simplicity in the kitchen, especially in a world where people are making hamburgers with donut buns.  I’m not knocking them, though. I’m from Round Rock originally, and the next time I get a chance I will probably try this hamburger if it’s still on the menu.  I’ll eat the crazy food, I’m just not going to make it.

Rustic Almond Cookies-5

Rustic Almond Cookies

From FIKA

Ingredients

  • 4 ounces butter, room temperature
  • 1/3 cup sugar
  • 1 tablespoon corn syrup
  • 1 1/4 ounces almonds (blanched whole or slivered) finely chopped in a food processor
  • 1 cup flour
  • 1/2 teaspoon baking soda
  • 1/4 teaspoon salt

Directions

  1. Beat together butter, sugar and corn syrup until thoroughly combined.
  2. Whisk together flour, almonds, salt and baking soda in a small bowl.
  3. Add flour mixture to the butter mixture and beat to combine.
  4. On a floured surface, roll the dough into a log about 1 inch thick.  Wrap in plastic and chill for at least 1 hour.
  5. Preheat oven to 400°F and line a baking sheet with parchment.
  6. Using a serrated knife, slice cookie log into slices between 1/4 and 1/2 inch thick.  Place on prepared cookie sheet, spacing them 1/2 inch apart.  Bake for 5-8 minutes depending on how thick you sliced the cookies.  They should be just golden on the edges.  Let cook on a wire rack.


Baking Through Fika: Mazarin Tarts

Confession time: I ate all but two of these.  Myself.  In a week.  One night I ate 3 in one sitting.  These are evil.  And oh so delicious.

Mazarin Tarts-3

Really there was no choice but for them to be tasty.  Butter pastry and sweet almond filling are two of the best things in the food world I think.  At least in the sweet food world, because there’s bacon and goat cheese to consider…

Mazarin Tarts-5

I would like to make these again, and not simply with the intention of devouring them.  This was my first time using these tins and I don’t yet know the best way to prep them or to remove the final product.  In the Fika book they are perfect rounds, which is darling and seems easier to remove than a fluted tin.  I didn’t start out greasing them, but after I’d done a few I thought I’d better do it so that if the ungreased tins did stick I wouldn’t have ruined them all.  I think greasing helped, but it was still tricky to get them out fully intact.  That could also have something to do with the delicate-ness of the crust itself, though.

Mazarin Tarts

The filling was more than I needed for the dozen tart shells I prepared.  I think that the crust was a bit thick on some of them, so I could’ve probably stretched the dough for the crusts a bit and made at least 3 more than the dozen I made.  The filling does cook up so don’t fill them too much or it will run up and over the crust.

To finish these off, you can either give them a nice dusting of powdered sugar or a simple powdered sugar glaze.  I love the look of both, but chose the glaze since it added another texture to the tart.

Mazarin Tarts-4

This isn’t a dessert you make on a Wednesday just ’cause.  Or maybe it is!  I think they’d be a great addition to a dessert spread and perfect for a little tea or coffee party.  They keep very well in the fridge for a few days, just let them sit at room temp to warm up a bit.  Enjoy!  Hopefully this is all you will want to leave behind of these sweet tarts.

Mazarin Tarts-2

Mazarin Tarts

From Fika

Ingredients

Tart Shells

  • 3 1/2 ounces of butter, cold and cut into chunks
  • 2 tablespoons sugar
  • 3/4 cup flour
  • 1 egg yolk
  • pinch of salt

Filling

  • 1 3/4 ounces butter, softened
  • 1/2 cup sugar
  • 3 1/2 ounces of blanched almonds, ground
  • 2 eggs
  • 1/4 teaspoon almond extract

Glaze

  • 3/4 cup powdered sugar
  • 1 1/2 tablespoons milk

Directions

Tart Shells

  1. Combine flour, sugar, salt and butter in a food processor and pulse until mixture looks like coarse sand.
  2. Add in the egg and mix until dough comes together.
  3. Wrap in plastic wrap and chill for at least an hour.
  4. Grease 12-16 tart tins.  If you have small tins you will use more, bigger tins you’ll need fewer.

Filling

  1. Whisk together all filling ingredients.

Assemble and Bake

  1. Preheat oven to 350°F.
  2. Divide dough into as many pieces as you have tins.  Press a piece of dough into the tin and up the sides making it as even as possible.  Repeat for all the tins and place on a baking sheet.
  3. Fill the tarts about 2/3 full with the almond filling.  Err on the side of less filling since it could spill over the edge of the tart.
  4. Bake for about 20 minutes, until tarts begin to turn golden.
  5. Cool tarts completely and remove from the tins before whisking together glaze ingredients and pouring a thin layer over the filling of the tart.  You can also dust them with powdered sugar or leave them plain.


Baking Through Fika: Radio Cake

With any cookbook you are going to encounter some duds and some stand outs.  I’ve made a couple of duds from Fika that I don’t see myself ever making again.  But then there are the stand outs, and there are two types of stand out recipes.  Some are delicious but take so much work that you’re unlikely to repeat them.  Other stand outs are delicious and not overly complicated which makes them much easier and enjoyable to make again.

Raadio Cake-2

This radio cake didn’t seem like it would fall into either stand out category, really.  It just seemed safe.  It looked easy (a big plus for me!) and like it would be ok in the flavor department.  Turns out this is a true stand out that I can easily see myself repeating since it is simple to prepare, delicious, and lovely to look at.  It’s also unique, something I’d never made or eaten before.

Raadio Cake-9

You can keep this simple or dress it up.  A plain slice of this would be fine to enjoy as an afternoon treat by yourself.  Or you can add some whipped cream and cookie crumbs and serve it to your dinner guests.  Speaking of dinner guests, you can make this hours before if not a full day before you need to serve it, making it an even better choice to serve guests for dessert.

Raadio Cake-8

This is pretty rich and can be changed based on the type and quality of chocolate you use.  I used Ghiradelli bars, one 60% and one 70% cacao.  It was rich, a thin slice was plenty for me.

The recipe calls for Marie butter cookies.  I couldn’t find those, so I used a digestive biscuit cookie that I hadn’t tried before.  I finished the package I bought for the cookies and went back and bought two more just for snacking.  It has an almost graham cracker-like taste with a hearty texture that pairs well with the chocolate and cream (if you’re wise enough to add a dollop).  These cookies were too big to fit three in a row in my loaf pan on the bottom layer, so I broke them in half to fit.

As you can see in these photos, I didn’t do a great job of putting the plastic wrap in the loaf pan.  There are all kinds of creases in the chocolate.  In my defense, plastic wrap is a pain to keep smooth so I was lucky to get it in there at all!  I placed one sheet horizontally and a second vertically.  I guess there’s a way to smooth the top after you’ve inverted  it on to a platter, but I’m not sure what that is.  I’d probably make it look worse if I tried to make it better, though, so leaving it alone was a better choice for me!

To slice this I thought at first of using a large chef’s knife, but then thought that a bench scraper would be a better choice to make one nice clean cut.  I warmed it underneath hot water, dried it, then cut straight down on the cake for a nice clean slice.  Not a beautiful serving tool, but a functional one.

Raadio Cake-10

Raadio Cake-11

Now.  Those eggs.  I’m not sure if they’re warmed enough by the addition of the melted butter/chocolate mixture.  To be safe they need to be warmed to 160°F.  I did not check that they were.  Bad.  I know.  Grab a thermometer and check them after mixing.  If it’s not warmed enough you could set it over simmering water and whisk away until it does.  I escaped without any issues, but will check next time for sure.

I loved that the wonderfulness of this “cake” was such a surprise!  I just thought I was checking off another Fika recipe, and it wound up being terrific.  Looking forward to seeing what the next recipe holds.  Here’s hoping it’s another pleasant surprise!

Radio Cake

From Fika

Ingredients

  • 8 ounces butter
  • 8 ounces dark chocolate (roughly chopped)
  • 2 eggs
  • 3/4 cup powdered sugar
  • 1 tablespoon good cocoa powder
  • 1/2 teaspoon vanilla
  • Marie cookies (about 25) or large digestive cookies (12-18) extra cookies crushed for garnish
  • sweetened whipped cream for garnish

Directions

  1. Line a loaf pan with plastic wrap and set aside.
  2. Melt the butter and chocolate together in a bowl either in a double boiler or in the microwave in 30-45 second increments stirring in between until melted and smooth.
  3. In another bowl beat eggs, powdered sugar, cocoa powder and vanilla until light.  Add in the melted chocolate mixture and beat to fully combine.
  4. Spread a layer of chocolate in the pan, then lay cookies down in a row on top.  Cover with chocolate, then cookie, repeat until you have 3-4 cookie layers and end with chocolate.
  5. Chill for at least an hour.
  6. Invert on to a platter and peel off the plastic wrap.
  7. Slice and serve with whipped cream if desired.

Baking Through Fika: Toffee Cookies

This always happens.  After Halloween things just get a little nuts and before I know it it’s Christmas!  Anyone else feeling like that?!  In a mere 4 weeks we’ll be ringing in 2016.  Crazy.

I’ve been slacking off a little on the blog and on this Fika project.  After a couple of mishaps I got a little frustrated, so I wasn’t as excited about continuing and possibly encountering failure yet again.  And to be honest I wasn’t expecting much from this simple cookie.

Toffe Cookies-3

But these unassuming cookies are quite good and something I see myself making again, especially if I need to whip up dessert in a hurry.  These are great with a cup of coffee or tea (of course they’re included in a book called Fika!) but would also make a nice addition to a cookie platter.  They freeze nicely, so you could make them ahead of time and take them out when you need them.

Since the ingredients are so few the kind of vanilla you use is going to make a difference.  I’ve been partial to this Watkins Clear Vanilla lately, but it isn’t the same as pure vanilla extract or vanilla bean paste, both of which would be terrific.  You could add a touch of almond extract if you were feeling adventurous or play around with all kinds of extracts really…maybe peppermint and then dip these in chocolate?  I might have a weekend project to work on…

I wasn’t sure about why they were called toffee cookies at first.  But the flavor is rich and buttery like toffee.  So I guess the name is fitting.

I made these twice thinking the first time I flattened the logs of dough too much and they spread more than they should have resulting in a pancake-like cookie log.  The next time I chilled the logs and hardly flattened them at all.  There was some change, enough that I’d still chill and flatten less, but not a huge difference that I’d say you absolutely MUST chill the dough.

Toffe Cookies-2

These really are quick, simple and delicious.  This would even be a great cookie to make with young kids.  Put them to work measuring, mixing, rolling and cutting.  I sliced these with a pizza cutter which made it a quick and easy task.  I don’t know about your kids, but mine love the idea of the pizza cutter and might get a little carried away with it so I’d have to do that job myself 🙂

Toffe Cookies-5

Toffee Cookies

Adapted ever so slightly from Fika

Ingredients

  • 1 stick of butter, softened slightly
  • 1/2 cup sugar
  • 1 tablespoon corn syrup
  • 1 cup flour
  • 1 teaspoon baking powder
  • 1/2 teaspoon salt
  • 1 teaspoon vanilla extract

Directions

  1. Pre-heat oven to 350°F and line a baking sheet with parchment.
  2. Combine butter, sugar and corn syrup in a mixing bowl and beat until thoroughly combined.
  3. Add in flour, salt, baking powder and extract and beat until it the dough together.
  4. Turn dough out onto a floured surface and divide into 3 equal-sized pieces.  Roll each into a rope about as long as the baking sheet and about as thick as your thumb and carefully transfer to the baking sheet.  At this point you can chill the dough on the baking sheet for half an hour if you have the time.  If not, then just go ahead and put them in the oven.
  5. Bake for 10-15 minutes until they begin to brown.  Transfer the entire piece of parchment to a cutting surface and using a large knife or pizza cutter slice the warm cookies on an angle into pieces 1/2-3/4 inch thick.  Let cool and enjoy.

Baking Through Fika: Apple and Cream Millefeuille

This is probably not a comparison that any pastry chef would ever wish upon their wares, but I am no pastry chef, so I have no problem with it.  This tasted like an apple toaster strudel!  The best apple toaster strudel you have ever had.  Ever in your life.  Ever.

Millefeuille-19

When you search images of millefeuille, French for “a thousand leaves”, what I have here is not exactly what you will see.  You probably know them as Napoleons, layers of puff pastry filled with all kinds of sweetness.  Most of these fancy pastries are beautiful and well trimmed with lovely, even layers.  I’m the gal who’s ok with making something taste like a toaster strudel, so my millefeuille is not well trimmed, and the layers are not even.  But it is so delicious, and really that is all that matters.

Millefeuille-15

One of the things about this cookbook that I don’t love is that sometimes there aren’t crystal clear instructions or it calls for an ingredient that requires you to make something extra for which there is no recipe and are no instructions.  In this recipe a cup of pastry cream or vanilla pudding is on the ingredient list.  I’ve made pastry cream before, but never in a small batch.  Thankfully I found this recipe for pastry cream that made just the perfect amount.  I did have a little scare when the fat separated out from the milk and I thought I was going to have to start over.  The internet saved me again with this quick fix for a broken pastry cream!

It also calls for whipping cream, but do not tell you to whip it.  If I hadn’t done much baking I would not have thought to whip it.  Maybe the authors of this book are just testing the baking knowledge of its readers, which I find to be tricky.  Tricky Swedes.

The recipe says to use 2/3 cup of apple sauce.  I used 3-4 tablespoons, just enough to cover the bottom layer of pastry.  Anymore and I was afraid it was going to just spill over the edges.

Red currant jam is called for…I used apple jelly.

Other than all that, this is a fairly straightforward recipe 😉  Thankfully it uses store-bought puff pastry and is easy to assemble.

Millefeuille Millefeuille-2 Millefeuille-3 Millefeuille-4 Millefeuille-5 Millefeuille-6 Millefeuille-7

The pastry cream can be made a day or two in advance, but don’t assemble this much more than a couple hours before you plan to serve it.  It is best enjoyed fresh.

Millefeuille-18

Apple and Cream Millefeuille

Ingredients

Millefeuille

  • 1 sleeve of frozen puff pastry
  • 1 cup pastry cream (recipe below)
  • 1/2 cup whipping cream whipped to soft peaks
  • 3-4 tablespoons apple sauce
  • 3-4 teaspoons apple jelly
  • 1/2 cup powdered sugar
  • 1/2-1 tablespoon milk or water
  • a few drops almond or vanilla extract

Pastry Cream

  • ¾ cup heavy cream
  • ¼ cup sugar
  • 2 tablespoons flour
  • pinch of salt
  • 2 large egg yolks
  • ½ teaspoon vanilla

Directions

Pastry Cream

  1. In a small saucepan warm the cream over medium-low heat until tiny bubbles appear around the edge of the pan, but do not boil.
  2. In a medium bowl, whisk together the flour, sugar and salt. Add in the egg yolks, and whisk together.
  3. Slowly pour the warm cream into the egg yolk mixture, a tablespoon or so at a time. Continue to whisk as you pour.
  4. Pour the mixture back into the saucepan and cook over medium heat. Whisk constantly while it comes to a simmer. Once simmering, it will begin to thicken. Once large bubbles pop on the surface, continue to cook for a few more seconds while whisking, then remove from heat. Stir in the vanilla.
  5. Scrape the pastry cream into a bowl, press a piece of plastic wrap directly on the surface, then chill in the fridge for at least 3 hours and up to 2 days.

Millefeuille

  1. Thaw the puff pastry according to the package directions and pre-heat the oven to 425°F.  Unfold the sheet and use a paring knife or pizza cutter to slice into 3 equal pieces (most sheets are already folded into thirds, so this should be easy.  Place the pastry on a parchment lined baking sheet and prick all over the a fork.  Bake for 10-12 minutes, until golden.  Let cool, then trim to neaten the edges…or not 🙂
  2. Fold the whipped cream into the pastry cream.
  3. Place one layer of pastry on a serving platter.  Spread applesauce evenly into this layer.
  4. Place another layer of pastry on top and spread evenly with the pastry cream.  You could also put the cream into a pastry bag and pipe it nicely.
  5. Place the last layer is pastry on top upside down so that you have a nice flat top layer.
  6. Heat the apple jelly in the microwave until easily spreadable, then spread on the top of the pastry.
  7. Whisk together the powdered sugar, milk/water and extract until smooth.  Spread over the jelly and let set.  Slice and serve or refrigerate for an hour or two.


Baking Through Fika: Checkerboard Cookies

This one was harder than I thought it would be.  It had a simple ingredient list and seemingly simple instructions.  But I just didn’t really deliver on the execution.  Gotta love being humbled in the kitchen!

Checkerboard Cookies-2

As you can see, my cookies are not sweet, dainty squares divided into equally sized plain and chocolate shortbread quadrants.  They are wavy, oddly shaped, and so far from dainty.  BUT they were yummy.  So yummy, in fact, that my son who much prefers a packaged sweet to my baked goods referred to them as the “special black and white cookies” when he told me what he wanted for dessert.  I thought he meant Oreos.  When I gave him an Oreo he says, “No, mom, the special ones you made!”  It was a rare moment, and a good one.

Checkerboard Cookies-3

There is a certain amount of precision required to make these cookies look like they should.  In order to get those straight edges you must really make each part neat, and then piece everything together neatly.  I just made rough rectangles by hand and the results were a more rustic cookie.  Here are some ideas I have for making them better.  Anyone out there have good tips to share?

  • Chill the dough after dividing it so that it’s just a bit firmer.  When I used the dough it was very soft, and too malleable.
  • Use a dough scraper as your straight edge to get neat edges on each piece, then chill them separately before joining them together.
  • Use the dough scraper again after putting the pieces together, and be sure to put them together on a flat surface that you can transfer directly in to the fridge to chill again.
  • When creating the long rectangles of dough, they become long and difficult to move.  If you made two sets of long rectangles, a total of 8 (4 chocolate and 4 plain) they would be easier to move and place together.

I’ll have to give these another go and see if any of those things help!

Even though these weren’t the prettiest of cookies, they had good flavor, buttery and slightly soft with a subtle chocolate flavor.  They’re nice along side your cup of coffee or tea and would make a nice addition to a Christmas cookie plate.  Not that I’m already thinking about Christmas…

Checkerboard Cookies

Checkerboard Cookies

From Baking Through Fika

Ingredients

  • 7 ounces of butter, softened
  • 1/2 cup sugar
  • 1/4 teaspoon vanilla extract
  • 2 cups flour
  • 2 tablespoons cocoa powder

Directions

  1. Beat the butter and sugar together until combined, then add in the vanilla followed by the flour.  Mix until evenly combined.
  2. Divide the dough into two equally sized pieces.
  3. Mix the cocoa into one half of the dough until it’s incorporated and the dough is a consistent color.
  4. Divide each half in half so that you have 4 pieces, two plain and two chocolate.  If your dough is especially soft, you may want to chill it for 10-20 minutes.
  5. Form each piece into a long rectangle, about 1/2 inch thick.  Make all the pieces the same length and width.  (This is the part where dividing the dough further might be helpful.)  Place one chocolate rectangle next to one plain.  Then place a plain piece on top of the chocolate and a chocolate piece on top of the plain.  Press together lightly, wrap in plastic wrap and chill for at least an hour.
  6. Preheat oven to 350°F.
  7. Remove from the fridge and unwrap.  Slice (a large chef’s knife is good for this) into slice that are about 1/4 inch thick.  Place on a baking sheet lined with parchment.  They spread a bit, but not too much, so space them 1/2 an inch or so apart.
  8. Bake for about 10 minutes, until they are set and the edges are just beginning to brown.
  9. These store very well once cooled at room temperature in a container.  They would also freeze very well.


Baking Through Fika: Summer Torte

As promised, here is a much more complicated recipe from Fika!  I destroyed my kitchen with this one, so you know it’s good.

Summer Torte-4

For my third dessert I tried my hand at a layered cake filled with a lemon mousse, topped and filled with fruit and frosted around the edges with sweetened whipped cream and almonds.  Are you drooling yet?!

Summer Torte-9

I ran into a few little issues with the ingredients in this recipe.  Since these recipes are Swedish, some of the ingredients are not things you’d find in a non-European kitchen.  Here are the ingredients I struggled with and how I worked it out.

  • Potato flour: I did not have any potato flour (anyone out there use it on a regular basis?) and was not about to go buy some for a measly 1/4 cup.  After a little research I decided to grind potato flakes into a flour-like consistency.  It worked just fine.
  • Gelatin sheets: This is a European thing, or at least it seems to be based on my limited internet searching.  I could order gelatin sheets on Amazon, OR I could find a way to use powdered gelatin.  Turns out that 4 gelatin sheets (called for in the recipe) is just about equivalent to 1 packet of powdered gelatin.  Sprinkle it over 1/4 cup of cold water before using it.  Problem solved.
  • Jelly Sugar: This turned out to be a non-issue since I simply decided to skip this part of the recipe!  You are supposed to use the sugar to make a glaze for the fruit on top of the torte, which makes it nice and shiny.  I just chose not to glaze the fruit, and it was fine.  But just so you know, jelly sugar is not just plain ol sugar.  It contains pectin which causes it to gel when mixed with water and heated.  I’m interested to try it, but since it wasn’t easy for me to find I didn’t use it.  When talking about this with my Aunt Vivie, she suggested heating up some jam and glazing with that.  Wish I’d talked to her before making this!  I think that would be a great alternative.

It wasn’t just the ingredients that tested my baking knowledge and skill!  The methods for making the lemon mousse filling and the cake were things I had never done before.  The filling ended up being just as it should be (at least I think it was) but the cake was maybe not as tall as it should have been, and it was sunken in the center.  When I sliced it in half the middle of the top layer was significantly thinner than the outer edges.  BUT when all was said and done, this was super good.  I’m glad I made it during the summer, it is a perfect summer dessert.

Summer Torte-19

This is best eaten within a few days, so make it for guests (it serves 6-8) or for a family who will eat it within that time!  In my house I am the only one eating stuff like this, so I pawned it off on a few friend and visitors who were kind enough to help me finish it.

Summer Torte-11 Summer Torte-22

Summer Torte

Ingredients

Cake

  • 3 eggs
  • 1/2 cup sugar
  • 1/4 cup potato flour
  • 1/3 cup flour

Lemon Mousse

  • 3/4 cup heavy cream
  • 1 envelope powdered gelatin (4 gelatin sheets)
  • 1/2 cup sugar
  • zest and juice of one lemon

Fruit and Garnish

  • Some combination of strawberries, blueberries, raspberries (3-4 cups total)
  • 3/4 cup heavy cream
  • 1-2 teaspoons powdered sugar
  • 1/2 teaspoon vanilla extract
  • 1/4 teaspoon almond extract
  • 1 couple hefty handfuls of sliced almonds (toasted if desired)
  • 1/4 cup jelly sugar heated with 1/4 cup water OR heated apricot jam OR nothing

Directions

Cake

  1. Pre-heat oven to 400F.  Grease a 10-inch springform pan or line it with parchment.
  2. Heat a pot of water over medium heat.  Beat the eggs and sugar with a hand mixer until light and fluffy in a bowl placed over the hot water.  Once the mixture reaches 140F (about 7 minutes) remove from the heat but continue to beat for a few minutes.
  3. Sift the potato flour and all purpose flour over the egg mixture, then fold it into the eggs until just combined.  Pour into the prepared pan and bake in the lower third of the oven for 15-18 minutes.  Let cool for 10 minutes, remove from the pan and cool on a wire rack.

Lemon Mousse

  1. Whip the cream to medium-stiff peaks and keep in the fridge.
  2. Sprinkle the gelatin over 1/4 cup cold water and let bloom.
  3. Beat the egg and sugar until light, then beat in the lemon zest.
  4. Pour the lemon juice into a small saucepan.  Add the gelatin and heat over low to melt the gelatin.  Once melted, remove from the heat.  Stir in a spoonful of the melted gelatin into the egg mixture, repeat 2-3 times to temper the eggs, then add all of the gelatin mixture and mix to combine.  Fold in the whipped cream.

Layer and Assemble

  1. Prepare the pan by first cutting a cardboard round the size of the cake.  Line the spring form pan with plastic wrap, then place the cardboard round in the bottom of the pan.
  2. Divide the cake in to two layers and place one layer (the sturdier of the two) into the pan.  Spread a good layer of the mousse (not quite half) onto the cake, then place half of the fruit on top.  If you are using strawberries be sure to slice them.
  3. Place the other layer on top and repeat with some (but probably not all) of the lemon mousse and the rest of the fruit.  You can use whole strawberries on top (stems removed).  Refrigerate for 1-2 hours.
  4. Before removing the torte from the refrigerator whip the cream with the sugar and extracts.
  5. Remove the torte from the pan and spread the cream around the edges, then press the almonds into the cream.  Slice and serve!