Main Dishes

Main Dish Recipes

Peanut Noodles with Chicken and Vegetables

One of the great things about having a pantry that’s on the small side is that it is next to impossible to lose track of food, only to find it years later.  I don’t have to get elbow-deep in my canned goods to find a can of tomatoes.  My small food storage also keeps me from stocking up on things I don’t need…I do have a snack bowl on top of the cabinet for my assortment of gummy candies and what remains of Carson’s Easter goodies.  But candy is a need, right?

Anyway, when I came across this recipe on Eatingwell.com I knew that I had about 3/4 of a box of thin spaghetti because I see it every time I get something from the pantry, so I added this to my meals for the week.  I was already planning to buy chicken for chicken parmesan, so I was able to buy a 4 pack of chicken breasts and know that they would all get used that week.  That makes me happy.

The recipe calls for a bag of vegetable medley, but I just used veggies that we like; broccoli, red bell pepper, snap peas, frozen edamame and carrots.  Since I was using more like 11-12 ounces of spaghetti, I increased the amount of vegetables I used to about 20 ounces.  I really like there to be a lot of vegetables in pasta dishes, so you may not want to use as much as I did.  I used 1 medium sized broccoli crown, 1 red bell pepper, 5 small carrots, 1 small bag of snap peas, and 8 ounces of frozen edamame.  I kept the sauce pretty much the same, but did end up adding more soy and a drizzle of sesame oil at the end.  The sriracha is spicy.  I like spice, so I used 2 teaspoons of the stuff and definitely felt the heat.  If you are not a fan of spicy foods, use 1/2 a teaspoon in the sauce, taste it and add more if you’d like.

A mistake I made with this was adding all of my vegetables at once.  The carrots were a little under cooked, so if you’re using carrot slices, don’t slice them too thick and make sure to give them a head start in the boiling water.  The broccoli, bell pepper, snap peas and edamame cooked easily in the 3-4 minutes of cooking time.

To make this meal even faster to fix, use shredded rotisserie chicken.  Buy bagged vegetables that are ready to go, or chop your veggies the morning of or the night before.  You can even make the sauce ahead of time and refrigerate it.  The heat from the cooked pasta and hot water will loosen it up as it will be stiff coming out of the fridge.  You can serve this warm or cold.  We ate it both ways and it was delicious.

Peanut Noodles with Chicken and Vegetables

Adapted from Eatingwell.com

Serves 6-8

Ingredients

  • 2-3 boneless skinless chicken breasts
  • 10-12 ounces thin spaghetti
  • 16-18 ounces of vegetables (broccoli, snap peas, bell pepper, carrots, edamame) carrots, broccoli and bell pepper cut into pieces
  • fresh chopped cilantro, optional

Sauce

  • 1/2 cup chunky, natural peanut butter
  • 2-3 tablespoons reduced-sodium soy sauce
  • 2 teaspoons minced garlic
  • 1-2 teaspoons chile-garlic sauce (Sriracha), or to taste
  • 2-3 teaspoons minced fresh ginger
  • 1/2-1 teaspoon sesame oil

Directions

  1. Cook the chicken.  In a medium saucepan, bring water to a boil, salt water, then add chicken, reduce heat to a simmer and cook for 20 minutes.  Remove chicken from water and let cool slightly before shredding into bite size pieces.
  2. Bring a large pot of salted water to a boil, add pasta and cook for 4 minutes, add carrots if using and cook for a minute, add the rest of the vegetables and cook for another 3-4 minutes.  Reserve about 1 cup of pasta water then drain and rinse with cool water.
  3. Make sauce by whisking peanut butter, soy sauce, garlic, ginger, sriracha and sesame oil in a large bowl.  Stir 1/2 cup of pasta water into the sauce.  Toss in pasta, vegetables and chicken.  Add in more pasta water to moisten pasta to your liking.  Mix thoroughly so that all the veggies, pasta and chicken are coated with sauce.  Garnish with cilantro if desired.

Greek Turkey Meatloaf

When Ben got home from work and asked what we were having for dinner I am pretty sure that he cringed and rolled his eyes when I said turkey meatloaf.  If it were up to him there would be no turkey burgers, no turkey meatballs, and no turkey meatloaf.  And I get it.  If the name of the food has the word meat in it, then it should be made of meat.  This made me wonder, what is meat, exactly?  I looked into the definition of meat, which is really just any animal flesh that we eat.  But meat is defined more specifically as pork, beef and lamb by the meat packing industry.  Chicken and turkey are grouped in the poultry category.  So today we’re making poulty-loaf…which just doesn’t sound very good.  So, I will keep calling this turkey “meat”loaf.

This was a good meatloaf.  Definitely unique in flavor with the feta and dill.  It wasn’t real juicy, but not at all dry either.  I liked it, and Ben didn’t say that he hated it…

One of the reasons I chose to make this was its built in leftover recipe.  I recently got an iPad (which I still can’t believe I talked myself into thinking I needed) and I have the Martha Stewart Everyday Food mag on it.  This meatloaf recipe uses 1/3 of the leftover meatloaf to make turkey and spinach hand pies.  Usually the only option for leftover meatloaf is meatloaf sandwiches, which are delicious, but it was fun to try something different.  More on those later.

The only changes I made were to use wheat sandwich bread slices (which I soaked in a few tablespoons of milk before mixing them with everything else) and using all 85/15 turkey.

Greek Turkey Meatloaf

From Everyday Food April 2012

Ingredients

  • 2 teaspoons extra-virgin olive oil
  • 1 small red onion, diced small
  • 2 garlic cloves, finely chopped
  • 2 large celery stalks, diced small
  • coarse salt and ground pepper
  • 2 pounds ground 85/15 turkey (or half 93/7 and half 85/15)
  • 1 large egg
  • 2 slices white or wheat sandwich bread, cut into small pieces
  • 2 tablespoons milk
  • 4 ounces feta, crumbled (1 cup)
  • 1/4 cup fresh dill, chopped

Directions

  1. Preheat oven to 350°F. In a medium skillet, heat oil over medium. Add onion, garlic, and celery and cook, stirring occasionally, until vegetables are soft, 7 minutes. Season with salt and pepper.
  2. In a large bowl, combine bread crumbs and milk and let soak for a few minutes.  Add in vegetables, turkey, egg, 1 1/4 teaspoons salt, and 1/2 teaspoon pepper. Using your hands, mix until combined. Mix in feta and dill.
  3. Transfer to a parchment-lined rimmed baking sheet and form into a 4-by-10-inch loaf. Bake until cooked through, 45 to 55 minutes, rotating sheet halfway through. Let rest 10 minutes before slicing. (To store, cover and refrigerate, up to 3 days.)

Spring Tortellini with Asparagus, Peas, Goat Cheese, Pine Nuts & Mint

Do you think that’s a descriptive enough title?  Should I have also told you that it has salt in it?  Honestly though, I tried to shorten it, but I thought people needed to know what was in this perfect for springtime pasta right from the start.  So no need to read on for the recipe, just print it out, go to the store and make this for dinner.

I don’t get any cooking magazines other than Fine Cooking.  It isn’t loaded down with ads and is full of yummy recipes.  I bookmarked this one the first time I went through the issue.  It did not disappoint.  We ate it warm the first night and then a few days later as a cold pasta salad for lunch.  It was delicious each time.  The flavors are refreshing and light, a great option for a warmer weather pasta dinner.  It is a cinch to prepare since you use store bought tortellini.  The only work you have to do is cut the asparagus, mince the garlic, chop the mint and toast the pine nuts.  This meal came together incredibly fast.  So fast, in fact, that Carson wasn’t yet in bed by the time it was done so I had to let it sit for a while before we ate.

The only things I changed from the original recipe were using a little less olive oil in the sauce, adding a few extra peas (I love peas), using 2 packages of tortellini totaling 18 ounces (just 2 ounces more than called for) I used 1 package of cheese and 1 of Italian sausage.  I also used closer to 3 ounces of goat cheese (I love goat cheese).  Make sure to reserve the pasta water!  It makes a lovely sauce on this dish.

Spring Tortellini

From Fine Cooking Magazine

Ingredients

  • 1/4 cup extra-virgin olive oil
  • salt and pepper
  • 2 medium cloves garlic, pressed or minced
  • 1/8 tsp. cayenne
  • 1 lb. fresh cheese tortellini (or 2 9-ounce packages)
  • 1 lb. asparagus, trimmed of tough, woody stems, and cut crosswise into 1/2-inch pieces (leave the tips whole)
  • 1 1/2 cups shelled fresh peas (or thawed frozen peas)
  • 1/3 cup pine nuts, toasted
  • 1/4 cup coarsely chopped fresh mint
  • 2-3 oz. fresh goat cheese, softened
  • Freshly ground black pepper
Directions
  1. In a 6-quart covered pot, bring 3 quarts well-salted water to a boil over high heat.
  2. In a large bowl, combine the olive oil, garlic, cayenne, and 1/2 tsp. salt.
  3. Add the tortellini to the boiling water and cook for 3 minutes, then add the asparagus, and peas to the water and cook for an additional 2 to 3 minutes.
  4. Reserve 1 cup of the cooking water, then drain the pasta and vegetables and toss with the garlic-oil mixture. Add  the pine nuts, mint, and  goat cheese and stir until the cheese melts into a sauce, adding cooking water as needed to moisten the pasta.
  5. Season to taste with salt and freshly ground black pepper and serve.

Slow Cooker Chicken Tikka Masala

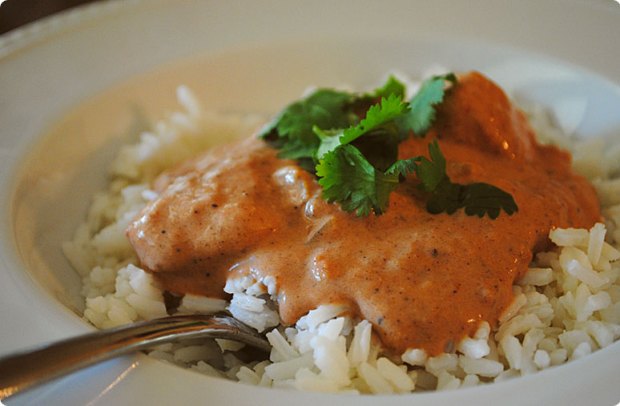
It is hard to cook for two.  This meal was yet another reminder of that fact.  After the two of us had one big (for Ben) and two small (for me) servings of this chicken tikka, it didn’t look like we’d even touched the stuff.  We will be eating this for days, and I mean that in a very good way.  I really enjoyed this and have had no problem eating it as leftovers.  Make sure to leave the jalapeno in with whatever you need to refrigerate.  This tastes even better the next day.

This recipe is from Tasty Kitchen.  I used 4 boneless skinless chicken breasts and will use 5 or 6 next time to accommodate for the large amount of yummy sauce.  The original recipe says that it serves 6, but I think it could easily serve 8.

I couldn’t find garam masala, so I made my own.  If you have a grocery store that sells spices in bulk I would recommend buying some of these spices that you don’t use very often in smaller amounts to cut the cost a bit.  I had a jar of ground cardamom already, but a new jar was going to set me back $9.00 so I’m glad I had it.  This is what I used for the garam masala.  It was exactly 3 tablespoons, so it’s perfect for this recipe.

Garam Masala

Mix together the following spices.  Use or store in a sealed container.

  • 1 tablespoon ground cumin
  • 1 1/2 teaspoons ground coriander
  • 1 1/2 teaspoons ground cardamom
  • 1 1/2 teaspoons ground pepper
  • 1 teaspoon ground cinnamon
  • 1/2 teaspoon ground cloves
  • 1/2 teaspoon ground nutmeg

The only thing I didn’t enjoy about making this meal was all the ginger I had to grate.  I do love fresh ginger, and so there was no way I was going to use less than it called for.  But peeling and grating a 3 inch piece of ginger is not a task I took forward to repeating.  But since I will be making this again, I will be peeling and grating all that ginger yet again.  You can finely chop it, but I think grating it in this recipe is a better choice because then you don’t get little pieces of ginger.  If you don’t have a microplane grater, chop it as finely as you can.  If you do grate it, watch your fingertips!  Those graters are sharp.

Other than using chicken breasts and making my own garam masala, I followed this recipe exactly.  I do think you could use less cream at the end, maybe 3/4 of a cup.  But I wouldn’t eliminate it completely.

I served this with white rice, green peas and these pita bread.  Choose just one starch if you’d like, but make sure you have at least one of them to soak up the sauce.  It is delicious.

Slow Cooker Chicken Tikka Masala

From The Tasty Kitchen

Ingredients

Chicken

  • 9 whole Boneless, Skinless Chicken Thighs
  • 1 Tablespoon Ground Coriander
  • 1 Tablespoon Ground Cumin
  • 1 teaspoon Kosher Salt
  • 1 cup Yogurt
  • 3-4 Tablespoons Butter
  • 1 whole Jalapeno Pepper, Stem Removed, Pepper Pierced Several Times With A Sharp Knife
Sauce
  • 4 Tablespoons Butter
  • 1 whole Large Onion, Peeled And Diced
  • 6 cloves Garlic, Peeled And Minced
  • 1 Tablespoon Kosher Salt
  • 3 Tablespoons Garam Masala
  • 1 piece Fresh Ginger, About 2-3 Inches, Peeled And Grated
  • 4 cups Crushed Tomatoes
  • 1 Tablespoon Raw Sugar (can Substitute White Granulated If Necessary)
  • 2 teaspoons Cornstarch Or Cleargel
  • 1-½ cup Heavy Cream
Serving
  • Hot Buttered Rice And Peas
  • Chopped Fresh Cilantro

Directions

  1. Cut the chicken into 1- 1 1/2 inch pieces. Sprinkle the coriander, cumin and salt over the chicken, then stir in the yogurt until all the pieces are evenly coated. Cover lightly and let sit for 10 minutes before proceeding.
  2. Melt 1 tablespoon the butter in a large saute pan over medium heat. Raise the heat to medium high and quickly brown about 1/4 to 1/3 of the chicken. Transfer browned chicken to the slow cooker as it is finished, using 1 tablespoon of butter per batch, and repeat until the chicken is all in the slow-cooker. Throw the pierced jalapeno in on top of the chicken.
  3. Prepare the sauce. Return the pan to the heat and melt the butter over medium high heat. Add the onions, garlic, and kosher salt, then stir. Cook, stirring frequently, until the onions begin to lightly brown around the edges.
  4. Stir in the garam masala and ginger and cook until fragrant (about 1 minute) before raising the heat to high and adding the crushed tomatoes and raw sugar. Stir well, scraping the caramelized bits from the bottom of the pan, and bring to a boil. Pour over the chicken in the slow-cooker.
  5. Cover and cook on LOW for 5 hours, or until the chicken is very tender.
  6. Use a fork or whisk to stir the cornstarch or cleargel into the heavy cream until smooth. Pour into the slow-cooker and stir gently until the colour is even. Replace the lid and let cook for 10 minutes or until bubbly around the edges.
  7. Serve over hot rice and peas, topped with a generous amount of chopped cilantro.

Curried Chicken and Rice Soup

This is a great meal if you’re looking for a nice alternative to chicken noodle soup.  This hearty chicken and rice soup is flavorful, loaded with veggies and has a nice crisp flavor thanks to the fresh herbs and lemon juice added at the end.  The curry isn’t overwhelming, but gives the soup a nice spice that makes it a unique chicken soup.  It’s great with the herbs and lemon.

We really enjoyed what was most likely the last hot soup we’ll have for a while.  I have a feeling that the weather is just not going to get cool enough for soup until October or November.  Oh, Houston.  If you live somewhere that is still experiencing or expecting a cool and rainy day, take advantage of it and give this soup a try.

I used this recipe from the Food Network kitchens as my starting point for this soup and then changed a few things to create a soup that had more of the things I like.  I’m sure it’s still great without the changes I made.  I added more carrots and celery, more broth, more rice, pureed only some of the soup instead of all of the rice mixture, added spinach and put lemon juice right in the soup instead of serving it with lemon wedges.  I also changed the cooking method a bit by doing it all in one pot instead of cooking the soup base and rice separately.

Since this was my first time to make this and I was kind of figuring it out as I went, I didn’t measure exactly how much broth and water I used.  Luckily, you can add as much or as little liquid as you want near the end of the cooking to get the consistency you want in this soup.  When I reheated this soup last night for dinner I added a little more broth since it had thickened up overnight in the fridge.  Soups are so forgiving, one of the many reasons I love them.

To make getting this meal on the table quicker and easier cook the chicken ahead of time and refrigerate it, or shred a rotisserie chicken.  If you do this, you will still need all the chicken broth and water called for below.  Slice the onion and chop the carrots and celery and store them in baggies or containers, the onion should be in its own container since it goes in before the carrots and celery.  You can chop the herbs and store them as well, but I think they lose some of their flavor if they are chopped too far in advance.  I’d recommend chopping them while the rice is cooking, but I doubt there would be much difference in flavor if they sat in the fridge for a few hours, just make sure to store them in covered containers to keep them from drying out.

Curried Chicken and Rice Soup

Adapted from Food Network Magazine

Ingredients

  • 2 bone-in chicken breast halves, skin removed
  • 5-6 cups low sodium chicken broth, divided
  • 4-5 cups water, divided
  • 2 bay leaves
  • 1 teaspoon whole peppercorns
  • kosher salt and black pepper
  • 1 tablespoon butter
  • 1 tablespoon olive oil
  • 4 large carrots, peeled and sliced into 1/4 inch coins
  • 4 large celery stalks, cut 1/2 inch slices (you may want to halve the stalks if they are very large)
  • 1 large yellow onion, halved and thinly sliced
  • 2 teaspoons curry powder
  • 1 teaspoon sugar
  • 1/2 cup white rice
  • 3-4 ounces baby spinach leaves (left whole or roughly chopped)
  • 3 tablespoons chopped dill
  • 3 tablespoons chopped mint
  • 1 large lemon, juiced

Directions

  1. In a large pot, heat 3 cups of water and 3 cups of broth over medium heat.  Once liquid starts to simmer, add chicken breasts, a pinch of kosher salt, peppercorns and bay leaves.  Bring to a boil, cover, then reduce heat and simmer for 20 minutes.
  2. Remove chicken from broth and let cool until you can handle the chicken and shred it.  Strain the bay leaves and peppercorns out of the broth and set the broth aside.
  3. In a large saucepan or dutch oven, heat 1 tablespoon of butter and 1 tablespoon of oil over medium heat.  Add the onions, sugar and a pinch of salt.  Cook, stirring frequently, until onions begin to soften.  Add carrots and celery and cook for another 4-5 minutes.
  4. Add curry powder, stir and cook for 1 minute.  Add the rice, stir and cook for about 2 minutes, then add 3 cups of the reserved broth.  Bring to a boil, cover, reduce heat and simmer for about 20 minutes.
  5. After rice is cooked, take about 2 cups of the soup and puree it in a blender or food processor until smooth.  Add it back to the soup along with the chicken.  At this point you can add more liquid to achieve the consistency you’d like in your soup.  I added equal amount of broth and water, probably a cup of each to start with, but you can do what looks right to you.  More broth for a soupier soup, less broth for a more stew-like soup.
  6. With heat on medium low, stir in spinach and herbs.  Let simmer for 5-10 minutes until spinach is wilted down.
  7. Stir in lemon juice.  Taste and adjust seasoning if needed.

Butternut Squash, Spinach, Caramelized Onion & Goat Cheese Pizza

I made this in December, back when butternut squash was a more appropriate and more seasonal ingredient but life gets ahead of me sometimes (and by that I mean ALL the time) so it is just now making its way onto the blog.  So bookmark for the fall, or ignore all that stuff you hear about seasonal eating and make it anyway!

This was one tasty pizza.  With all these yummy ingredients, how could it not be?  I love every single thing on top of this pizza on its own and together they are just perfect.

I found this recipe in my search for vegetarian dinner options on epicurious.  If you or someone you’re cooking for needs some meat, add some crumbled bacon for some meaty flavor and a nice crunch.  This really is a great vegetarian pizza with such terrific flavors that you won’t miss the meat, or at least I didn’t.

The trick to making this without finding yourself with an incredibly messy and hot kitchen at the end of the day is to prep all your vegetables earlier in the day and refrigerate them.  Roast the squash, caramelize the onions and saute the spinach all before lunchtime (or the night before if you’re doing this on a work day) store them all in separate tupperware or plastic bags and they’re ready to go on the pizza for dinner.  Prepping has become the key to dinnertime sanity for me.  And it’s smart for working folks, stay at home parents or people who just despise cleaning a bazillion pots and pans after having enjoyed their meal.

I used a store bought pizza dough ball (you can sometimes find these in the freezer section of your grocery store) but making your own is not too hard if you plan ahead.  I used this recipe for pizza dough not too long ago and it was easy to make, easy to work with and tasted great.  I followed the instructions up to the baking.  Instead of pre-baking and freezing my crusts, I divided the dough into 4 balls (keep it in one ball for one large pizza), placed them on a greased baking sheet, covered lightly with a piece of plastic wrap sprayed with non-stick cooking spray and put the pan in the fridge until I needed them (about 4 hours).  When I was ready, I formed them into crusts, topped them and baked them.  Once you get the hang of it, pizza dough at home is really easy.  If, like me, you didn’t have the foresight this time around to make your own dough, a frozen one is good.  Make sure to thaw it out overnight in the fridge, or on the counter for a few hours in its original packaging so it doesn’t dry out.

When I made this pizza I had a large squash, so I cubed the entire thing (probably ended up with 4 cups) and roasted it all.  You can use any leftovers tossed with some cooked pasta and goat cheese for a simple vegetarian pasta dinner, or you can use it at meal time for your toddler (which is the direction I chose to go).  The instructions below are for roasting just 2 cups, so if you plan to roast all your squash just increase the oil and seasonings.  It might also take more time to get a good roasted color if your pan is more crowded, so stir the squash and check them for tenderness every so often after the 25 minutes of cooking time recommended below.

My biggest problem with pizza is getting it from the pizza peel or cookie sheet onto the stone in the oven.  Here is a sweet and humorous home video (not my own) that shows you how to do it.  The trick is to do it quickly and use enough corn meal so it slides easily off the peel.

Note:  You may not use all of the onions or spinach.  Just add to the pizza what looks good to you.  Enjoy!

Butternut Squash, Spinach, Caramelized Onion and Goat Cheese Pizza

From epicurious.com

Ingredients

  • 2 cups cubed butternut squash
  • 1 6-ounce bag of baby spinach
  • 1 medium sized yellow or red onion, halved and thinly sliced
  • 6 ounces of goat cheese
  • 1 tablespoon chopped fresh thyme
  • 1 clove garlic, chopped
  • salt and pepper
  • olive oil
  • corn meal
  • 1 ball of prepared pizza dough, thawed if frozen
Directions
  1. Roast the Squash:  Heat oven to 400°F.  Toss cubed squash with a drizzle of olive oil just so it is lightly coated, 1/4 teaspoon of salt and 1/8 teaspoon fresh ground black pepper.  Spread out onto a rimmed baking sheet and roast for 25 minutes until squash is tender and lightly browned, stirring occasionally to prevent sticking and to brown squash more evenly.  Set aside or cool and put in a container and into the fridge if you’re baking the pizzas later in the day.
  2. Saute the Spinach:  Heat 1 teaspoon of oil in a medium skillet over medium heat.  Add a teaspoon of chopped garlic, let cook for 30 seconds, then add spinach and a pinch of salt.  Saute, stirring occasionally, until spinach is wilted down and most of the liquid has evaporated, 8-10 minutes.  Spread a few paper towels on a plate and pour the spinach onto the towels to drain some of the liquid.  Set aside or refrigerate in a container.
  3. Caramelize the Onions:  Heat a medium skillet over medium high heat with 1 tablespoon of olive oil.  Add onions, 1/4 teaspoon of salt and 1/8 teaspoon black pepper.  Cook, stirring, for 10 minutes until onions are light brown.  Add 2 tablespoons of water and cook an additional 5 minutes.  Onions should be very soft and brown in color.  Set aside or refrigerate.
  4. Heat oven to 450°F and heat your pizza stone or you can use the back of a cookie sheet, but don’t preheat the cookie sheet.
  5. Take your pizza dough and either roll it out on a floured surface using a rolling pin or use your hands to stretch it out into a round.  You should have either a 15 inch circle or a 10 by 16 inch rectangle.  Lay your dough on a pizza peel or the back of a cookie sheet coated with corn meal.
  6. Brush olive oil on the outer edges of the crust, then top the pizza with the squash, spinach, onions, crumbles of goat cheese and thyme.  Transfer pizza to pizza stone or place cookie sheet in the oven and bake for 10-12 minutes until cheese is melted and crust is lightly browned.


Quick Chicken, Black Bean, Corn & Feta Tacos

These little guys come together easily with very little cooking, making them a quick, easy and tasty weeknight meal.

All you need is a rotisserie chicken, a can of black beans, a can of corn, tortillas, feta cheese, avocado, tomatoes, pickled jalapenos, limes and fresh cilantro.

You can change anything about this meal to make it fit your family, the amount of time you have and the time of year.  Use flour or corn tortillas, different cheeses, cook your own black beans, use fresh corn and roast it on the grill (yum), cook your own chicken the way you like it, and you can even leave out the chicken altogether for a vegetarian taco dinner.

I found a Honey Jalapeno rotisserie chicken at HEB and it was really tasty with just the right amount of spicy kick and sweetness.  I shredded half the chicken and that made 8 generously sized tacos.  I used the rest of the chicken throughout the week for lunches.

Prep everything before beginning to assemble the tacos.  This just makes life easier, and is necessary if people are going to assemble their own.

You can use room temperature tortillas, but heating them makes the tacos much tastier.  Here are some ways you can warm tortillas.

Microwave
  1. Wrap as many as 12 tortillas in paper towels that have been lightly splashed with water.
  2. Microwave on high for 15 to 30 seconds.
  3. Turn over stack of tortillas. Microwave 15 to 30 seconds longer or until heated thoroughly.
Oven
  1. Wrap as many as 12 tortillas in aluminum foil.
  2. Heat in 325°F oven for 20 minutes or until heated thoroughly.
Stovetop

This is my favorite because you can get a perfect crunchy edge if you want it.  Don’t let them get too crunchy or they will crack when you try to wrap the taco.

  1. Heat a heavy pan or cast iron skillet over medium heat.
  2. Warm tortillas for 15 seconds on each side or until heated thoroughly.
  3. After heating, keep wrapped in a clean dishtowel while you warm the rest.

Chicken, Black Bean, Corn and Feta Tacos

Ingredients

  • Shredded chicken, about 2 cups
  • 1 can black beans, drained and rinsed
  • 1 can corn, drained
  • salt, pepper and cumin to taste
  • 1/2 cup (or more) crumbled feta cheese
  • 1/2 avocado, sliced or cubed
  • diced tomatoes
  • pickled jalapenos
  • 2 limes, cut into wedges
  • fresh cilantro, chopped
  • 6-8 tortillas, flour or corn, warmed

Directions

  1. Combine black beans and corn in a small saucepan with 1-2 tablespoons of water.  Warm over low heat and season with salt, pepper and cumin if desired, stirring occasionally until warmed through, about 5 minutes.
  2. Warm tortillas and keep warm while prepping the rest of your ingredients.
  3. Assemble tacos: In the center of the tortilla layer chicken, then bean and corn mixture, cheese then the vegetables of your choice.  Squeeze a lime wedge over the taco if desired.

Buttery Pie Crust (Pate Brisee) and Ham & Cheese Quiche

This is one of the first things you will see as you start preparing this pie crust.  2 whole sticks of pure and lovely butter.  So you know it’s gotta be good.

There is nothing at all wrong with buying your pie dough.  I do it all the time.  Those twin packs of Pillsbury pie dough are convenient and really tasty.  However, if you can find the time to make pie dough from scratch, it is well worth it.  The great thing about this particular recipe is that it makes enough for a double crusted pie so you can use one now and keep the other in the freezer for up to 1 month.

Since I was going to make quiche with this pie crust, I had to blind bake it.  I hate blind baking.  I always feel like my efforts to make an attractive edge are futile.  After putting the dough in the pie plate you have to put in and take out the foil and pie weights which inevitably causes some part of the edge to get bumped.  I am not good at this.  This time I also had a little trouble with the crust sliding down from the top of the plate during baking, so I had to squish the still pliable dough back up to the top of the plate.  After searching a little on this issue I learned that a quick rest in the freezer would have kept it from losing as much of its shape during the blind baking.  An obvious thing that I probably should have known to do, but didn’t.   Even though this crust was far from the prettiest it was delicious.

Thanks to the generous amount of butter, this crust is absolutely delicious.  You just cannot beat the flavor of butter.  The crust is also slightly flaky and the layers just melt in your mouth.  A mix of butter and shortening is supposed to yield a more flaky dough, so I will have to try that sometime.  The dough comes together quickly in a food processor, but you can also use a pastry blender.  It rolls out easily, but do make sure you dust your surface and rolling pin with flour as you’re rolling.  After a few rolls make sure you pick up your dough and rotate it 90 degrees.  I have the tendency to roll with more pressure when the pin is closest to me and less pressure when it is far away.  So rotating the dough not only helps with sticking, but also with keeping your dough an even thickness.

This recipe is from Martha Stewart’s Baking Handbook.

Pâte Brisée

Ingredients

  • 2 1/2 cups all purpose flour
  • 1 teaspoon salt
  • 2 sticks cold butter, cut into small pieces
  • 1/4 cup ice water, more if needed
Directions
  1. In the bowl of a food processor, combine flour and salt; pulse to combine.  Add the butter and pulse until mixture resembles coarse crumbs with some larger pieces remaining, about 10 seconds. (Or use a pastry blender to combine ingredients.)
  2. With machine running, add ice water through the feed tube in a slow, steady stream, just until the dough comes together without being wet or sticky.  Do not process more than 30 seconds.  Dough should hold together and not be crumbly.  Add 1 tablespoon more of water if it is crumbly.
  3. Turn dough out onto a clean work surface.  Divide in half, place each on a piece of plastic wrap.  Shape into flattened disks and wrap in the plastic wrap.  Refrigerate for at least 1 hour.
  4. Roll out on a floured surface to about 1/4 inch thick.  Place your pie plate on the dough and make sure you have about 2 inches excess all around.  Roll dough onto pin, then unroll into pie plate.
I searched for a healthier quiche just to kind of balance things out since I was using an all butter pie crust!  I found some that used skim milk, but we all know how well those things usually turn out.  Bad.  That’s how.  So I kept looking and found some that used non-fat evaporated milk.  So I decided to combine some 2% milk with some evaporated milk.  I also noticed many recipes that used whole eggs and egg whites.  So I used 3 whole and 3 whites.  The resulting texture was different than the usual whole egg and all milk quiches I have made, but it wasn’t weird.  The flavor was quite good and we finished the quiche off in 3 days.  Feel free to use any meat you have, any cheese, and any vegetables.  Quiche is good for emptying the fridge.  Pardon this bad picture!  Still documenting food with the iPhone and it is getting old.  I miss my camera.

Ham & Cheese Quiche

Ingredients

  • 3 eggs
  • 3 egg whites
  • 3/4 cup milk
  • 3/4 cup non-fat evaporated milk
  • 1/2 teaspoon salt
  • 1/4 teaspoon pepper
  • 1/2 cup grated white cheddar
  • 1/2 cup chopped ham
  • 1/4 cup chopped scallions
  • 1 pie crust

Directions

  1. Preheat oven to 350°F.
  2. Blind bake the pie crust for 7 minutes, then remove the pie weights, (rice, beans, etc.) and bake for an additional 4 minutes.
  3. Whisk eggs, whites, milk, salt and pepper until foamy.
  4. Stir in ham, cheese and scallions.
  5. Pour filling into pie crust and bake for 35-45 minutes.  Center can be slightly jiggly, but bake for the longer time if you want a firmer texture.  Let sit for 5-10 minutes before cutting.


Tilapia Packets with Potatoes and Haricots Verts in Lemon Wine Sauce

Last weekend we went out of town to visit family and I brought my camera.  I didn’t even take it out of the case the entire weekend, but still managed to leave it at my aunt’s house.  So, for the time being I will be using my iPhone to document my food.  This does bring me some relief since I will be able to put less pressure on myself to get the perfect shot.  No moving plates of food from room to room, turning on and off lights, standing next to windows and changing settings on the camera.  So I guess forgetting my camera is a blessing.

This meal was an adaptation of a recipe I found on epicurious, here is the link to the original recipe that uses snap peas and capers.  I used haricots verts, added cherry tomatoes, thinly sliced my potatoes and used some different seasonings.  Instead of grilling the packets, I baked them in the oven.  Many of the comments on the website talk about the variations on this dish and all the many things you can use to make these packets fit what you like or what you have in the kitchen.

Ben and I both thought it was a nice, light dinner.  We also liked the amount of clean up!  As long as you don’t cut through the foil (like I did on one of the packets) you won’t have any pots and pans to clean.  There are a few things I would do differently the next time I make these.  I’d probably skip the tomatoes.  While I love the color they add, they were just too mushy.  Maybe a few slices of sun-dried tomatoes would have been better, or roast them separately and toss them on after the fish is baked.  I’d also add less liquid, or serve with some nice crusty bread to soak up the sauce.  If you want it less saucy, shoot for the smaller amount of liquid listed below.  I did not make my foil long enough, so everything was really crammed together in the packets.

For the seasoning I used Citrus Seafood Rub from Adams Reserve seasoning that I bought at HEB.  The ingredient list printed on the label includes garlic, onion, coriander, dill weed, tarragon, pepper, paprika, fennel seed, lime and lemon oil.  If you can’t find this rub, but I would suggest you at least try to find it because it is so delicious, you could use some of the spices listed in the rub, or find another seafood rub or any spice mix you enjoy.

Tilapia Packets with Potatoes and Haricots Verts

Ingredients

  • 4 tilapia fillets
  • 2-3 red potatoes, thinly sliced, larger slices halved
  • 1-2 cups haricots verts, cut in half
  • 12-15 cherry tomatoes, halved (optional)
  • salt and pepper
  • Adams Citrus Seafood Rub (or another seafood seasoning you like)
  • 1 lemon, juiced
  • 2-4 tablespoons white wine or chicken broth
  • 2-3 tablespoons butter
  • Parsley, freshly chopped, for garnish

Directions

  1. Preheat oven to 375°F.
  2. Toss potatoes and haricots verts with about 1/2 teaspoon of salt and a few grinds of black pepper.
  3. Cut 4 pieces of heavy duty foil into 18-inch pieces, fold each in half, then unfold.  Spray one side with cooking spray and lay one fillet down.  Season with salt, pepper and between 1/4 and 1/2 teaspoon of the spice rub.  Sprinkle with 2-3 teaspoons of lemon juice.
  4. Take 1/4 of the vegetables and spread them around the fish.  Add halved cherry tomatoes now if using.  Fold up the sides of the foil and pour 1/2-1 tablespoon of wine around the edge.  Dot the top with a few small pieces of butter.  Fold the top of the foil down and crimp all the edges together.  Cut a small slit in the top of the packet and transfer to a rimmed baking sheet.
  5. Repeat with remaining fillets and bake packets for 15-20 minutes.  Check a potato slice for doneness.
  6. Open packets, sprinkle with parsley and serve.

Chicken and Chickpea Stew

Houston received quite a bit of rain on Monday, and so that morning I began looking for good rainy day meals.  Of course soup came to mind, but then I came across this recipe for a chicken and chickpea stew on Epicurious.

The recipe is simple.  Sauteed veggies mixed with chicken in a simple chicken broth sauce spiced with cinnamon and cumin and served over whole wheat couscous.  I made things even easier by shredding a rotisserie chicken instead of cooking the pound of chicken breasts the recipe calls for.  I also left out the tomato paste, did not drain the canned tomatoes, used 2 cups of broth instead of 1, and garnished with fresh cilantro and mint.  The combination of fresh herbs with the spices was wonderful.

You can easily make this a vegetarian dish by leaving out the chicken, using vegetable broth, adding more tomatoes, zucchini, chickpeas, or trying some different veggies.  I guess you could use some type of mock meat…if you’re into that kind of stuff.  I have tried and actually liked some of those choices, like a Philly “Steak” made with seitan at a food truck called Counter Culture in Austin.  Thanks for taking me, Sarah!  It really wasn’t bad, but I don’t see myself ever cooking it.  If I am going to cook something vegetarian at home, I stick with veggies and protein packed beans.  Plus I don’t think Ben would ever go for it.  He had a hard time eating chicken sausage, so I don’t think he’d go for tofu or seitan in place of good ol’ reliable meat.

Chicken and Chickpea Stew

Adapted slightly from epicurious.com

Ingredients

  • 1 small rotisserie chicken, shredded (use 2-3 cups of chicken)
  • 1 box whole wheat couscous (prepare what you need according to the instructions)
  • salt and pepper
  • 1 tablespoon olive oil
  • 1 1/2 cups chopped onion
  • 1 zucchini, chopped into 3/4 inch chunks
  • 2 cloves garlic
  • 1 can diced tomatoes
  • 1/2 teaspoon cinnamon
  • 1/2 teaspoon cumin
  • 1 can chickpeas, drained and rinsed
  • 2 cups low sodium chicken broth
  • chopped fresh cilantro and mint for garnish (0ptional)
Directions
  1. Heat oil in deep skillet over medium heat.  Add onion and cook for 3-4 minutes.  Add in garlic, cook for 1 minute, then add zucchini and cook for 2-3 minutes.
  2. Season with salt and pepper, cumin and cinnamon and cook for 1 minute.  Add tomatoes, chickpeas, broth and chicken.  Reduce heat to medium low, cover and simmer for 5-10 minutes.  Taste and season accordingly.
  3. While stew is simmering, prepare couscous according to package instructions.
  4. Serve stew on top of couscous and garnish with cilantro and mint.