goat cheese

Fall Vegetable Salad with Dill Vinaigrette

Last week I had lunch with a good friend at a place called Local Foods in Houston.  They have 2 locations now and we visited the newer one on Kirby for the first time.  This location has more seating and boasts a lovely outdoor space.  The weather cooperated perfectly making for a lunch I’d gladly repeat every day if I could.  We split a pork sandwich and their fall harvest salad.  The salad was so delicious that I knew I’d be trying to recreate it at home.

Fall Vegetable Salad with Dill Vinaigrette | Hottie Biscotti

While I am sure there was more in this salad that I couldn’t quite pinpoint or remember when I made a grocery list, I knew that is had broccoli, cauliflower, roasted brussels sprouts, pomegranate seeds, sunflower seeds and goat cheese.  We chose to add chicken to ours at the restaurant, but it would’ve been just as incredible without it.  You could leave out the chicken for a vegetarian salad or if you’re serving this as a side salad, or add it if you’re serving as a main course.

Fall Vegetable Salad with Dill Vinaigrette | Hottie Biscotti

One of my favorite parts about this salad was the dressing.  Again, I know mine isn’t the same as Local Foods, but the dill in the dressing stood out to me and really brought out all the delicious flavors of the salad.  So I made a dill vinaigrette to dress this salad.  And it’s pretty special.  I’ll be making it again.

Make sure to use fresh dill and parsley in the dressing and chop them very fine.  As with all homemade salad dressings, you can adjust the flavors to your liking.  Add more or less honey (I found this to be on the sweet side) add more salt, some cracked pepper, or more garlic if you’d like.  Shaking dressing up in a small mason jar is an easy way to make and store the dressing.

Dill Vinaigrette | Hottie Biscotti Dill Vinaigrette | Hottie Biscotti

The amounts below are enough for 2 to 4 salads, depending on how big you make them and who’s eating.  After prepping all the vegetables they can be refrigerated for use later on, so you can easily enjoy this salad for lunches during the week by simply tossing the ingredients together when you’re ready.

Fall Vegetable Salad with Dill Vinaigrette | Hottie Biscotti Fall Vegetable Salad with Dill Vinaigrette | Hottie Biscotti

Salads at our house are almost always greens, carrots, celery, tomatoes, dried cranberries and nuts if I have them around.  I love that this salad has so much stuff in it that I’ve never thought of putting in to a salad!  It’s delicious.  You can make it for one or for a large group.  And it’s a great fall salad with the roasted brussels and sweet pops from the pomegranate seeds.  And of course there is goat cheese.  Thank God for goat cheese!  I hope you try this salad.

Fall Vegetable Salad with Dill Vinaigrette | Hottie Biscotti

Fall Vegetable Salad with Dill Vinaigrette

Inspired by Fall Harvest Salad from Local Foods

Ingredients

For the Salad

  • Spring mix
  • 3/4 cup broccoli florets
  • 3/4 cup cauliflower florets
  • 8-10 brussels sprouts, ends trimmed, outer leaves removed and cut into quarters
  • pomegranate seeds
  • roasted, salted sunflower seeds
  • 2 ounces plain goat cheese
  • cooked chicken (optional)

For the Dill Vinaigrette

  • 2 tablespoons finely chopped dill
  • 2 tablespoons finely chopped parsley
  • 2-3 teaspoons honey
  • 1/4 cup lemon juice
  • 1/2 teaspoon dijon mustard
  • 1-2 cloves garlic, minced
  • 1-2 tablespoons olive oil
  • pinch of salt

Directions

For dressing

  1. Shake all ingredients together in a jar or whisk together in a bowl.  Set aside or store in the fridge.

For Salad

  1. Preheat oven to 400°F.  Line a rimmed baking sheet with foil.  Toss brussels in a little olive oil and sprinkle with salt.  Roast, shaking the pan once or twice, for 20 minutes until brussels sprouts are tender and browned.  Set aside to cool.
  2. Bring a pot of water to a boil and prepare a large bowl of ice water.  Boil broccoli and cauliflower for 2 minutes, then drain and put vegetables in the ice water, swish around a few times, then remove from the water to drain.
  3. Prepare the salad by either tossing salad greens, broccoli and cauliflower, brussels sprouts in a large bowl with your desired amount of dressing, then plating and topping with pomegranate seeds, sunflower seeds and goat cheese OR plate everything together and drizzle on the dressing.

Quick Skillet Lasagna

One day I am going to be a great meal planner.  At this current time however I am not so great at it.  Every now and then I plan a week of meals and I only have to take one trip to the grocery store.  But then there are weeks like last one where I find myself on the couch at 5pm on Friday evening not sure of what we are going to eat for dinner.  I loaded the kids up in the car after browsing through my Test Kitchen cookbook and got what I needed for this quick one skillet dinner.  It was ready by 7pm,  it was a huge hit and a recipe that I will definitely be making again.

Quick Skillet Lasagna | Hottie Biscotti

In this skillet lasagna you have all the goodness of lasagna without all the work of layering and dirtying several dishes.  The recipe calls for broken lasagna noodles, but you could use penne or ziti if that’s what you have around.  I used Italian turkey sausage, but a mixture of ground beef and pork is what is called for in the original recipe.  I added a few ounces of goat cheese to the ricotta because I don’t think that there is a thing on this earth that couldn’t use some goat cheese goodness.  I layered some mozzarella slices on top of the finished dish and broiled it for a few minutes.  I think when you serve lasagna there should be strings of cheese stretching from pan to plate, so this ensures that will happen.  Top it all off with some fresh chopped basil and you have a super delicious and satisfying dinner that is ready in less than an hour.  I realize it’s no 30-minute meal, but it sure does take less time than a proper lasagna!

Quick Skillet Lasagna | Hottie Biscotti

Serve this with lots of good bread and a green salad for a complete meal, and one that will make everyone very happy.

Quick Skillet Lasagna

Adapated slightly from America’s Test Kitchen Family Cookbook

Ingredients

  • 1 tablespoon olive oil
  • 1 medium onion, diced
  • 3 cloves of garlic, minced
  • salt and pepper
  • 1 package Italian turkey sausage (16-20 ounces)
  • 1 28-ounce can of diced tomatoes
  • 1 can tomato sauce (8-10 ounces)
  • 8 ounces of lasagna noodles, broken into 2 inch pieces
  • 1/2 cup grated Parmesan + more for serving
  • 8 ounces part-skim ricotta
  • 3 ounces goat choose
  • 8-10 slices of fresh mozzarella cheese
  • 1/4 cup fresh basil, chopped

Directions

  1. Pour the tomatoes into a quart measuring cup and fill with water to make 4 cups.  Set aside.
  2. Heat oil in a large skillet over medium heat.  Add the onion and cook until onion begins to soften, about 5 minutes.  Season with a pinch of salt.
  3. Stir in the garlic and cook for 30 seconds.  Add in the turkey and cook, breaking the meat up into pieces, until meat is cooked through and no longer pink.
  4. Pour in the tomatoes and tomato sauce and stir to combine.  Taste and season with salt and pepper.
  5. Add in the noodles and stir to combine.  Press the noodles down into the sauce so that they are covered and then cover the skillet.  Bring the sauce to a simmer and then reduce heat to medium low and cook for 20 minutes, stirring occasionally.
  6. In a small bowl stir the ricotta with the goat cheese, 1/2 teaspoon of salt and 1/4 teaspoon of pepper.  Set aside.
  7. Preheat your broiler.
  8. Remove the pan from the heat and stir in the Parmesan.  Use a large spoon to dot the top of the skillet with the ricotta mixture, then lay the mozzarella slices on top.
  9. Place the skillet under the broiler until the cheese begins to brown.  Remove from the oven and sprinkle with the basil.
  10. Serve with extra Parmesan.


Ham & Cheese Quiche with Thyme

Of  course the first thing that comes to mind for me when I have ham around, after ham sandwiches of course, is quiche.  I’ve made ham & cheese quiche before, and you’ve likely seen this combination many times.  But this one is extra decadent and amazing thanks to some super yummy cheese that I had on hand.  I LOVE when a meal comes together without having to try too hard and when you just so happen to have ingredients that end up being delicious together.

Ham & Cheese Quiche | Hottie Biscotti

I had a little block of gruyere and some wine soaked goat cheese left from the Easter cheese tray.  Any cheese would do, but these seemed to take this quiche to a new level of wonderfulness.  Trader Joe’s has a goat cheese gouda that I think would be awesome, similar in flavor and texture to the goat cheese I used.  It’s not your typical soft and creamy goat cheese, this one is soft but still grate-able.

The crust and the base for this came from this America’s Test Kitchen cookbook.  Have you bought yourself a copy yet?  What’s stopping you?  I had to do some things differently with the crust because I started dinner at 5 and it needed to be on the table at 7.  I didn’t have the time to chill the dough for an hour, roll it and chill for 30 minutes, par-bake for 30 and then bake the custard for another 45 minutes.  So I improvised.  The recipe below shows what I did, but if you have the time, chill the dough before rolling and par-bake for a full 30 minutes.  It will yield a crispier crust.

Ham & Cheese Quiche | Hottie Biscotti

The quiche base is not for the faint of heart.  It’s heavy on the eggs, cream and whole milk.  Add in the ham and cheese and you’ve got yourself a quiche that is hearty enough for the manliest of men.  Add in a little crumbled bacon and they won’t have a hard time scarfing down a few pieces.  But it’s not so heavy that you can’t serve it at a ladies lunch.  It’s just too delicious for any sane person to say “no” to.

Ham & Cheese Quiche | Hottie Biscotti Ham & Cheese Quiche | Hottie Biscotti

You can take this quiche base and add in whatever you want to.  Make it vegetarian with mushrooms, spinach, peppers, asparagus, etc.  Use bacon instead of ham, or cooked chicken or other meat.  Play with the herbs as well.  Endless options.  Enjoy!

Ham & Cheese Quiche with Thyme

Adapted from America’s Test Kitchen Family Cookbook

Serves 6-8

Ingredients

Crust

  • 1 1/4 cups flour
  • 1 tablespoon sugar
  • 1/2 teaspoon salt
  • 3 tablespoons vegetable shortening, cut into chunks and chilled
  • 4 tablespoons butter, cut into chunks and chilled
  • 4 to 6 tablespoons ice water

Custard

  • 5 eggs
  • 1 cup whole milk
  • 1 cup heavy cream
  • 1/2 teaspoon salt
  • 2 teaspoons dijon mustard
  • 1 teaspoon fresh thyme, roughly chopped
  • 1 cup of cooked chopped ham
  • 4 ounces of shredded cheese, 2 ounces of gruyere and 2 ounces of firm goat cheese such as goat gouda

Directions

Crust

  1. In a food processor combine flour, sugar and salt, and pulse a few times to combine.
  2. Add in the chunks of shortening and butter and pulse a few times until the fat is in coarse pieces.
  3. Add the ice water into the machine, start with 3 tablespoons, pulse a few times, then add water, 1 tablespoon at a time, pulsing once or twice in between additions, until dough looks like it is just holding together, but not until it is smooth.
  4. Pour the dough out onto a large piece of parchment and pat it together into a disk.
  5. Place another piece of parchment on top and roll the dough out, as quickly as possible into a 12-inch circle.  Peel off the top piece of parchment, then place the pie plate on top of the dough circle.  Turn it all over together and carefully press the dough into the pie plate and peel off the parchment.  Make sure the dough is pressed into the pan evenly, crimp the edges and transfer to the freezer for 30 minutes.
  6. Preheat oven to 375°F.
  7. Line the crust with foil and fill with pie weights, beans or rice.
  8. Bake for 20-30 minutes, prepare the custard mixture while it cooks.
  9. Remove the foil and weights, then immediately fill with the custard.

Custard

  1. Whisk the eggs, milk and cream well in a bowl.
  2. Whisk in the salt, mustard and thyme.
  3. When the crust comes out of the oven scatter the ham on the bottom of the crust then scatter the cheese on top.
  4. Move the pie plate to the oven then pour the egg mixture slowly into the pan until it is almost full.  You may have egg mixture left over if you have a shallow pie pan.
  5. Close the oven and bake for 40-50 minutes.  Remove from the oven when quiche is just about set.
  6. Let cool before cutting and serving.


The Best Dip Ever: Goat Cheese Dip with Piloncillo Chipotle Sauce

This recipe came from a restaurant in San Antonio called Liberty Bar.  I’ve never actually been, but my sister lived in San Antonio for a while and has been there.  When she saw this recipe in a magazine, something like 10 years ago, she decided we should make it.  And we did.  And it was incredible.  I usually refer to it as “the piloncillo dip” to my family, and they immediately know what I’m talking about.  And then we all start drooling.

piloncillodip1

For some reason I had kind of forgotten about it until recently.  I’ve now made it twice in the last month for parties and am so glad to have rediscovered it.

The dip is a great combination of flavors; spicy, sweet and tangy.  I love goat cheese, so I’m a big fan of this dip, but the goat cheese isn’t so strong that someone who isn’t crazy about it won’t like it.  The sauce is rich and creamy and sweet and amazing.  It is a little spicy because of the chipotle.  If you’re worried about it you can cut back on the chipotle, or just use the adobo sauce and not so much of the peppers themselves.

Piloncillo, also called panela, is a Mexican unrefined whole cane sugar that is available at most large grocery stores.  I always find it with the other Mexican foods and have seen it in a cone form and also in a round disc.  It is similar in flavor to dark brown sugar, but has a different texture.  You might be able to substitute brown sugar in this recipe, but I’ve never tried it.  Let me know if you do and if it’s successful.  Chipotles in adobo are in the same spot as the piloncillo at my grocery store.  But my sister in New York has said it’s hard to find.  You don’t end up using the whole can in this recipe, but I’ve frozen the extra in a small tupperware or freezer bag, thawed it out and used it in other recipes with great success.  Don’t let it go to waste, especially if it’s a rarity where you live!

piloncillodip2

Serve this with pita chips or slices of grilled bread.  I serve the sauce on top of the dip, but you can also serve the cheese dip and sauce in separate bowls, allowing people to get just the amount of sauce and cheese they want.  To serve altogether I usually lay a piece of plastic wrap in the botttom of a pie plate, spread the cheese in an even layer, cover with plastic wrap and refrigerate.  Then I uncover the cheese spread and flip it out onto a large platter, peel off the plastic wrap, and then cover with some of the sauce.  There is almost always extra sauce and I hate throwing it away since it’s so stinking good.  Any ideas on how to use the extra?

Goat Cheese Dip with Piloncillo Chipotle Sauce

Serves at 10-12 as an appetizer

From Liberty Bar

Ingredients

For the cheese spread

  • 6 ounces soft mild goat cheese, at room temperature
  • 12 ounces cream cheese (full fat or 1/3 fat), at room temperature
  • 1 small garlic clove, minced and mashed to a paste with 1/4 teaspoon salt (use the side of a large chef’s knife to do this)
  • 1 teaspoon minced canned chiles chipoltes in adobo sauce

For the sauce

  • 1 tablespoon minced canned chiles chipoltes in adobo sauce
  • 8 ounces piloncillo (Mexican unrefined sugar), roughly chopped
  • 1 cup heavy cream
  • Pita chips, crackers, toasted baguette slices or grilled bread slices

Directions

  1. Make the cheese spread: Beat together cheeses, garlic paste, and chipolte chiles. Transfer mixture to a small serving bowl (or pie plate lined with plastic wrap) and chill, covered, at least 4 hours or overnight.
  2. Make the sauce: In a small saucepan combine chipoltes, piloncillo, and cream and cook over low heat, stirring occasionally and breaking up sugar, until piloncillo is melted and sauce is smooth, about 10 minutes.
  3. Transfer sauce to a small serving bowl and chill, covered, for at least 4 hours or up to overnight.
  4. Serve cheese and sauce in separate bowls, or pour some of the sauce over the cheese spread to serve.


Sweet Potato and Black Bean Enchiladas with Goat Cheese and Homemade Enchilada Sauce

When my dear, sweet sister Sarah came to help with Betsy right after she was born, she made us dinner.  She made these incredible vegetable enchiladas with sweet potato and black beans.  They were delicious.  The really wonderful thing about them was the goat cheese.  I would’ve never thought to do that, and I would’ve never thought it would’ve been as terrific as it was.  I tried to recreate them last week and while Ben and I really enjoyed them, they weren’t quite like Sarah’s.  So I’ll have to get an enchilada lesson from her the next time we’re together.

Pardon this iPhoned and Instrgramed photo.  I’m honestly just proud that I took a picture at all.  And to be quite honest I like that if I don’t try to take a good photo, then I can have an excuse for taking crummy ones.  One day I’ll start taking better quality pictures…

These enchiladas are a healthier option when you’re craving Tex-Mex.  They aren’t heavy laden with cheese, and they can be totally vegetarian if you choose to skip the chicken.  You really won’t miss it.  The goat cheese adds a perfect tangy surprise.  If you don’t like goat cheese, add some regular shredded cheese to the filling.

Sarah cooks like I wish I could.  She doesn’t really measure anything.  She doesn’t really follow a recipe.  She just makes what she thinks will be good.  And every time she’s done that when I’ve been around to taste the end result, it’s been quite yummy.  I tried to take some inspiration from Sarah and cook without measuring cups or spoons, so my measurements below are approximate.  The beautiful thing about that kind of cooking is that if you don’t have or like something below you can replace it with something else and not get too preoccupied with doing things a specific way.  Just taste as you go to make sure you have the flavor you want.  I used a packet of chicken taco seasoning, but you can use your favorite spices to make your own seasoning mix.

Other ingredients that I would consider trying in these enchiladas are corn, green chiles, spinach, mushrooms, shredded carrots and zucchini.  In place of chicken you can use ground beef or turkey, or some shredded pork if you happen to have some left over from another meal.

I realized when I started to put these together that I didn’t think to get any sauce and wondered if Sarah had even used any.  So I asked her and she said she just used a can of enchilada sauce.  And of course I had no enchilada sauce.  What’s a girl to do?  Make her own enchilada sauce of course.  And where does one find a recipe for enchilada sauce?  The internet of course.  I just Googled “homemade enchilada sauce” and I found this little gem.  I followed the recipe except for a couple things.  I didn’t have any tomato sauce so I pureed a can of diced tomatoes after draining off some of the juice.  In place of the self rising flour I used regular.  I used the spices it called for and as it cooked I tasted and added a little more chili powder, some paprika and I believe a little more salt since I didn’t have onion salt.  It tasted ok, but I was worried about how it was going to turn out on the enchiladas.  Turned out to be wonderful paired with the enchiladas, and something I’m going to make again the next time I need enchilada sauce.

Now I know flour tortillas are not what is traditionally used for enchiladas.  I used flour because that’s what Sarah used.  I might try corn sometime.  If you decide to, make sure to soften them in warm chicken broth or in the microwave to soften.  If you skip that step they will crack when you go to roll them up.

Sweet Potato and Black Bean Enchiladas

Ingredients

  • 1-2 tablespoons olive oil
  • kosher salt
  • 1 large sweet potato, cut into small dice
  • 1 red bell pepper, chopped
  • 1 yellow bell pepper, chopped
  • 1 medium yellow onion, chopped
  • 1 can black beans, rinsed and drained
  • 2 cups cooked, chopped chicken (optional)
  • 2 tablespoons taco seasoning
  • goat cheese, 3-4 ounces
  • 8-12 flour tortillas (taco or burrito size)
  • 1 can enchilada sauce (or make your own using the recipe below)
  • shredded cheese, optional
  • sour cream and cilantro for serving

Directions

  1. Heat oven to 400°F.  Toss sweet potato, bell peppers and onion together with olive oil and salt on a large rimmed baking sheet.
  2. Bake for 30-40 minutes, stirring occasionally.  Remove from oven and let cool a bit.
  3. Combine vegetables, black beans, chicken (if using) and seasoning.  Taste and season as needed.
  4. Crumble goat cheese into filling and combine gently, keeping the goat cheese in good sized chunks.
  5. Scoop some filling into a tortilla and roll to close.  Fill generously but do not overfill, the tortilla should overlap itself by at least 1 inch.  Place seam side down in a greased pan.  Repeat with remaining tortillas fitting them tightly in the pan.  You may need 2 pans depending on what size tortillas you use.
  6. Reduce oven to 350°F.  Top with enchilada sauce, cover with foil and bake for 30 minutes.  Remove foil (add cheese if using) and bake for 15 minutes more.
  7. Serve topped with sour cream and chopped cilantro.

Enchilada Sauce

Ingredients
  • 1/4 cup vegetable oil
  • 2 tablespoons flour
  • 1/4 cup chili powder
  • 8 ounce can tomato sauce
  • 1 1/2 cups water
  • 1/2 teaspoon cumin
  • 1/2 teaspoon garlic powder
  • 1/4 teaspoon paprika
  • salt to taste
Directions
  1. Heat oil in a skillet over medium-high heat. Stir in flour and chili powder, reduce heat to medium, and cook until lightly brown, stirring constantly to prevent burning flour.
  2. Gradually stir in tomato sauce, water, cumin, garlic powder, and salt into the flour and chili powder until smooth
  3. Continue cooking over medium-low heat approximately 10 minutes, or until thickened slightly. Season to taste with salt.


Spring Tortellini with Asparagus, Peas, Goat Cheese, Pine Nuts & Mint

Do you think that’s a descriptive enough title?  Should I have also told you that it has salt in it?  Honestly though, I tried to shorten it, but I thought people needed to know what was in this perfect for springtime pasta right from the start.  So no need to read on for the recipe, just print it out, go to the store and make this for dinner.

I don’t get any cooking magazines other than Fine Cooking.  It isn’t loaded down with ads and is full of yummy recipes.  I bookmarked this one the first time I went through the issue.  It did not disappoint.  We ate it warm the first night and then a few days later as a cold pasta salad for lunch.  It was delicious each time.  The flavors are refreshing and light, a great option for a warmer weather pasta dinner.  It is a cinch to prepare since you use store bought tortellini.  The only work you have to do is cut the asparagus, mince the garlic, chop the mint and toast the pine nuts.  This meal came together incredibly fast.  So fast, in fact, that Carson wasn’t yet in bed by the time it was done so I had to let it sit for a while before we ate.

The only things I changed from the original recipe were using a little less olive oil in the sauce, adding a few extra peas (I love peas), using 2 packages of tortellini totaling 18 ounces (just 2 ounces more than called for) I used 1 package of cheese and 1 of Italian sausage.  I also used closer to 3 ounces of goat cheese (I love goat cheese).  Make sure to reserve the pasta water!  It makes a lovely sauce on this dish.

Spring Tortellini

From Fine Cooking Magazine

Ingredients

  • 1/4 cup extra-virgin olive oil
  • salt and pepper
  • 2 medium cloves garlic, pressed or minced
  • 1/8 tsp. cayenne
  • 1 lb. fresh cheese tortellini (or 2 9-ounce packages)
  • 1 lb. asparagus, trimmed of tough, woody stems, and cut crosswise into 1/2-inch pieces (leave the tips whole)
  • 1 1/2 cups shelled fresh peas (or thawed frozen peas)
  • 1/3 cup pine nuts, toasted
  • 1/4 cup coarsely chopped fresh mint
  • 2-3 oz. fresh goat cheese, softened
  • Freshly ground black pepper
Directions
  1. In a 6-quart covered pot, bring 3 quarts well-salted water to a boil over high heat.
  2. In a large bowl, combine the olive oil, garlic, cayenne, and 1/2 tsp. salt.
  3. Add the tortellini to the boiling water and cook for 3 minutes, then add the asparagus, and peas to the water and cook for an additional 2 to 3 minutes.
  4. Reserve 1 cup of the cooking water, then drain the pasta and vegetables and toss with the garlic-oil mixture. Add  the pine nuts, mint, and  goat cheese and stir until the cheese melts into a sauce, adding cooking water as needed to moisten the pasta.
  5. Season to taste with salt and freshly ground black pepper and serve.

Butternut Squash, Spinach, Caramelized Onion & Goat Cheese Pizza

I made this in December, back when butternut squash was a more appropriate and more seasonal ingredient but life gets ahead of me sometimes (and by that I mean ALL the time) so it is just now making its way onto the blog.  So bookmark for the fall, or ignore all that stuff you hear about seasonal eating and make it anyway!

This was one tasty pizza.  With all these yummy ingredients, how could it not be?  I love every single thing on top of this pizza on its own and together they are just perfect.

I found this recipe in my search for vegetarian dinner options on epicurious.  If you or someone you’re cooking for needs some meat, add some crumbled bacon for some meaty flavor and a nice crunch.  This really is a great vegetarian pizza with such terrific flavors that you won’t miss the meat, or at least I didn’t.

The trick to making this without finding yourself with an incredibly messy and hot kitchen at the end of the day is to prep all your vegetables earlier in the day and refrigerate them.  Roast the squash, caramelize the onions and saute the spinach all before lunchtime (or the night before if you’re doing this on a work day) store them all in separate tupperware or plastic bags and they’re ready to go on the pizza for dinner.  Prepping has become the key to dinnertime sanity for me.  And it’s smart for working folks, stay at home parents or people who just despise cleaning a bazillion pots and pans after having enjoyed their meal.

I used a store bought pizza dough ball (you can sometimes find these in the freezer section of your grocery store) but making your own is not too hard if you plan ahead.  I used this recipe for pizza dough not too long ago and it was easy to make, easy to work with and tasted great.  I followed the instructions up to the baking.  Instead of pre-baking and freezing my crusts, I divided the dough into 4 balls (keep it in one ball for one large pizza), placed them on a greased baking sheet, covered lightly with a piece of plastic wrap sprayed with non-stick cooking spray and put the pan in the fridge until I needed them (about 4 hours).  When I was ready, I formed them into crusts, topped them and baked them.  Once you get the hang of it, pizza dough at home is really easy.  If, like me, you didn’t have the foresight this time around to make your own dough, a frozen one is good.  Make sure to thaw it out overnight in the fridge, or on the counter for a few hours in its original packaging so it doesn’t dry out.

When I made this pizza I had a large squash, so I cubed the entire thing (probably ended up with 4 cups) and roasted it all.  You can use any leftovers tossed with some cooked pasta and goat cheese for a simple vegetarian pasta dinner, or you can use it at meal time for your toddler (which is the direction I chose to go).  The instructions below are for roasting just 2 cups, so if you plan to roast all your squash just increase the oil and seasonings.  It might also take more time to get a good roasted color if your pan is more crowded, so stir the squash and check them for tenderness every so often after the 25 minutes of cooking time recommended below.

My biggest problem with pizza is getting it from the pizza peel or cookie sheet onto the stone in the oven.  Here is a sweet and humorous home video (not my own) that shows you how to do it.  The trick is to do it quickly and use enough corn meal so it slides easily off the peel.

Note:  You may not use all of the onions or spinach.  Just add to the pizza what looks good to you.  Enjoy!

Butternut Squash, Spinach, Caramelized Onion and Goat Cheese Pizza

From epicurious.com

Ingredients

  • 2 cups cubed butternut squash
  • 1 6-ounce bag of baby spinach
  • 1 medium sized yellow or red onion, halved and thinly sliced
  • 6 ounces of goat cheese
  • 1 tablespoon chopped fresh thyme
  • 1 clove garlic, chopped
  • salt and pepper
  • olive oil
  • corn meal
  • 1 ball of prepared pizza dough, thawed if frozen
Directions
  1. Roast the Squash:  Heat oven to 400°F.  Toss cubed squash with a drizzle of olive oil just so it is lightly coated, 1/4 teaspoon of salt and 1/8 teaspoon fresh ground black pepper.  Spread out onto a rimmed baking sheet and roast for 25 minutes until squash is tender and lightly browned, stirring occasionally to prevent sticking and to brown squash more evenly.  Set aside or cool and put in a container and into the fridge if you’re baking the pizzas later in the day.
  2. Saute the Spinach:  Heat 1 teaspoon of oil in a medium skillet over medium heat.  Add a teaspoon of chopped garlic, let cook for 30 seconds, then add spinach and a pinch of salt.  Saute, stirring occasionally, until spinach is wilted down and most of the liquid has evaporated, 8-10 minutes.  Spread a few paper towels on a plate and pour the spinach onto the towels to drain some of the liquid.  Set aside or refrigerate in a container.
  3. Caramelize the Onions:  Heat a medium skillet over medium high heat with 1 tablespoon of olive oil.  Add onions, 1/4 teaspoon of salt and 1/8 teaspoon black pepper.  Cook, stirring, for 10 minutes until onions are light brown.  Add 2 tablespoons of water and cook an additional 5 minutes.  Onions should be very soft and brown in color.  Set aside or refrigerate.
  4. Heat oven to 450°F and heat your pizza stone or you can use the back of a cookie sheet, but don’t preheat the cookie sheet.
  5. Take your pizza dough and either roll it out on a floured surface using a rolling pin or use your hands to stretch it out into a round.  You should have either a 15 inch circle or a 10 by 16 inch rectangle.  Lay your dough on a pizza peel or the back of a cookie sheet coated with corn meal.
  6. Brush olive oil on the outer edges of the crust, then top the pizza with the squash, spinach, onions, crumbles of goat cheese and thyme.  Transfer pizza to pizza stone or place cookie sheet in the oven and bake for 10-12 minutes until cheese is melted and crust is lightly browned.


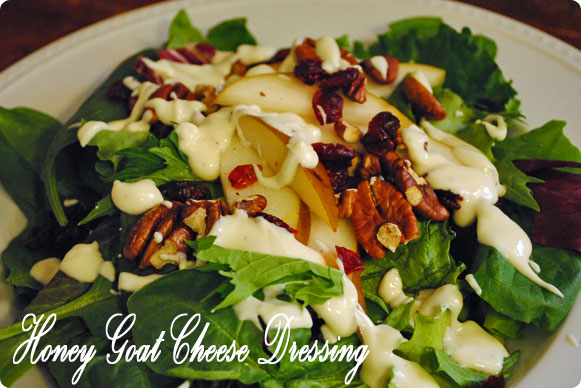
Pear, Pecan and Cranberry Salad with Honey Goat Cheese Dressing

Whenever I eat goat cheese I wonder why I don’t use it more often.  I love its tang and creaminess.  Even the tiniest of crumbles of the stuff can transform a dish.  The honey goat cheese dressing on this salad was so tasty, and took an already great salad to another level of deliciousness.

My mother in law turned me on to skinnytaste.com after making two meals for us with recipes from the site.  Both tasted great and were pretty healthy.  If you do Weight Watchers, then you’re in luck because Gina includes the points.

I added some grilled chicken to this salad to make it a meal.  Instead of apples I used pears, which I think pair better with the other ingredients.  You must, must, must toast the pecans.  The flavor of any nut is improved by a quick toasting in the oven or in a dry skillet on the stove.  Do the same when you are adding pecans, walnuts or almonds to baked goods.  They just taste better.  So take the extra 5 minutes.  You’ll be glad you did.

This salad recipe used measurements for the apples and cranberries, but I just added what I wanted.  This probably messes with the points, so here is the link to Gina’s original recipe.  If you don’t care so much about counting out how many cranberries or slices of apple you can use, then just pile on a plate the following ingredients and top with the dressing.

  • Spring mix or baby spinach
  • Dried cranberries
  • 1 Bosc Pear, sliced
  • Toasted pecans, halves or pieces
  • Grilled chicken, sliced (optional)

The dressing was a little on the thick side when I made it, so I added a little more water, lemon juice and a touch of olive oil to loosen it up a bit.  After storing the leftover dressing in the fridge it was no longer pour able, so either let it warm up at room temp before you plan to use it again, or zap it in the microwave for a few seconds and stir it up.  Enjoy!

Honey Goat Cheese Dressing

Courtesy of skinnytaste.com

Ingredients

  • 4 oz goat cheese, room temperature
  • 1 1/2 tbsp honey
  • 2-3 tbsp extra-virgin olive oil
  • 2 tsp apple cider vinegar
  • 1/2 lemon, juiced
  • 1-2 tbsp water
  • Kosher salt and freshly ground black pepper
Directions
  1. In a small blender, combine goat cheese, honey, olive oil, vinegar, lemon juice, water.
  2. Season to taste with salt and plenty of freshly ground black pepper.
  3. Add more lemon juice, water, or oil to create desired consistency.