About Carrie Zinnecker

Posts by Carrie Zinnecker:

Easy Pita Bread

Indian food is one of those things I rarely if ever make at home, unless it’s “Indian spiced” or something that only tastes something like Indian food but is nothing like the palak paneer, tikka masala, samosas or naan you can get from your favorite Indian restaurant.  Last night I made Indian food.  I tried a chicken tikka masala recipe in the slow cooker and it turned out to be pretty tasty.  As it was cooking I realized I’d forgotten bread at the store.  So, I decided to make my own.

I know I should have made naan.  I know that pita is typically not served at Indian restaurants, but that naan or roti are the breads on the menu.  But as I started looking for recipes, pita just seemed simpler, and I desperately needed something simple.  This recipe is from an about.com article about Middle Eastern Food.  Here is the link.

The dough had me in doubt from the very beginning.  It never came together or pulled away from the sides of the bowl, so I had to add more flour.  After adding about 1/2 cup I deemed it worthy to come out of the mixer and start rising.  Still incredibly sticky.  I managed to get it safely into its bowl, covered and ready to rise, but had to do some serious hand and fingernail scrubbing to get the sticky dough cleaned up.  It rose nicely but still looked sticky, so I floured my surface very generously.  Good thing, because I still needed to have my flour jar close at hand while I rolled out the dough into a long rope and then as I rolled the 10 pita breads.

After that though, the baking was a breeze and the results were rewarding and well worth the messy hands.  I would try this recipe again with more flour from the outset, but not too much.  You can always add flour as you’re rolling out your dough, but you can’t take it away.

Pita dough balls before rolling.

 Puffed pitas in the oven. 

The only special tool you may need is a pizza stone.  You can use a regular baking sheet, but at high temps a pizza stone is the best choice.

I am thrilled about the fact that these came out so well!  Ben will tell you that I commented on this more than once last night during dinner.  A package of pitas, while convenient, isn’t nearly as yummy or as cheap as these guys.  Another benefit is that since these are hand rolled you have a much more exciting variety of shapes than those boring circles you get in the package!

Easy Pita Bread

Ingredients

  • 1 package yeast
  • 1/2 cup warm water
  • 1 1/2 teaspoons sugar
  • 3 1/2-4 cups flour (plus more for dusting)
  • 1 1/4 teaspoon salt
  • 1 cup warm water

Directions

  1. Dissolve yeast in 1/2 cup of warm water. Add sugar and stir until dissolved. Let sit for 10-15 minutes until water is frothy.
  2. Combine flour and salt in large bowl or the bowl of a stand mixer fitted with a dough hook.  Make a small well in the middle of the flour and pour yeast water in the well.
  3. Slowly add 1 cup of warm water, and stir with wooden spoon or rubber spatula until elastic.
  4. Place dough on floured surface and knead for 10-15 minutes OR mix on medium speed until dough starts to pull away from the sides of the bowl. When the dough is no longer sticky and is smooth and elastic, it has been successfully kneaded.  (This may not quite happen for you, add a bit more flour but you can just transfer it to the bowl to rise, it will be fine.)
  5. Coat large bowl with vegetable oil and place dough in bowl. Turn dough upside down so all of the dough is coated.
  6. Allow to sit in a warm place, covered with a clean towel for about 3 hours, or until it has doubled in size.
  7. Once doubled, roll out in a rope, and pinch off 10-12 small pieces. Place balls on floured surface.  Let sit covered for 10 minutes.
  8. Preheat oven to 500°F and make sure rack is at the very bottom of oven. Preheat your pizza stone in the oven.
  9. Roll out each ball of dough with a rolling pin into circles. Each should be about 5-6 inches across and 1/4 inch thick.
  10. Bake 3 circles at a time for 4 minutes until the bread puffs up. Turn over and bake for 2 additional minutes.
  11. Remove each pita with a spatula from the stone and add additional pitas for baking. Take spatula and gently push down the puff.  Keep baked pitas covered with a clean towel while you bake the rest.

Curried Chicken and Rice Soup

This is a great meal if you’re looking for a nice alternative to chicken noodle soup.  This hearty chicken and rice soup is flavorful, loaded with veggies and has a nice crisp flavor thanks to the fresh herbs and lemon juice added at the end.  The curry isn’t overwhelming, but gives the soup a nice spice that makes it a unique chicken soup.  It’s great with the herbs and lemon.

We really enjoyed what was most likely the last hot soup we’ll have for a while.  I have a feeling that the weather is just not going to get cool enough for soup until October or November.  Oh, Houston.  If you live somewhere that is still experiencing or expecting a cool and rainy day, take advantage of it and give this soup a try.

I used this recipe from the Food Network kitchens as my starting point for this soup and then changed a few things to create a soup that had more of the things I like.  I’m sure it’s still great without the changes I made.  I added more carrots and celery, more broth, more rice, pureed only some of the soup instead of all of the rice mixture, added spinach and put lemon juice right in the soup instead of serving it with lemon wedges.  I also changed the cooking method a bit by doing it all in one pot instead of cooking the soup base and rice separately.

Since this was my first time to make this and I was kind of figuring it out as I went, I didn’t measure exactly how much broth and water I used.  Luckily, you can add as much or as little liquid as you want near the end of the cooking to get the consistency you want in this soup.  When I reheated this soup last night for dinner I added a little more broth since it had thickened up overnight in the fridge.  Soups are so forgiving, one of the many reasons I love them.

To make getting this meal on the table quicker and easier cook the chicken ahead of time and refrigerate it, or shred a rotisserie chicken.  If you do this, you will still need all the chicken broth and water called for below.  Slice the onion and chop the carrots and celery and store them in baggies or containers, the onion should be in its own container since it goes in before the carrots and celery.  You can chop the herbs and store them as well, but I think they lose some of their flavor if they are chopped too far in advance.  I’d recommend chopping them while the rice is cooking, but I doubt there would be much difference in flavor if they sat in the fridge for a few hours, just make sure to store them in covered containers to keep them from drying out.

Curried Chicken and Rice Soup

Adapted from Food Network Magazine

Ingredients

  • 2 bone-in chicken breast halves, skin removed
  • 5-6 cups low sodium chicken broth, divided
  • 4-5 cups water, divided
  • 2 bay leaves
  • 1 teaspoon whole peppercorns
  • kosher salt and black pepper
  • 1 tablespoon butter
  • 1 tablespoon olive oil
  • 4 large carrots, peeled and sliced into 1/4 inch coins
  • 4 large celery stalks, cut 1/2 inch slices (you may want to halve the stalks if they are very large)
  • 1 large yellow onion, halved and thinly sliced
  • 2 teaspoons curry powder
  • 1 teaspoon sugar
  • 1/2 cup white rice
  • 3-4 ounces baby spinach leaves (left whole or roughly chopped)
  • 3 tablespoons chopped dill
  • 3 tablespoons chopped mint
  • 1 large lemon, juiced

Directions

  1. In a large pot, heat 3 cups of water and 3 cups of broth over medium heat.  Once liquid starts to simmer, add chicken breasts, a pinch of kosher salt, peppercorns and bay leaves.  Bring to a boil, cover, then reduce heat and simmer for 20 minutes.
  2. Remove chicken from broth and let cool until you can handle the chicken and shred it.  Strain the bay leaves and peppercorns out of the broth and set the broth aside.
  3. In a large saucepan or dutch oven, heat 1 tablespoon of butter and 1 tablespoon of oil over medium heat.  Add the onions, sugar and a pinch of salt.  Cook, stirring frequently, until onions begin to soften.  Add carrots and celery and cook for another 4-5 minutes.
  4. Add curry powder, stir and cook for 1 minute.  Add the rice, stir and cook for about 2 minutes, then add 3 cups of the reserved broth.  Bring to a boil, cover, reduce heat and simmer for about 20 minutes.
  5. After rice is cooked, take about 2 cups of the soup and puree it in a blender or food processor until smooth.  Add it back to the soup along with the chicken.  At this point you can add more liquid to achieve the consistency you’d like in your soup.  I added equal amount of broth and water, probably a cup of each to start with, but you can do what looks right to you.  More broth for a soupier soup, less broth for a more stew-like soup.
  6. With heat on medium low, stir in spinach and herbs.  Let simmer for 5-10 minutes until spinach is wilted down.
  7. Stir in lemon juice.  Taste and adjust seasoning if needed.

Rainbow Cake

Happy St. Patrick’s Day!  And happy birthday to my sweet niece Maren who is having a great 2nd birthday party in Brooklyn today that we are sadly not attending.  My parents will be there to help celebrate the big day with my sister’s family.  Happy Birthday, Maren!

We don’t really do St. Patrick’s Day, but I was seeing so many fun rainbow and pot o’ gold crafts, snacks and baked goods on blogs and on Pinterest that I just had to make this rainbow cake.  I’d originally seen rainbow cakes in layers, which I think is so beautiful and orderly.  But I do not have enough cake pans of the same size, nor do I have the patience and willingness to make 3 cakes, then wash and dry the pans and make 3 more.  So I found this rainbow cake on Hostess with the Mostess who links to Omnomicon’s tutorial for making this fun and easy rainbow cake that only requires you to have 2 cake pans of the same size!  Perfect.

I used the cake recipe from Omnomicon, which is simply 2 white cake mixes and 3 cups of Diet Sprite.  No oil, no eggs, no joke.  So I suppose this cake could be considered “good” for you.  But then I used a not so good for you buttercream instead of the cool whip and pudding frosting that she uses.  The cake in its entirety is kind of like ordering a diet coke along side your big greasy hamburger.

The cake recipe honestly had me a little worried.  Was this diet soda thing really going to work?  Well, it did!  For the most part anyway.  The cake took a little longer to bake, about 40 minutes, and even then it was so moist that it fell apart a little after being removed from the pans.  One layer split almost totally in half, but I was able to squish it back together with the help of a bit of frosting.  It was also stickier than normal cake mix cakes.  I let the cakes cool upside down on racks and when I went to take them off I had more breakage because it had stuck to the rack.  Again, frosting repair was needed.  Here is but one of my frosting repair jobs.

But even with the problems that made cake assembly a little difficult it was oh so very tasty, moist and delicious.  I think with cupcakes you could use this cake mix + diet soda method and be quite pleased with the results since you don’t have any layering to do, and there’s less guilt involved.  I think you might only get 12-18 cupcakes out of one cake mix and 1 1/2 cups of diet soda.  2 cake mixes and 3 cups gave me what a cake mix with the usual eggs and oil would have.  But there might be some deflation due to mixing the batter once all together and then again to make the colors.  I don’t know.  I am not a scientist.

Dividing and coloring the cake batter was pretty simple.  I used a scale to get the same amount in each of my 6 bowls, but you could easily eyeball it and not suffer any serious consequences if you were a little off.  You really should use gel colors if you want the lovely bright colors.  The food coloring you use for dyeing Easter eggs won’t cut it.  I used Wilton gel colors.  If you do any cake or cookie decorating at all, you should have some of these.

Grease and flour 2 8-inch cake pans and fill the first pan with red, orange and yellow.  Pour the red in first, right in the center of the pan.  Follow with the orange, also right in the center and try your best to make it a circular shape (mine was kind of amoeba shaped) and the do the same with the yellow.  In the second pan fill with green, blue and violet.  If you are a science nerd you noticed that I left out Indigo from ROYGBIV.  Feel free to divide your batter into 7 and make yourself some indigo colored batter, but I took a short cut and liked the ease and equality of 3 colors in each pan.

Use your favorite recipe for vanilla frosting or the one below.  I love the white frosting against the bright colors of the cake.  This cake is a lot of fun.  It would be great for a kid’s (or adult’s) birthday party.  You can use the same method with cupcakes, just layer the colors with teaspoons of batter.  In a 9×13 pan it might be hard to get good layers, so you could just randomly dollop colors for more of a tie-dyed effect.  If you do bake in something other than 8-inch cake pans, refer to the baking times and temps on the box of cake mix and then check for doneness, adding more time if needed.

Rainbow Cake

From Omnomicon

Ingredients

  • 2 boxes white cake mix
  • 3 cups (24 ounces) diet lemon-lime soda

Directions

  1. Preheat oven to 350°F.
  2. Mix cake mixes and soda together until well combined.
  3. Divide batter evenly into six bowls.
  4. Color each bowl of batter red, orange, yellow, green, blue and violet.
  5. Grease and flour 2 8-inch cake pans.  Pour red, orange and yellow batter into one cake pan, starting with red, yellow on top of that, and then orange.  Repeat with green, blue and violet.
  6. Bake for 35-40 minutes or until tops bounce back when pressed lightly or cake tester inserted into the the center comes out clean.
  7. Let cool in pans for 10-15 minutes then remove and let cool completely on racks.
  8. Level cakes if desired, then layer one cake on a plate or cake stand.  Frost with vanilla icing, top with second layer of cake and put on a crumb coat of icing.  Refrigerate for at least 1 hour.
  9. Finish frosting the cake with the remaining icing, chill until ready to serve.

Simple Vanilla Buttercream

Ingredients

  • 3 sticks of butter, softened
  • 4 1/2 to 6 cups of powdered sugar
  • 2 teaspoons vanilla extract
  • 2-4 tablespoons milk or cream

Directions

  1. Beat butter until smooth, then add in powdered sugar.  Start with 4 1/2 cups, then add more in 1/2 cup increments to achieve a thick but still spreadable consistency.
  2. Beat in vanilla and milk, starting with 2 tablespoons and adding more if needed.
  3. Use to generously frost a layer cake or 24 cupcakes.

Butternut Squash, Spinach, Caramelized Onion & Goat Cheese Pizza

I made this in December, back when butternut squash was a more appropriate and more seasonal ingredient but life gets ahead of me sometimes (and by that I mean ALL the time) so it is just now making its way onto the blog.  So bookmark for the fall, or ignore all that stuff you hear about seasonal eating and make it anyway!

This was one tasty pizza.  With all these yummy ingredients, how could it not be?  I love every single thing on top of this pizza on its own and together they are just perfect.

I found this recipe in my search for vegetarian dinner options on epicurious.  If you or someone you’re cooking for needs some meat, add some crumbled bacon for some meaty flavor and a nice crunch.  This really is a great vegetarian pizza with such terrific flavors that you won’t miss the meat, or at least I didn’t.

The trick to making this without finding yourself with an incredibly messy and hot kitchen at the end of the day is to prep all your vegetables earlier in the day and refrigerate them.  Roast the squash, caramelize the onions and saute the spinach all before lunchtime (or the night before if you’re doing this on a work day) store them all in separate tupperware or plastic bags and they’re ready to go on the pizza for dinner.  Prepping has become the key to dinnertime sanity for me.  And it’s smart for working folks, stay at home parents or people who just despise cleaning a bazillion pots and pans after having enjoyed their meal.

I used a store bought pizza dough ball (you can sometimes find these in the freezer section of your grocery store) but making your own is not too hard if you plan ahead.  I used this recipe for pizza dough not too long ago and it was easy to make, easy to work with and tasted great.  I followed the instructions up to the baking.  Instead of pre-baking and freezing my crusts, I divided the dough into 4 balls (keep it in one ball for one large pizza), placed them on a greased baking sheet, covered lightly with a piece of plastic wrap sprayed with non-stick cooking spray and put the pan in the fridge until I needed them (about 4 hours).  When I was ready, I formed them into crusts, topped them and baked them.  Once you get the hang of it, pizza dough at home is really easy.  If, like me, you didn’t have the foresight this time around to make your own dough, a frozen one is good.  Make sure to thaw it out overnight in the fridge, or on the counter for a few hours in its original packaging so it doesn’t dry out.

When I made this pizza I had a large squash, so I cubed the entire thing (probably ended up with 4 cups) and roasted it all.  You can use any leftovers tossed with some cooked pasta and goat cheese for a simple vegetarian pasta dinner, or you can use it at meal time for your toddler (which is the direction I chose to go).  The instructions below are for roasting just 2 cups, so if you plan to roast all your squash just increase the oil and seasonings.  It might also take more time to get a good roasted color if your pan is more crowded, so stir the squash and check them for tenderness every so often after the 25 minutes of cooking time recommended below.

My biggest problem with pizza is getting it from the pizza peel or cookie sheet onto the stone in the oven.  Here is a sweet and humorous home video (not my own) that shows you how to do it.  The trick is to do it quickly and use enough corn meal so it slides easily off the peel.

Note:  You may not use all of the onions or spinach.  Just add to the pizza what looks good to you.  Enjoy!

Butternut Squash, Spinach, Caramelized Onion and Goat Cheese Pizza

From epicurious.com

Ingredients

  • 2 cups cubed butternut squash
  • 1 6-ounce bag of baby spinach
  • 1 medium sized yellow or red onion, halved and thinly sliced
  • 6 ounces of goat cheese
  • 1 tablespoon chopped fresh thyme
  • 1 clove garlic, chopped
  • salt and pepper
  • olive oil
  • corn meal
  • 1 ball of prepared pizza dough, thawed if frozen
Directions
  1. Roast the Squash:  Heat oven to 400°F.  Toss cubed squash with a drizzle of olive oil just so it is lightly coated, 1/4 teaspoon of salt and 1/8 teaspoon fresh ground black pepper.  Spread out onto a rimmed baking sheet and roast for 25 minutes until squash is tender and lightly browned, stirring occasionally to prevent sticking and to brown squash more evenly.  Set aside or cool and put in a container and into the fridge if you’re baking the pizzas later in the day.
  2. Saute the Spinach:  Heat 1 teaspoon of oil in a medium skillet over medium heat.  Add a teaspoon of chopped garlic, let cook for 30 seconds, then add spinach and a pinch of salt.  Saute, stirring occasionally, until spinach is wilted down and most of the liquid has evaporated, 8-10 minutes.  Spread a few paper towels on a plate and pour the spinach onto the towels to drain some of the liquid.  Set aside or refrigerate in a container.
  3. Caramelize the Onions:  Heat a medium skillet over medium high heat with 1 tablespoon of olive oil.  Add onions, 1/4 teaspoon of salt and 1/8 teaspoon black pepper.  Cook, stirring, for 10 minutes until onions are light brown.  Add 2 tablespoons of water and cook an additional 5 minutes.  Onions should be very soft and brown in color.  Set aside or refrigerate.
  4. Heat oven to 450°F and heat your pizza stone or you can use the back of a cookie sheet, but don’t preheat the cookie sheet.
  5. Take your pizza dough and either roll it out on a floured surface using a rolling pin or use your hands to stretch it out into a round.  You should have either a 15 inch circle or a 10 by 16 inch rectangle.  Lay your dough on a pizza peel or the back of a cookie sheet coated with corn meal.
  6. Brush olive oil on the outer edges of the crust, then top the pizza with the squash, spinach, onions, crumbles of goat cheese and thyme.  Transfer pizza to pizza stone or place cookie sheet in the oven and bake for 10-12 minutes until cheese is melted and crust is lightly browned.


Sprinkles Strawberry Cake

There is something just plain fun about making layer cakes.  I shared this thought with Ben as I put the finishing touches on this cake that I’d started working on almost 24 hours earlier.  Cookies, cupcakes, brownies, bars, etc. are great because they are typically pretty easy, not terribly time consuming, you can make enough for a big group, and they are hard to screw up.  Cakes, on the other hand, can be troublesome for me because I worry about them not turning out and then not having a single thing to show for my hours spent in the kitchen.  Not to mention you have a big, sugary, calorie laden commitment on your hands…unless you’re giving the cake away or serving it to at least 12 people.  You also are not as free to taste test with a cake.  You can sneak a cookie, or a cupcake (or 2) without being found out, but steal a slice of cake before it’s served and everyone notices the big gaping hole and the crumbs you’re trying to wipe from your mouth.  Despite all that, making a layer cake is therapeutic and the end result is more rewarding than a batch of cookies.  I feel the same way about pie.  They are both big glorious circles of sweet goodness, meant to be displayed on a pretty cake plate and served on those lovely dessert plates you never use.  Am I being too dramatic about baked goods?  I guess it wouldn’t be the first time…

For some reason I was in the mood for strawberry cake, maybe it was all the pretty pink cakes I’d been seeing on Pinterest.  I’ve made Spinkles strawberry icing before, but never the cupcakes.  So I printed the recipes off of Martha Stewart and headed to the store, a girl on a mission to make a delicious cake.  I was pretty excited about it.

I doubled the cupcake recipe to make two 9-inch cakes.  I made 150% of the frosting.  At first I thought about doubling it but when I realized that meant 4 sticks of butter I decided we would just make do with less, and it was plenty.

The cake is dense, not too terribly sweet, and not at all like the strawberry cake you can make from a box.  I wonder if it’s even possible to create a cake from scratch that is close in texture to a box mix.  If you know of a recipe, please send it to me!  Those soft textured cakes do tend to fall apart when frosted and stacked too high, so a dense cake is probably better when you’re planning on stacking 4 layers.  I usually grease my cake pans, line them with parchment circles, and then flour them.  Somehow I’d managed to run out of parchment and not buy any more.  So with a bit of fear I simply greased and floured my pans.  They came out perfectly!  That was a nice surprise.

The frosting is SWEET.  Quite possibly too sweet, not for me, but for the average person.  I like sweetness and sugar…a lot.  If you are not as much of a sweet fan, maybe use half butter and half cream cheese for the frosting to give it a little tang.  Now that I am thinking about it,strawberry cream cheese icing sounds pretty incredible, so I might have to try it myself.  The frosting has little strawberry seeds, and some people may not like that.  So, use a sieve to strain the seeds from the puree if you’re one of those people.  I like my frosting stiff when I frost a layer cake so that it doesn’t start to fall off the cake.  In order to achieve this I had to add more powdered sugar than the recipe calls for (which explains the sweetness) but really does make frosting and decorating less stressful.

Here are some tips for layers cakes that I’ve found helpful.

  • Bake the cakes and let them cool completely.  I like to do this either in the morning or the night before.  If I do it the night before I wrap the cakes in plastic wrap overnight so they don’t dry out.
  • Make the frosting on the thicker side.  (Unless you’re frosting a really delicate cake.  It will pull on the cake too much and cause it to fall apart.)
  • Level your cakes so that when stacked the cake is not domed or slanted.  I use this, but some people are amazing and are able to just use their eyes and a serrated knife.
  • If you’re slicing the cake layers in half, measure to be as close to half as possible.
  • Use an offset spatula for frosting.  It is just easier, buy one.  I use them for loosening the sides of a cake from the pan as well.
  • When you start frosting, plop a little frosting in the center of your cake plate and center the bottom layer on it.  This will keep the cake from moving around.
  • After layering, put a thin coat of frosting on the cake (your crumb coat) and then chill it for at least an hour.  This will allow your next layer to be smoother and free of crumbs.
As far as decorating goes, there are so many beautiful things you can do.  I am not so great at the decorating.  I used my extra frosting to pipe around the bottom and top of my cake.  Here is a great resource from King Arthur that will help you.  This kind of thing takes a lot of practice, so you’ll have to practice, and probably mess up.  When I was piping the top edge I noticed I’d started using more pressure as I was going around the cake so that when I finished there was a huge difference in the size of the rope.  I carefully wiped off what I’d done, smoothed the icing and did it again.   A good way to practice, if you ever find yourself with extra icing, is to use different frosting tips and just pipe onto wax paper.
I hope you think of an excuse to make a layer cake!  If you can’t, then try this recipe for cupcakes.

Strawberry Cake

From Sprinkles via Martha Stewart, doubled from cupcake recipe

Ingredients

  • 1 1/3 cup whole fresh or frozen strawberries, thawed
  • 3 cups all-purpose flour, sifted
  • 2 teaspoons baking powder
  • 1/2 teaspoon coarse salt
  • 1/2 cup whole milk, room temperature
  • 2 teaspoons pure vanilla extract
  • 1 cup (2 sticks) unsalted butter, room temperature
  • 2 cups sugar
  • 2 large eggs, room temperature
  • 4 large egg whites, room temperature

Directions

  1. Preheat oven to 350°F. Grease and flour 2 9-inch cake pans; set aside.
  2. Place strawberries in a small food processor; process until pureed. You should have about 2/3 cup of puree, add a few more strawberries if necessary or save any extra puree for frosting; set aside.
  3. In a medium bowl, whisk together flour, baking powder, and salt; set aside. In a small bowl, mix together milk, vanilla, and strawberry puree; set aside.
  4. In the bowl of an electric mixer fitted with the paddle attachment, cream butter on medium-high speed, until light and fluffy. Gradually add sugar and continue to beat until well combined and fluffy. Reduce the mixer speed to medium and slowly add egg and egg whites until just blended.
  5. With the mixer on low, slowly add half the flour mixture; mix until just blended. Add the milk mixture; mix until just blended. Slowly add remaining flour mixture, scraping down sides of the bowl with a spatula, as necessary, until just blended.
  6. Divide batter evenly among prepared cake pans. Bake until tops are just dry to the touch, 30 to 35 minutes. Transfer cakes in pans to wire racks and let cool for 10 minutes.  Then, carefully remove cakes from pans and let cool completely on wire racks.

Strawberry Frosting

Ingredients

  • 3/4 cup whole frozen strawberries, thawed (I used fresh)
  • 1 1/2 cup (3 sticks) unsalted butter, firm and slightly cold
  • 1/4 teaspoon coarse salt
  • 5 1/2 to 6 1/2 cups confectioners’ sugar, sifted
  • 3/4 teaspoon pure vanilla extract
Directions
  1. Place strawberries in the bowl of a small food processor; process until pureed.
  2. In the bowl of an electric mixer fitted with the paddle attachment, beat together butter and salt on medium speed until light and fluffy.
  3. Reduce mixer speed and slowly add confectioners’ sugar; beat until well combined. Add vanilla and about 6 tablespoons strawberry puree (save any remaining strawberry puree for another use); mix until just blended. Do not overmix or frosting will incorporate too much air. Frosting consistency should be dense and creamy, like ice cream.
  4. Use frosting to top cupcakes or cake.


Daring Bakers: Jalapeño, Bacon and Cheese Beer Bread & Blueberry Almond Streusel Bread

Oh, how I love quick breads.  They are delicious, easy and, most importantly, quick.  This month’s challenge was quite versatile and so fun.  I was able to make one loaf of savory bread to serve with dinner and then a sweet loaf a couple days later for breakfast.  Getting started on this challenge more than a day before the posting date was immensely helpful and I hope I can do the same thing next month.  But we shall see…I have a history of acknowledging how great it was to work on something and get it done early and yet still managing to go back to my old ways of procrastination.

The Daring Bakers’ February 2012 host was – Lis! Lisa stepped in last minute and challenged us to create a quick bread we could call our own. She supplied us with a base recipe and shared some recipes she loves from various websites and encouraged us to build upon them and create new flavor profiles.

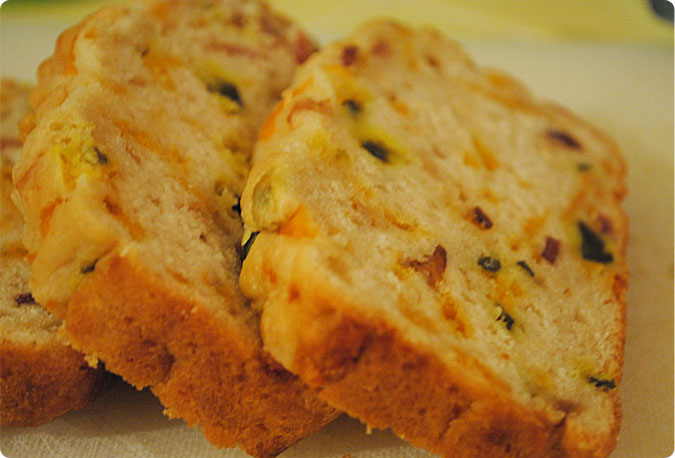
This jalapeño bread was a big hit.  I made a meal of barbecued chicken, creamed corn and cole slaw (all recipes I’d never used before and all of which were flops) and then this bread.  My husband told me the bread was the best part of the meal, and he was right.  I used a sharp cheddar cheese, pickled jalapeños, crumbled bacon and a bottle of Shiner.  We ate it with dinner warm from the oven and the next couple of mornings toasted with butter. I’m bummed it’s all gone, so I’ll probably have to make another loaf.

Jalapeño, Bacon and Cheese Beer Bread

Ingredients

  • 3 cups flour
  • 3 tablespoons sugar
  • 2 teaspoons baking powder
  • 1 teaspoon coarse salt
  • 1/2 cup chopped pickled jalapeños
  • 1/2 cup bacon, cooked and crumbled
  • 1 cup grated cheese
  • 12 ounces beer
  • 1/4 cup butter, melted

Directions

  1. Preheat oven to 375°F and grease a 9×5 loaf pan.
  2. Measure and then sift the flour, baking powder, sugar and salt into a mixing bowl.
  3. Mix in the the chopped jalapeños, cheese and bacon.
  4. Pour one can of beer into the mixing bowl and mix until blended.
  5. Pour mixture into the loaf pan, then pour half of the melted butter over the top.
  6. Bake for 30 minutes, then pour remaining butter on top of the loaf.  Bake for another 20-30 minutes or until golden brown.
  7. Cool for 5-10 minutes, then remove from the pan and cool an additional 10 minutes.

The blueberry almond bread recipe came from Joy the Baker.  She used raspberries in her bread, and I might try that next time, or maybe a mix of berries.  I used frozen blueberries that I’d thawed out and drained, and dried as much as I could on paper towels.  I added a buttery almond streusel to the top of this bread that was so delicious, sweet and crunchy.  It might have been my favorite part of the loaf.

Blueberry Almond Streusel Bread

Streusel

Ingredients
  • 1/3 cup flour
  • 1/4 cups sliced almonds, toasted
  • 1/4 cup cold butter, cut into small chunks
  • 1/4 cup brown sugar
  • 1/4 cup sugar
Directions
  1. Mix together all ingredients except for almonds and butter.
  2. Cut butter into flour mixture with a pastry blender or two knives until the butter pieces are mostly the size of small pebbles with some larger pieces, then mix in the almonds.  Refrigerate until ready to use.
Bread

Ingredients

  • 2 cups flour
  • 1 teaspoon baking powder
  • 1 teaspoon baking soda
  • 1/2 teaspoon salt
  • 1/2 cup (1 stick) unsalted butter, room temp
  • 1 cup sugar
  • 1/2 teaspoon pure almond extract
  • 2 eggs
  • 2 tablespoons sour cream
  • 1 cup blueberries, fresh or thawed and drained if frozen
  • 1/3 cup slivered almonds, toasted

Directions

  1. Preheat oven to 325°F.  Grease and sugar a 9×5 loaf pan.
  2. In a medium bowl, whisk together the flour, baking powder, baking soda and salt. Set aside.
  3. In a large bowl, using an electric mixer, cream the butter, sugar and almond extract until light and fluffy, about 3 minutes. Beat in the eggs one at a time, beating well after each addition. Mix in the flour and sour cream. Fold in the crushed fruit and almond slivers.
  4. Spoon the batter into the prepared pan, then top with streusel.  Bake in the center of the oven for 55 to 60 minutes, or until a cake tester inserted into the center comes out clean.
  5. Cool the bread in the pan for 20 minutes, then invert onto a wire rack, turn right side up and cool completely.

Quick Chicken, Black Bean, Corn & Feta Tacos

These little guys come together easily with very little cooking, making them a quick, easy and tasty weeknight meal.

All you need is a rotisserie chicken, a can of black beans, a can of corn, tortillas, feta cheese, avocado, tomatoes, pickled jalapenos, limes and fresh cilantro.

You can change anything about this meal to make it fit your family, the amount of time you have and the time of year.  Use flour or corn tortillas, different cheeses, cook your own black beans, use fresh corn and roast it on the grill (yum), cook your own chicken the way you like it, and you can even leave out the chicken altogether for a vegetarian taco dinner.

I found a Honey Jalapeno rotisserie chicken at HEB and it was really tasty with just the right amount of spicy kick and sweetness.  I shredded half the chicken and that made 8 generously sized tacos.  I used the rest of the chicken throughout the week for lunches.

Prep everything before beginning to assemble the tacos.  This just makes life easier, and is necessary if people are going to assemble their own.

You can use room temperature tortillas, but heating them makes the tacos much tastier.  Here are some ways you can warm tortillas.

Microwave
  1. Wrap as many as 12 tortillas in paper towels that have been lightly splashed with water.
  2. Microwave on high for 15 to 30 seconds.
  3. Turn over stack of tortillas. Microwave 15 to 30 seconds longer or until heated thoroughly.
Oven
  1. Wrap as many as 12 tortillas in aluminum foil.
  2. Heat in 325°F oven for 20 minutes or until heated thoroughly.
Stovetop

This is my favorite because you can get a perfect crunchy edge if you want it.  Don’t let them get too crunchy or they will crack when you try to wrap the taco.

  1. Heat a heavy pan or cast iron skillet over medium heat.
  2. Warm tortillas for 15 seconds on each side or until heated thoroughly.
  3. After heating, keep wrapped in a clean dishtowel while you warm the rest.

Chicken, Black Bean, Corn and Feta Tacos

Ingredients

  • Shredded chicken, about 2 cups
  • 1 can black beans, drained and rinsed
  • 1 can corn, drained
  • salt, pepper and cumin to taste
  • 1/2 cup (or more) crumbled feta cheese
  • 1/2 avocado, sliced or cubed
  • diced tomatoes
  • pickled jalapenos
  • 2 limes, cut into wedges
  • fresh cilantro, chopped
  • 6-8 tortillas, flour or corn, warmed

Directions

  1. Combine black beans and corn in a small saucepan with 1-2 tablespoons of water.  Warm over low heat and season with salt, pepper and cumin if desired, stirring occasionally until warmed through, about 5 minutes.
  2. Warm tortillas and keep warm while prepping the rest of your ingredients.
  3. Assemble tacos: In the center of the tortilla layer chicken, then bean and corn mixture, cheese then the vegetables of your choice.  Squeeze a lime wedge over the taco if desired.

You Can Make Your Own: White Bread

This is not going to be impressive to you bread aficionados.  Who can’t make simple white bread, you ask?  Me.  That’s who.  Well, until now.  Feast your eyes on my first decent loaf of white bread.

I have only recently begun to feel more comfortable using yeast.  Pizza dough really gave me my initial confidence with trusting something to rise, and I haven’t been too afraid of it for a good while now.

However, after my first trial with making some simple white sandwich bread this past week I was yet again fooled by that tricky micro organism!  I guess I knew it was going to be a flop before I even started.  I bought a jar of yeast at the store because they were out of packets.  I thought, “Well, this is nice.  A big jar I can measure from instead of cutting open those pesky packets.”  I first opened and used the yeast a week ago in pizza dough which rose beautifully.  Then guess what I did.  I put it in the cabinet.  Because that’s where I always keep yeast.  I pulled it out this past week to make this bread and noticed a little, ok fine, a rather large, note on top of the jar that gave a simple instruction.  “Refrigerate after Opening”  Oops.  So what did I do?  I kept on working.  Mixing everything together thinking that by some miracle it would work.  Well, it didn’t.  I plopped the unrisen dough ball into the trash.  It was sad.  I hate throwing food away.

The next day I tried again with new yeast from a package.  It still didn’t rise to double its original size each time like the recipe stated it should, but the end result was a nice, slightly dense white bread of which half a loaf is gone a mere 24 hours later.  So I think I am going to work on perfecting this bread.  It is simple and yummy.  Nothing too complex about it.  It is just good white bread.  This morning we made cinnamon toast with it and it was breakfast bliss.  I think this would make excellent grilled cheese sandwiches and spectacular turkey or ham and cheese, or just simple toast with butter and jam.

This recipe comes from a Houston Junior League cookbook that my friend Megan gave me.  Thanks, Megan!  This cookbook is a lot of fun to browse through since it was originally printed in 1968.  This recipe caught my eye with its title “Old Fashioned White Bread”.  Some recipes don’t get better or improve tremendously over time, and I think basic bread it one of them.  I only changed one ingredient, I used butter instead of shortening, and I changed the instructions a bit since I have the luxury of owning a stand mixer.

If you have any great recipes for white bread, please share them!  While I loved this bread, I always love to try recipes others swear by and also would love any tips you have for bread baking.  I am just a beginner and I know that good bread bakers are made, not born.

Old Fashioned White Bread

Houston Junior League Cookbook

Ingredients

  • 1 package dry yeast
  • 1/3 cup warm water
  • 1/4 cup butter, melted and cooled
  • 1/2 cup sugar
  • 1 tablespoon salt
  • 2 cups lukewarm water
  • 6 cups bread flour
  • Egg Wash: 1 egg whisked with 1 teaspoon of water or milk

Directions

  1. Dissolve yeast in 1/3 cup warm water.
  2. In the bowl of a stand mixer fitted with a dough hook, combine sugar, butter, salt and 2 cups lukewarm water.  Add yeast and mix.
  3. Mix in flour and run the mixer on slow speed for 2 minutes, then on medium speed for 4-5 minutes.  Dough will be sticky.
  4. Oil a large bowl and turn dough out into the bowl, turn to coat with oil.  Cover and let rise for 1-2 hours until doubled in size.
  5. Sprinkle hands with flour, punch down dough and turn onto a lightly floured surface.  Cut dough in half and shape into 2 loaves.
  6. Place dough into 2 greased loaf pans, cover and let rise for 45 minutes, until doubled in size.
  7. Brush loaves lightly with egg wash.  (You will not use it all.)
  8. Bake at 350°F for 40-45 minutes until tops are lightly browned.
  9. Let cool for 5 minutes in the pan, and then completely on wire racks before cutting.


Chocolate Chip Cookies

This is Jacques Torres’s secret recipe!  I found it on Martha Stewart, so it’s really no big secret.  In the summer of 2010 I went to visit my sister and her family in Brooklyn.  We stopped by the Jacques Torres shop in Dumbo and we got one of these cookies.  I think these have got to be among the best chocolate chip cookies I’ve ever had.  The chocolate is in these thin layers thanks to chocolate pastilles, not chocolate chips.  You can find these online, at some grocery stores and baking shops.  This makes a huge difference. You get lots of chocolate in every single bite and it is melty, gooey and wonderful.  Pastilles are those big flat chocolate disks.  You’ve probably seen them.  They look like this.

Now, I will not claim to have duplicated the magic of Mr. Chocolate in my kitchen, but I did turn out some tasty cookies.  They would have been tastier if I’d gotten the chocolate I was supposed to get and hadn’t been distracted at HEB by Fabio.  That’s right.  Fabio from Top Chef, and me, and Carson.  We took a picture together.

I was almost done with my grocery list.  All I needed were a few more produce items and 1 pound block of the best chocolate HEB had to offer.  Then I found out Fabio was doing a cooking demo and in my haste to get everything I needed in time for Fabio, I forgot about it.  About 5 minutes after he started cooking Carson started getting pretty grumpy, so we had to check out and head home.  I had to go out later (in the pouring down rain, without an umbrella) to the store closer to us that didn’t have a great selection.  I wound up with some 60% cocoa chocolate bars, one bag of semi sweet and one of milk chocolate chips.

The recipe below is the full batch.  I made a half batch of the smaller sized cookies and wound up with somewhere around 50 larger than average size cookies.  I can’t imagine any occasion where you might possibly need to make a full batch, maybe a bake sale or if you’re making Christmas cookie plates for the neighborhood.  The half batch made a ton of cookies.

The recipe calls for pastry flour, but I used cake flour.  For the chocolate I used 8 ounces of chopped 60% cocoa chocolate, 4 ounces of semi sweet chips and 4 ounces of milk chocolate chips.  I let the dough sit overnight in the fridge.  I’ve heard that this lets the flour soak up more moisture and then there’s some scientific mumbo jumbo about letting the gluten strands relax which is said to create better texture.  Either way, these have wonderful chew, a terrific flavor and are dangerously addictive.  Be very careful if you make these and make sure to give lots of them away!

Jacques Torrres’s Chocolate Chip Cookies

Ingredients

  • 1 pound unsalted butter
  • 1 3/4 cups granulated sugar
  • 2 1/4 cups packed light-brown sugar
  • 4 large eggs
  • 3 cups plus 2 tablespoons pastry flour
  • 3 cups bread flour
  • 1 tablespoon salt
  • 2 teaspoons baking powder
  • 2 teaspoons baking soda
  • 1 tablespoon pure vanilla extract
  • 2 pounds Jacques Torres House (60 percent cocoa) Chocolate or other best-quality semisweet or bittersweet chocolate, coarsely chopped

Directions

  1. Preheat oven to 350 degrees. Line baking sheets with parchment paper or nonstick baking mats; set aside.
  2. In the bowl of an electric mixer fitted with the paddle attachment, cream together butter and sugars. Add eggs, one at a time, mixing well after each addition. Reduce speed to low and add both flours, baking powder, baking soda, vanilla, and chocolate; mix until well combined.
  3. Using a 4-ounce scoop for larger cookies or a 1-ounce scoop for smaller cookies, scoop cookie dough onto prepared baking sheets, about 2 inches apart. Bake until lightly browned, but still soft, about 20 minutes for larger cookies and about 15 minutes for smaller cookies. Cool slightly on baking sheets before transferring to a wire rack to cool completely.

Valentine’s Cream Puffs

Happy Valentine’s Day!  I made these as a last minute Valentine’s dessert.  And by last minute I mean I thought about doing them last night and made them this morning.  The great thing is that they turned out!  Not in the perfect heart shape I was hoping for, but love isn’t perfect.  So, I’m going to pretend that it was intentional and I meant it as a metaphor for life.  Love isn’t always perfect, but it is delicious! 

If you haven’t made cream puffs before, you really should try it.  They aren’t that difficult or time consuming, you can fill them with a variety of tasty things, and they are impressive.  You can tell people you made pâte à choux, which sounds fancy and hard, but only because it is French.

I used a pâte à choux recipe from Mastering the Art of French Cooking.  The recipes in this cookbook are different than most, but once you read through it and see how it’s all laid out, they are actually quite easy to follow.  I retyped it below in the usual form of ingredients followed by directions.  Julia uses a side-by-side form that I really do like.  If you have the book, turn to page 175!  I had no issues with these puffs.  I made mine on the larger side, so there is some extra cooking time involved.  I’ll include directions for little and big puffs below.

You can use ice cream, whipped cream or pastry cream as a filling for your finished puffs.  The recipe I used for pastry cream was quite thin, so I couldn’t pipe the filling into the puffs like I’d planned.  Here is a good pastry cream recipe.  I cut the top off of the puff and spooned the cream into the center and placed the top back on.  This is an easier and less messy method anyway, so I’m glad I was forced to do it this way.  For a really simple dessert, just slice the puffs in half and fill with a little scoop of your favorite ice cream, drizzle with chocolate sauce, and you have profiteroles.  Again, fancy sounding but so very simple.

If you fill these with pastry cream before you plan to serve them, refrigerate the puffs and do not dust with powdered sugar.  Dust with sugar and drizzle with chocolate right before serving.  If you’re using ice cream or whipped cream, fill right before serving.  Enjoy!

Piped Puffs
Center of Cooked Puff
 
Baked Puffs
All of these hearts are a little different (and some don’t even look like hearts at all!)
Filling the Puffs with Pastry Cream

Pâte À Choux

Ingredients

  • 1 cup water
  • 6 tablespoons butter
  • 1 teaspoon sugar
  • a pinch of salt
  • 3/4 cup all purpose flour
  • 4 eggs
  • 1 egg beaten with 1/2 teaspoon of water for glazing the puffs

Directions

  1. In a heavy 1 1/2 quart saucepan, bring water, butter, sugar and salt to a low boil, stirring, until butter is completely melted.
  2. Remove from the heat and immediately add all the flour.  Beat vigorously with a wooden spoon to blend thoroughly.  Then beat over moderately high heat for 1 to 2 minutes until mixture pulls from the sides of the pan, forms a mass, and begins to leave a film on the bottom of the pan.
  3. Remove pan from heat and make a well in the center of the paste with your spoon.  Break an egg into the center and beat it into the paste for several seconds until it has absorbed.  Continue with the rest of the eggs, one at a time.  The third and fourth eggs will be absorbed more slowly.  Beat for a moment more to be sure it is well blended and smooth.
For the hearts (10-12 puffs)
  1. Preheat oven to 425F and set oven racks in upper and lower thirds of the oven.
  2. Fill a pastry bag (or ziploc) with a 3/4 inch diameter tip (or cut an opening in your bag) with the choux paste.
  3. Pipe the outline of a heart onto the pans lined with parchment, then fill in the center.  Hearts should be about 2 inches in diameter and no more than 3/4 inch high in the center.  Space them about 2 inches apart.
  4. Dip pastry brush in the beaten egg and water, letting the excess drip off.  Slightly flatten the top of each puff with the side of your brush.  Be careful not to let the egg drip down the sides, or the puff will not rise as high.
  5. Place the baking sheets in the oven and bake for 20 minutes.  Then, reduce the temperature to 375 and bake for an additional 8-10 minutes.  Puffs will be golden brown, and firm and crusty to the touch.  Turn off the oven.
  6. Remove from the oven and cut a 1-inch slit in the side of each puff.  Return pans to the oven and let sit for 10 minutes with door ajar.
  7. Test one puff by opening it and making sure the center is not wet or uncooked.  If it is, remove the uncooked portion from that and all the other puffs.  Allow the puffs to cool completely on wire racks.

For small puffs (35-40 puffs):

  1. Preheat oven to 425F and set oven racks in upper and lower thirds of the oven.
  2. Fill pastry bag (or ziploc) with a 1/2 inch diameter tip (or cut an opening in your bag) with the choux paste.
  3. Squeeze the paste onto baking sheets lined with parchment, making circular mounds about 1 inch in diameter and 1/2 inch high, spacing about 2 inches apart.
  4. Dip pastry brush in the beaten egg and water, letting the excess drip off.  Slightly flatten the top of each puff with the side of your brush.  Be careful not to let the egg drip down the sides, or the puff will not rise as high.
  5. Bake for 20 minutes until puffs are golden brown, firm and crusty to the touch.  Remove from the oven, pierce the side of each with a knife.  Turn off the oven.  Set back in the oven for 10 minutes with the door ajar.  Then cool puffs completely on a wire rack.