About Carrie Zinnecker

Posts by Carrie Zinnecker:

Roasted Cauliflower and Carrot Couscous Salad

This vegetarian dish can stand alone as the main meal, or it can be served as a side dish.  I served this alongside some grilled chicken.  When I asked Ben if he’d be OK eating a vegetarian dinner or if he wanted chicken, well, you know what he said.  If I were to serve this as a side again I might leave out the chickpeas.  It seemed too substantial as a side with them.  It can be eaten warm, at room temperature, or cold (which is how I’ve enjoyed it for dinner and lunch the last couple days).

Yes, I made yet another meal with couscous.  I like couscous.  My grocery store had whole wheat this time, so I grabbed 2 boxes just in case they decide to stop carrying it again.  This is an incredibly simple meal to prepare.  The only bad part is having the oven not only on, but on at 450°F to roast the vegetables.  It’s in the triple digits outside, so it does seem a little crazy to make it even hotter inside.  I do love the flavor that roasting vegetables produces, so it’s worth it.  The combination of rich roasted vegetables with the cumin and the bright flavor of the lemon is wonderful.

This recipe came from my dear friend Martha Stewart.  I played with it a little bit, but will not say that I “adapted” it at all.  I used baby carrots, omitted the arugula completely, and then the dressing I just mixed up without measuring.  I used about a tablespoon of olive oil, the zest and juice of one large lemon, and salt and pepper.  I’ve said this before, I do not like things to be overdressed or sauced.  You can always add more, but you can’t take any away.  It’s like cutting bangs, sort of.  Some of you know what I mean.  Anyway, start by adding a little dressing, taste, and then add more to your liking.  The recipe below reflects my changes.  The original can be found here.  Enjoy!

Roasted Cauliflower and Carrot Couscous Salad

Courtesy of marthastewart.com

Ingredients

  • 1 pound carrots, sliced 3/4 inch thick on the diagonal (or halved baby carrots)
  • 1 head cauliflower (3 pounds), cored and cut into florets
  • 1 1/2 teaspoons ground cumin
  • 2-3 tablespoons olive oil
  • Coarse salt and ground pepper
  • 1 cup whole-wheat couscous
  • 1 lemon, zested and juiced
  • 1 can (15 ounces) chickpeas, rinsed and drained
  • 6 scallions, thinly sliced
Directions

  1. Preheat oven to 450°F. Place carrots and cauliflower on a rimmed baking sheet; toss with cumin and 1-2 tablespoons oil. Season with salt and pepper.  Roast until browned and tender, 25 to 30 minutes, rotating sheet and tossing halfway through. Cool to room temperature.
  2. Meanwhile, in a medium saucepan, bring 1 1/4 cups salted water to a boil. Stir in couscous; cover and remove from heat. Let stand until tender, 5 minutes. Fluff with a fork; set aside to cool, uncovered.
  3. Make dressing: In a small bowl, whisk together lemon zest and juice and remaining tablespoon oil; season with salt and pepper.
  4. In a large bowl, combine roasted vegetables with couscous, chickpeas, and scallions.  Toss with dressing.

Rosemary Apricot Bars

A while back I posted that I wanted this cookbook from Baked.  So, I armed myself with a Barnes and Noble gift card and went out to fulfill my desire.  My plans went awry when they did not have the book in stock.  I bought the second cookbook from Baked instead, Baked Explorations.


The cookbook itself is quite wonderful.  The photos are lovely and unique with a rustic appeal.  Beautiful antique plates, platters and serving dishes display the sweet offerings of this cookbook.  Wood grains, and all shades of brown dominate the color scheme with the occasional pop of color and accents of gold and silver.  The recipes are keeping with the feel of this book, which to me feels like the cooler days of autumn.  I can’t wait for it to be cool enough for me to make the whiskey pear tart!  It’s 102° at the moment…

The first recipe I tried was the Rosemary Apricot Bars.  I had one of these from the bakery when I was in Brooklyn last summer visiting my sister.  It was such a great combination of sweet and savory, crunchy and gooey, and totally delicious.  Mine did not quite measure up to the bakery standards, but they were good.  So good that my husband asked for seconds.  This is a rare occurrence, so I know this is a keeper recipe.

I made some mistakes with these bars.  The recipe calls for a 9 inch square pan.  I used an 8 inch, which made the bottom crust a bit too thick, and the topping a bit too thick, but the filling was just right.  I skimped by 1 tablespoon on the crumb topping because that’s all I had left after the 12 tablespoons in the crust.  As a result, a lot of the topping fell off the top of the bars when I cut them.  Don’t skimp on the butter.  My timing on putting these together was also a bit off, so the apricot filling ended up getting too thick and too reduced after sitting in a warm oven for almost 2 hours.  Why?  Well…

Our house is on the market, as of last week, but we hadn’t had any showings as of Sunday.  So yesterday I struggled with myself a bit.  Do I make these bars and risk a messy kitchen when someone wants to see the house at the last minute, or do I not make them and then regret it because no one came to look at the house anyway?  I made the decision to make them.  Having my house on the market shouldn’t mean sacrificing my freedom to baked goods, right?

I’d made all the parts of the recipe…crust chilling in the fridge, filling cooked and ready to be pureed, crumb topping mixed and in the fridge.  Dirty dishes all over the place.  Carson wakes up from his nap.  I get a call from the realtors office that someone wants to come see the house as soon as I’m ready.  I said 30 minutes and the frenzy begins to get things put away.  15 minutes later there’s a knock at the door.  The dog starts barking, so Carson starts crying, so I’m trying to keep the dog from attacking the realtor as I try to get to the door.  She apologized for being early, I asked for a few minutes to at least put my sweet guard dog in the back yard, I swept Carson up and we headed out to run an errand.  I was a sweaty mess and then realized that I was holding a baby who’s diaper was just about at its breaking point.  I was so tired.

I’d stashed the cooling apricots in the oven, which was warm from the beginning of a preheat, so when I get home the apricots were a seriously sticky and overly reduced mess.  I warmed them up again with a little water and then pureed them.  It worked out ok, given the circumstances.

Despite the craziness surrounding these they turned out well.  I might play around with them in a 9×13 to get a thinner crust.  I’ve learned a valuable lesson about using my kitchen and trying to sell my home.  They do not mix.  I think I will try to bake later in the evening instead of the middle of the afternoon to avoid the chaos I experienced yesterday.

Rosemary Apricot Bars

Courtesy of Baked Explorations

Ingredients

Rosemary Short Dough

  • 1 3/4 cups flour
  • 1/2 teaspoon salt
  • 2 teaspoons fresh rosemary, minced
  • 12 tablespoons butter, room temperature
  • 1/2 cup powdered sugar
  • 3/4 teaspoon vanilla extract
Apricot Filling
  • 2 cups dried apricots
  • 1/2 cup sugar
  • 3 tablespoons honey
  • 2 tablespoons brandy
  • pinch of salt
Crumb Topping
  • 1/2 cup flour
  • 1/2 cup brown sugar
  • 1/3 cup pecans, chopped
  • pinch of salt
  • 3 tablespoons cold butter, cut into cubes
Directions
Rosemary Short Dough
  1. Grease a 9-inch square baking pan and line with parchment, overhanging on 2 sides.
  2. In a medium bowl whisk flour, salt and rosemary.
  3. In the bowl of a stand mixer beat butter, sugar and vanilla on medium speed until fluffy.
  4. Stream in the flour and mix on low speed until flour is incorporated, then turn the dough into the pan and press into an even layer.  Refrigerate at least 30 minutes.
  5. Bake at 350°F for 25-30 minutes.  Let cool on wire rack.
Apricot Filling (Make while dough is chilling)
  1. Place the apricots, sugar, honey, brandy and salt in a medium saucepan with 1 1/2 cups water and simmer over low heat for 45 minutes, or until apricots are tender and most of the liquid has evaporated and thickened.
  2. Let cool slightly, then puree in a food processor until smooth.
  3. Spread over crust while it is still warm.
Crumb Topping
  1. Combine sugar, flour salt and pecans in a bowl.
  2. Cut in butter with a pastry blender or two knives until butter is incorporated and you have a sand-like texture.  (You can store this in the fridge until ready to use.)
  3. Sprinkle crumb mixture on top of the apricot layer and bake at 350°F fr 20-25 minutes.
Let bars cool out of the oven for 30 minutes, then remove using the parchment and cut into bars.

What I Want Wednesday

Have I really been this neglectful to my blog?  2 weeks without a post?  I am a terrible person and I promise to be better.  Things have been a little crazy around here getting our house ready to sell.  My house has never looked better!  We are leaving Amarillo and moving to Houston once we sell this lovely little place.  I have mixed emotions about the move.  It is bittersweet.

I am by no means a gardener, but I’ve been attempting to learn more about plants and gardening since having a yard I can work in.  If you’ve been to my house and seen my yard you are currently thinking, “She was working on that yard?”  Did I say I was successful?  Anyway, I really do want to be a good gardener.  I want to grow vegetables that I can cook with, and flowers that I can cut and arrange in a vase in my house, I want to sit and have a cup of coffee out among my lush and flourishing foliage.  But I should be realistic, I am no Ina Garten, and I live in Texas.

One of the things I really, really want is a functional herb garden.  I have managed to grow rosemary and so I never have to buy it from the grocery store.  I just head out back and snip a few sprigs.  It makes me happy.  Basil?  No luck.  Mint? I have some out back, and it’s doing well so far.  We shall see.  In my dream herb garden I want these.

Isn’t this a lovely idea?  Fresh herbs are such a great ingredient and garnish to savory and sweet things, and they are even greater when you can have the satisfaction of getting them from your own yard!  Here is a how-to from Bunny Hill Blog on making your own.  I may try this myself when we get to our new home…whenever and wherever that is.  I saw some already made on this Etsy page.  That may end up being the route I go if I get too lazy to search for old spoons, hammer them flat and then stamp them.


Slow Cooker Moroccan Chicken

The slow cooker gets a bad rap sometimes.  But not every meal that comes out of it has to be mediocre or full of cream-of-whatever soups.  I am currently in search of good crock pot recipes, and while I have had a couple mishaps, some of the meals I’ve made have been worth repeating.  This is one of those meals.

The only thing I would do differently with this recipe is to use bone-in chicken instead of boneless chicken breasts.  I knew that might be an issue, but I wanted to use what I had, and what I had was boneless chicken breasts.  Our chicken was a tad dry after cooking all day, in my opinion anyway.  Ben thought it was good, but Ben thinks most of what I make is good…I think he was just being nice : )

As far as flavor goes, this was a good slow cooker meal.  The apricots and raisins get nice and plump after soaking up the cooking liquid and add a nice sweetness to the dish.  The carrots stay surprisingly sturdy, not at all mushy, as long as you’re generous with your cut.  I sliced them on a bias somewhere between 1/4 and 1/2 inch thick.  A slight change I made was the addition of 2 extra carrots because I like more vegetables.  The original recipe calls for 2 onions, but since mine was rather large I only used one, and am glad that I did.

The slow cooker bible says DO NOT take the cover off the slow cooker while cooking!  I disobeyed this rule.  After about 4 hours of cooking  I stirred everything up so that the chicken would be covered in more liquid.  I don’t know how much of a difference that made.

Served atop the couscous, and sprinkled with the fresh cilantro and pine nuts, this meal is quite tasty.  The freshly made components make this seem less like your typical slow cooker meal.  Enjoy!

Slow Cooker Moroccan Chicken

Serves 4-6

From Better Homes and Gardens

Ingredients

  • 4-6 carrots, peeled and sliced
  • 1 large onions, halved and thinly sliced
  • 3 lb. meaty chicken pieces (breast halves, thighs, and drumsticks), skinned
  • 1/2 cup raisins
  • 1/2 cup dried apricots, coarsely chopped
  • 1 14-oz. can chicken broth
  • 1/4 cup tomato paste
  • 2 Tbsp. all-purpose flour
  • 2 Tbsp. lemon juice
  • 2 cloves garlic, minced
  • 1-1/2 tsp. ground cumin
  • 1-1/2 tsp. ground ginger
  • 1 tsp. ground cinnamon
  • Salt and Pepper
  • Hot cooked couscous
  • Pine nuts, toasted
  • Fresh cilantro, coarsely chopped
Directions
  1. In a 5- to 6-quart slow cooker place carrots and onions.
  2. Sprinkle chicken with 1/2 teaspoon salt. Add to cooker; top chicken with raisins and apricots.
  3. In a bowl whisk broth, tomato paste, flour, lemon juice, garlic, cumin, ginger, cinnamon, and 3/4 teaspoon ground black pepper and add to cooker.
  4. Cover; cook on low-heat setting for 6-1/2 to 7 hours or on high-heat setting for 3-1/2 to 4 hours.
  5. Serve in bowls with couscous. Sprinkle with nuts. Garnish with cilantro.

Fruit Tart with Vanilla Bean Pastry Cream

When I was asked to bring fruit to a little gathering of Sunday school ladies, I don’t know if this is what she had in mind.  But I’d been itching to make a proper dessert for a while, so this is what I brought.  Beats the pants off of a fruit salad, I’d say.

Making pastry cream is one of those “miracle in the kitchen” moments when you smile and marvel at what can become of eggs, milk, sugar and heat!  One minute on the stove you’re whisking, being careful not to stir too quickly to avoid spilling the thin mixture, then it’s suddenly a thickened pot of deliciousness!  Pastry cream is easy, as long as you can devote a little bit of undivided attention to it.  If you don’t whisk, whisk, whisk while its cooking you’ll end up with lumps, which are not what you want in a pastry cream.  You also have to let it cool for at least 2 hours in the fridge.  If you have time and patience, you can make pastry cream.

Recipes for the tart crust and pastry cream came from Martha Stewart’s Baking Handbook.  I had no problems with the pastry cream.  The crust was another story entirely.  After preparing the dough, I wrapped it in plastic wrap and put it in the fridge.  At this point I already had my doubts.  It was so crumbly and dry.  After chilling overnight (which the recipe says is fine) it was so dry that it was impossible to roll out.  And I mean impossible.  It crumbled.  All over the place.  I ended up just pressing it into the tart pan.  I blind baked it, worrying the entire time that I’d have to do it over again.  But it came out of the oven looking fine.  I figured that since it was going to be filled with pastry cream and topped with fruit, a less than stellar crust was OK.  It turned out to be a bit difficult to slice, and it did crumble easily, but it tasted great.  But I am in search of the perfect tart dough now.

You can use any fruit you like.  I used blueberries, raspberries and kiwi.  I also bought strawberries, but didn’t end up having room for them.  So I made baby food with them…something that was not a big hit.  But that’s a story for another blog.

I glazed the top of the finished tart with apricot jam that I’d heated and thinned with a little water to give it a nice sheen.  It doesn’t interfere with the taste at all.

Tart Dough and Pastry Cream From Martha Stewart’s Baking Handbook

Tart Dough

NOTE: The instructions below would work in an ideal baking world.  I had to press my crumbling dough into the tart pan, much like a graham cracker crust.  If you cannot roll this dough, the pressing method works fine, but does not yield a tender crust.  I might be inclined to tell you to simply use your favorite pie dough recipe in place of this one.  Sorry, Martha.

Ingredients

  • 6 tablespoons butter, room temp
  • 1/2 cup powdered sugar
  • 2 large egg yolks
  • 1 1/2 cups flour
  • 1/4 teaspoon salt
  • 2 teaspoons heavy cream

Directions

  1. In the bowl of an electric mixer with a paddle attachment, combine butter and powdered sugar on low speed until combined, about 2 minutes.
  2. Add egg yolks and mix until incorporated.  Add 3/4 cup flour and mix on low speed until just incorporated.  Add remaining 3/4 cup flour, salt and cream, and mix until flour is no longer visible, about 1 minute.
  3. Turn dough onto plastic wrap and shape into a flattened disk.  Wrap and refrigerate for at least 2 hours or overnight.
  4. When ready to make your tart shell, preheat oven to 375°F, remove dough from the fridge, roll out to 1/4 inch thick and at least 2 inches wider in diameter than your tart pan (so 13 inches for an 11 inch pan, 11 inches for a 9 inch pan).
  5. Drape dough over pan, press into the pan, remove excess by rolling a rolling pin over the top edge to trim dough.
  6. Blind Bake: Prick dough lightly with a fork in several places.  Lay a piece of parchment over the dough, fill with pie weights or dried beans.  Bake for 20 minutes, remove parchment and weights, bake for another 5-10 until slightly browned.  Let cool.

Pastry Cream

Ingredients

  • 2 cups whole milk
  • 1/2 cup sugar
  • 1 vanilla bean, split lengthwise, seeds scraped
  • pinch of salt
  • 4 egg yolks
  • 1/4 cup cornstarch
  • 2 tablespoons butter, cut into cubes

Directions

  1. In a medium saucepan, combine milk, 1/4 cup sugar, vanilla bean and seeds, and salt.  Cook over medium heat until mixture just comes to a simmer.
  2. In a medium bowl, whisk eggs yolks, cornstarch, and remaining 1/4 cup sugar.  Whisking constantly, slowly pour about 1/2 cup hot milk mixture into the egg mixture.  Continue adding milk mixture, a little at a time, to the egg mixture, whisking constantly, until it has all been incorporated.
  3. Pour mixture back into the saucepan and cook over medium-high heat, whisking constantly, until mixture thickens, about 2 minutes.  Remove and discard vanilla bean.
  4. Transfer to the bowl of an electric mixer with paddle attachment.  Add the butter and beat on medium speed until the butter melts and the mixture cools slightly, about 5 minutes.
  5. Pour pastry cream into a bowl and press plastic wrap directly onto the surface (so it doesn’t form a skin).  Refrigerate until chilled, at least 2 hours or up to 2 days.
  6. Just before using, whisk until smooth.

Fruit Tart

Ingredients

  • 1 baked tart shell
  • 1 batch pastry cream
  • Assorted fruits, rinsed and dried (a heaping cup each blueberries, raspberries and 3 kiwi fruits sliced with skin removed)
  • 1/4 cup apricot jam, warmed with 1-2 tablespoons water

Directions

  1. Brush jam over crust, just to coat, to keep it from becoming soggy.  Let dry for 20 minutes.
  2. Spread pastry cream in shell and smooth the top, fill almost to the top edge of the shell.
  3. Arrange fruit on top of pastry cream and then brush top of the fruit with more jam.  Chill until ready to serve.

Mini Turkey Meatloaves

Oh, meatloaf.  Loved by many, despised by some.  Or is it the other way around?  I like meatloaf.  I always have.  My mom used to make one in a pie plate that was topped with ketchup and lemon slices and baked in the microwave.  Yes, the microwave.  I have very fond memories of that dish.

This turkey meatloaf can be made as one large loaf or 4 mini loaves.  I chose to do the mini ones so they would cook a bit quicker…and I like the idea of my own cute personal meatloaf.

Here is the link to the original recipe from skinnytaste.com.  I used 93/7 ground turkey, soaked the oats in a few tablespoons of buttermilk for some more moisture, and used a combination of dried thyme, basil, parsley and oregano instead of the marjoram.  Whatever herbs you like would be good.  These were tasty.  I’ll make them again.

With the leftover loaves I made meatloaf sandwiches the next night.  You don’t have to reheat the meat, just toast some whole wheat buns, spread with mayo, slice the meatloaf, layer on the bun and top with dill pickle slices.  Ben first opted out of the pickles, but after a few bites he decided to give them a chance and said it was much improved.  Enjoy!

Mini Turkey Meatloaves

Adapted from skinnytaste.com

Ingredients

  • 1/2 small onion, chopped
  • 1.3 lb 93% ground turkey
  • 1/2 cup oatmeal
  • 3 tablespoons buttermilk (or milk)
  • 1/4 cup ketchup + 2 tbsp
  • 2 tsp Worcestershire sauce
  • 1 large egg
  • 1/4 to 1/2 teaspoon each dried thyme, basil, parsley and oregano
  • salt and pepper to taste
Directions
  1. Preheat the oven to 350°.
  2. Soak oatmeal and buttermilk in a small bowl for 5 minutes.
  3. In a medium bowl mix turkey, onion, oatmeal, egg, ketchup, salt, pepper and herbs.
  4. Divide into four equal loafs and place each loaf into a non stick mini loaf pan or shape into small loafs on a cookie sheet lined with non-stick foil or parchment.
  5. In a small cup mix remaining 2 tbsp ketchup with Worcestershire sauce and brush onto each loaf.
  6. Bake uncovered for about 40 minutes at 350°.  After baking let them sit for 5 minutes before serving.


Chocolate Snack Cake with Coconut Pecan Icing

This recipe came from a real cookbook.  One with pages and everything.  America’s Best Lost Recipes.

My sister worked at Half Price Books a couple years ago and got her hands on this neat cookbook from the Cook’s Country editors.  It contains recipes that have been around for a while that have been shared by home cooks.  Stories accompany each recipe telling who they came from, and how and where they originated.  The goal of this cookbook is to bring back recipes that are worth remembering.

This simple chocolate sheet cake is called “Scotch Cake” in the cookbook.  The note about this recipe says:

“The origin of the name of this simple sheet cake, with its unique pecan and coconut topping, was a mystery to Melinda and her mother, whose recipe card for it included a note that said: “I don’t understand the name of this cake.  I just call it my “boil it” cake”.”

I brought this cake to a potluck dinner, and it received a few compliments.  It’s a great potluck dessert because you can make it a day in advance and keep it in the fridge, it’s simple to prepare, you can take it in the pan and it cuts really nicely.  After being refrigerated the cake becomes almost fudgy and the coconut pecan icing gets that nice sugary crunch.  You know what I’m talking about.

Chocolate Snack Cake with Coconut Pecan Icing

From America’s Best Lost Recipes

Ingredients

Cake

  • 2 cups flour
  • 2 cups sugar
  • 2 sticks of butter
  • 1 cup water
  • 4 teaspoons cocoa powder
  • 1/2 cup buttermilk
  • 3 eggs
  • 1 teaspoon baking soda
  • 1 teaspoon vanilla
  • 1/4 teaspoon salt
Icing
  • 1 stick butter
  • 6 tablespoons whole milk
  • 4 teaspoons cocoa powder
  • 4 cups powdered sugar
  • 1 teaspoon vanilla
  • 1 cup sweetened, shredded coconut
  • 1 cup chopped pecans
Directions
For the Cake
  1. Preheat oven to 350 F. Grease and flour a 9×13 pan.
  2. Whisk flour and sugar in a large bowl.
  3. Heat butter, water and cocoa in a saucepan over medium heat until it comes to a boil.  Pour over the four mixture and stir to combine.
  4. Stir in the buttermilk, eggs, baking soda, vanilla and salt until combined.
  5. Pour into prepared pan and bake for 35-40 minutes until toothpick inserted into the center comes out clean.
For the Icing
  1. Heat the butter, milk and cocoa in the same saucepan over medium heat until the butter melts.
  2. Take it off the heat and stir in the powdered sugar, vanilla, coconut and pecans.
  3. Spread over the warm cake and let cool completely.
  4. Serve or refrigerate for up to 3 days.  Bring the cake to room temperature before serving.


Artichoke and Sun-dried Tomato Couscous Salad

The only part of this recipe that you have to cook is the couscous.  Couscous, as you may or may not know, is one of the simplest things to prepare.  Boil water, add couscous, stir, turn off heat, cover, wait for 5 minutes.  That’s it.  I don’t think it gets much simpler than that.

Adding chopped artichokes, sun-dried tomatoes, Italian dressing and crunchy almonds make for a lovely and light meal.  If you need meat in your meal, as many people do, add a cup or so of chopped cooked chicken (grilled or rotisserie chicken from your grocery store).

This recipe comes from picky-palate.com.  She serves this salad tossed with arugula.  I served it over a bed of baby spinach.  If this is something you are not going to eat all of the first time around, don’t toss the almonds in with the salad.  They’ll lose their crunch, so just sprinkle some on top of each serving.  You could substitute quinoa for the couscous for an extra punch of protein.  Enjoy!

Artichoke & Sun-dried Tomato Couscous Salad

Courtesy of picky-palate.com

Ingredients

  • 10 ounce box Couscous
  • 15 ounce can artichoke hearts, chopped
  • ½-1 cup sun dried tomatoes
  • ½-1 cup fresh shredded or grated Parmesan Cheese
  • 1/4 cup Italian dressing of choice
  • 1/2 teaspoon kosher salt
  • 1/4 teaspoon freshly ground black pepper
  • 1-1 ½  cups chopped cooked chicken (half of a rotisserie chicken)
  • ½-1 cup slivered almonds, toasted
  • 8 ounce bag baby spinach
Directions
  1. Cook couscous according to package directions. Toss to fluff and chill until cooled.
  2. Add artichokes, tomatoes, dressing, salt and pepper, and parmesan, stirring to combine. Serve or chill until ready to serve.
  3. Serve over a bed of baby spinach, top with toasted almonds.


What I Want Wednesday

When I heard that Borders was closing all of its stores I became really sad about the whole thing.  Empty stores left in shopping centers.  It’s depressing.  But I’ve seen the signs.  iPad, Kindle, Nook, etc.  Books are dying.  I’m pretty sure that at some point kids will no longer check out books from a school library, but download them instead.  This makes me a little sad.  But I’m contributing to this paperless future by getting a lot of my recipes online.  Cookbooks are lovely, and I have too many.  I’ve lamented about this problem before.

So, today I’m wanting this cookbook from Baked in Brooklyn.

Baked: New Frontiers in Baking.

My sister lives in Brooklyn, so I was able to get some goodies from Baked last summer on my visit.  The bakery is cool.  Their sweet offerings make you weak in the knees.  I want to go there right now for breakfast.

My sister turned me on to this blog, Crepes of Wrath, who has made a few of the recipes from the Baked cookbook. Every time she posts one I start to salivate and my tummy rumbles.

In an effort to keep the book alive, I want to add this cookbook to my collection even though I’m not sure where I’ll put it…

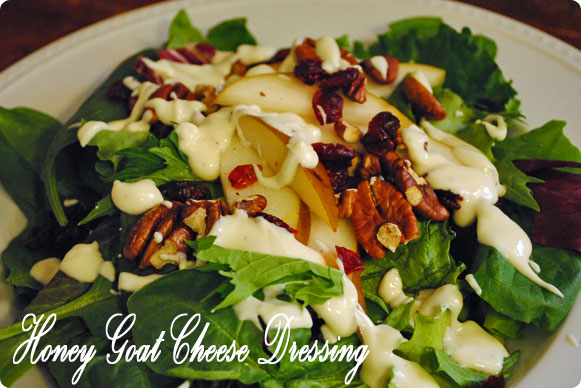
Pear, Pecan and Cranberry Salad with Honey Goat Cheese Dressing

Whenever I eat goat cheese I wonder why I don’t use it more often.  I love its tang and creaminess.  Even the tiniest of crumbles of the stuff can transform a dish.  The honey goat cheese dressing on this salad was so tasty, and took an already great salad to another level of deliciousness.

My mother in law turned me on to skinnytaste.com after making two meals for us with recipes from the site.  Both tasted great and were pretty healthy.  If you do Weight Watchers, then you’re in luck because Gina includes the points.

I added some grilled chicken to this salad to make it a meal.  Instead of apples I used pears, which I think pair better with the other ingredients.  You must, must, must toast the pecans.  The flavor of any nut is improved by a quick toasting in the oven or in a dry skillet on the stove.  Do the same when you are adding pecans, walnuts or almonds to baked goods.  They just taste better.  So take the extra 5 minutes.  You’ll be glad you did.

This salad recipe used measurements for the apples and cranberries, but I just added what I wanted.  This probably messes with the points, so here is the link to Gina’s original recipe.  If you don’t care so much about counting out how many cranberries or slices of apple you can use, then just pile on a plate the following ingredients and top with the dressing.

  • Spring mix or baby spinach
  • Dried cranberries
  • 1 Bosc Pear, sliced
  • Toasted pecans, halves or pieces
  • Grilled chicken, sliced (optional)

The dressing was a little on the thick side when I made it, so I added a little more water, lemon juice and a touch of olive oil to loosen it up a bit.  After storing the leftover dressing in the fridge it was no longer pour able, so either let it warm up at room temp before you plan to use it again, or zap it in the microwave for a few seconds and stir it up.  Enjoy!

Honey Goat Cheese Dressing

Courtesy of skinnytaste.com

Ingredients

  • 4 oz goat cheese, room temperature
  • 1 1/2 tbsp honey
  • 2-3 tbsp extra-virgin olive oil
  • 2 tsp apple cider vinegar
  • 1/2 lemon, juiced
  • 1-2 tbsp water
  • Kosher salt and freshly ground black pepper
Directions
  1. In a small blender, combine goat cheese, honey, olive oil, vinegar, lemon juice, water.
  2. Season to taste with salt and plenty of freshly ground black pepper.
  3. Add more lemon juice, water, or oil to create desired consistency.