This is a healthier version of a sloppy joe, but no less sloppy or tasty. Ground turkey takes the place of ground beef, and the addition of grated carrots and tomatoes makes these more nutritious. We ate these last night when my friend Carrie and her 3 girls came through Amarillo on their way to Albuquerque. It pleased the adults and the kiddos. Thank you Martha Stewart! Here is the link to her recipe.
I made a few slight changes to Martha’s recipe. I used a full pound of ground turkey, and instead of the 28 ounces of crushed tomatoes I used a can of diced tomatoes and 2 chopped roma tomatoes. You could easily use just the one can of diced, but consider draining off some or all of the liquid depending on your personal preference. Carrie and I had a little discussion about the tragedy that befalls tomato paste most of the time…it doesn’t all get used and so it gets tossed. Use the entire small can and avoid the waste.
I really like sloppy joes. It makes me feel like a kid to eat them. These sloppy joes are a great choice for the adult who wants a sloppy joe and wants it to be tasty. Enjoy, and get sloppy.
It is a miracle that this is actually going to post today. The icing on these lovely cookies is still wet, and my fingers are dyed a nice reddish orange. But, it is done, and it is delicious.
The September 2010 Daring Bakers’ challenge was hosted by Mandy of “What the Fruitcake?!” Mandy challenged everyone to make Decorated Sugar Cookies based on recipes from Peggy Porschen and The Joy of Baking.
Thankfully I am an old pro at this sugar cookie decorating thing. Well, I am not a pro but I have all the necessary cookie equipment and I don’t make as many mistakes and I did when I first starting doing this. I have an icing recipe I like and trust, and I know how long the process takes to do it well. I could have used an extra day to really make a polished looking and impressive cookie, but the two days I gave myself was just enough time.
For this challenge we were to make a basic sugar cookie and decorate them with a September theme. I am sure I am not the only one who immediately thought of fall and the changing seasons. So, I decided to try something I had not tried before…marbling my icings. I wanted to create a fall colored leaf with all the lovely red, orange and yellow hues that display themselves this time of year. While some are better looking than others, I was really pleased with the results. I simply dropped a few colors of icing on the cookie and spread them around with a toothpick to create the marbling.
Even though the temperature is now in the 80’s, it was in the upper 40’s here this morning. This cooler weather inspired me to make a more fall-like dish for dinner. I love sweet potatoes, but rarely cook with them…I can’t tell you why, it’s just a problem I have. They’re so good for you, and a great fall ingredient. I also like their versatility. Sweet potatoes can be used in tons of dishes, both sweet and savory. You can even make fries with them! I am sure the deep frying that makes sweet potato fries so delicious cancels out some of their nutritive value, but it still makes me feel better to eat them instead of regular french fries. Some of you are saying, “You know that you can bake sweet potato fries in the oven” but you and I both know they’re not as good. Sorry.
Anyway, I don’t know how I arrived at this recipe. I searched for sweet potato soup recipes and ended up with black beans and sausage in there at some point. I found a lot of variations with similar basic ingredients, so I used a few recipes and combined what I liked about each of them to make this soup.
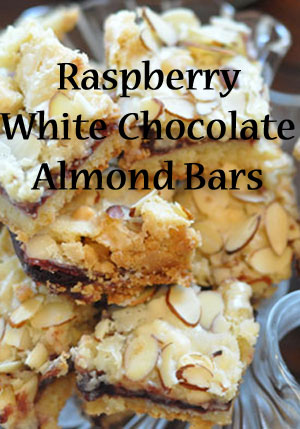
My friend Jackie made these for my baby shower this past weekend. She has made them before, so I knew what I was in for. These bars are pretty incredible. Everyone loved them, and a lot of people asked for the recipe. The recipe is from a Nestle cookbook that Jackie owns. I found it online here.
The ingredient list is short and sweet. I haven’t personally made them but I think the directions are not too difficult, just a bit tedious. I think there are some ways around some of the silly instructions, but I need to try this myself first to see. The only problem Jackie has had is the bars sticking in the pan, even with a generous greasing and sugaring. When I get around to making these, I’ll let you know if I discover a magical trick for that.
Make these, and make them tonight if possible. I must warn you that if you are in the house by yourself with a pan of these you could make the mistake of eating the entire pan. So either exercise some self control or make them and give most of them away. Or you could do like I did, and just eat way too many of them. These are delicious. Thanks, Jackie!
Raspberry White Chocolate Almond Bars
AKA Razz-Ma-Tazz Bars from Nestle
Ingredients
1/2 cup (1 stick) butter or margarine
2 cups white chocolate chips, divided
2 eggs
1/2 cup granulated sugar
1 cup all-purpose flour
1/2 teaspoon salt
1/2 teaspoon almond extract
1/2 cup seedless raspberry jam
1/4 cup toasted sliced almonds
Directions
Preheat oven to 325°F. Grease and sugar 9-inch square baking pan.
Melt butter in medium, microwave-safe bowl on HIGH (100%) power for 1 minute; stir. Add 1 cup morsels; let stand. Do not stir.
Beat eggs in large mixer bowl until foamy. Add sugar; beat until light lemon colored, about 5 minutes. Stir in morsel-butter mixture. Add flour, salt and almond extract; mix at low speed until combined. Spread 2/3 of batter into prepared pan.
Bake for 15 to 17 minutes or until light golden brown around edges. Remove from oven to wire rack.
Heat jam in small, microwave-safe bowl on HIGH (100%) power for 30 seconds; stir. Spread jam over warm crust. Stir remaining morsels into remaining batter. Drop spoonfuls of batter over jam. Sprinkle with almonds.
Bake for 25 to 30 minutes or until edges are browned. Cool completely in pan on wire rack. Cut into bars.
Today I cleaned out my pantry and the cabinet that houses all of the medicine, vitamins, paper goods, cookie cutters, cake decorating gadgets, and some other random junk I own. It felt so good to throw some things away and get everything organized.
The most impressive things I tossed were a box of generic NyQuil from HEB that expired in 2007 and a pretty large container of Gatorade mix that also was “Best By” June of 2007. Why did we still have these things? We moved to Amarillo in 2008. Why did I not throw them both away when we moved?
Anyway, our pantry is not exactly spacious. A few items that I don’t use often had been tossed on top of a bunch of other things on the very top shelf. Out of sight, out of mind. After cleaning everything out I couldn’t find another place for these items, and I couldn’t bear to put them back where they had been after I’d cleaned everything up. So, I made these cereal bars.
I used the rest of a box of Chex I’d needed to make Chex mix a while back and a bag of mini marshmallows. It was nice to get rid of those items, but I still have a few other items that I’ve got to use up to have a truly tidy pantry. Stay tuned for what’s coming next! I have some very interesting ideas.
Once I had mixed up these bars and pressed them into the pan I had some doubts about how they would taste. I let them cool in the fridge for about an hour, then I sliced a small corner for myself. Then I sliced a large hunk of this stuff for myself! The Chex mix gives a different texture than Rice Krispies would, and the combination of white, milk chocolate and marshmallow is pretty addictive. You could use any cereal, any combination or any flavor of baking chips and probably add any other tasty bits your heart desires and come up with something quite yummy. So, run wild and go create goodness with cereal!
This recipe is from the Tasty Kitchen blog, Pioneer Woman’s recipe sharing community. I sometimes forget to look here for recipes, but thanks to my Google Reader I am reminded to check it out every now and then when there is a new post. The site is organized well, and is easy and fun to search through. If you haven’t checked it out, you should. Here is the link to the recipe for these cookies.
These cookies have three kinds of chocolate, and that is never a bad idea. To make these cookies chocolate, you mix in hot chocolate mix instead of cocoa which creates a lighter chocolate flavor and color. I loved the combination of different kinds of chocolate and the subtle chocolate flavor in the cookies themselves.
I had three chunks of Callebaut chocolate left over from various things I’ve made, and so I chopped that up to get my white, milk and dark chocolate pieces instead of using chips. This process seems to infuse every bite with soft chocolate since you end up with some shards of chocolate and some chunks when you chop a block of chocolate. The shards melt into the cookie and don’t keep shape like a chip would, so the texture is different. If I had the $$$ to buy this kind of quality chocolate for every baked good I would use it every time. Although, a chocolate chip cookie isn’t quite the same without Nestle semi-sweets. So, I guess there are exceptions.
The only other change I made was to use a smaller scoop. I used an ice cream scoop roughly equal to golf ball size. I baked them for 9 minutes, let them cool for about 4 minutes and then transferred them to a cooling rack. They should look just a little too soft when you take them from the oven. These are quite treat to enjoy while still warm with a glass of really cold milk. But not to worry, they will not disappoint you if you eat them the next day. Enjoy!
There isn’t much to say about these creamy, yet crunchy, sweet, yet salty and incredibly yummy bars except that they are terrific. They are lovely and simple, and I will be marking this one in my recipe collection as one that is an all around pleaser and something I will probably make many times in the future.
I found this recipe on Bake or Break. The title is what initially drew me to the post, but then I saw the photo and knew I really had to make these bars.
I used pecans instead of cashews, and simply left out the apple butter because the only jar I found at the grocery store cost $8, and I wasn’t about to pour $8 onto a crumb crust and cover it with cream cheese. I am sure the apple butter would have been delicious, but they are wonderful without it as well. Ben’s dad really liked them and suggested maybe raspberry jam instead of the apple butter, which I think would add a great tartness to this sweet bar.
The bottom crust is thick. I would maybe take a little more of the crust mixture out and put it on top next time. The original recipe calls for removing 1 1/2 cups of the mixture…I would take out 1 3/4 or even 2 cups. After you bake the crust, you do not have to wait for it to cool completely. I waited about 10 minutes before pouring on the cream cheese mixture. If you plan to spread either apple butter or jam, you may want to wait a bit longer so that you don’t break the bottom crust while spreading.
The cream cheese filling is perfect as is; I wouldn’t change a thing. I did use one low-fat package of cream cheese, and am sure using all low-fat would be fine. So, I guess I did change one thing.
We ate these while they were still a little warm, and then the next day after chilling in the fridge. I liked them both warm and cool, although the butter is chilled so much straight from the fridge that I feel it needs a few minutes to warm up before the flavor of the butter can really be appreciated. Man, I love butter.
Few things are better than a really delicious chicken salad on some really delicious bread. This chicken salad is really delicious.
I have been convicted lately to use my cookbooks more. I am often reminded of my dad saying to me and my sisters when I lived at home, “Why are you looking on the internet for a recipe? You’ve got a whole bookcase full of cookbooks right here!”. He only said it once, but he had a good point that has obviously stuck with me. While I do still find myself browsing recipes on food sites, I am making an effort to use my cookbooks more and it is really paying off.
This chicken salad recipe is from Rebecca Rather’s cookbook and is one of my favorites. I have made and have blogged about many of them, and have yet to be disappointed. I often focus on her sweet treats, but decided to delve into another section of the cookbook this weekend.
I do prefer to use homemade items instead of store bought most of the time, but not for this recipe. Rather instructs you to make your own mayonnaise. This, I am sure, it spectacular. She also includes a few ways to spice up your homemade mayo that make it extra special. She suggests curry powder, saffron, garlic, chives or rosemary. With the egg fiasco going on, and this whole pregnancy thing I’ve got going on, I figured raw eggs would not be the best choice for me…so I used store bought mayo. I recently bought a bottle of Kraft Olive Oil mayonnaise that I used here, and I really liked it.
Other than my laziness in the mayo department, I made minor changes to this recipe. My changes are shown in the recipe below. The only thing I left out completely was 1/4 cup finely diced red onion. I didn’t have one, so I just used 5 chopped green onions. I also added the fresh tarragon. Central Market sells a lovely tarragon chicken salad, so that was my inspiration.
I served this chicken salad on ciabatta rolls with lettuce and tomato. I ate some leftover today on a bed of lettuce. The almonds still had some texture, so two days in the fridge will not turn your almonds into mush. Enjoy!
To kick off the long weekend we had a great dinner with Ben’s parents who made the trip up from Austin to visit. I’ve had this recipe from Fine Cooking printed out and in my wonderfully organized recipe binder for a while now with every intention of making it, but just never got around to it. So, I pulled this out with high hopes that it would be a winner. Here is the link to the original recipe.
It turned out to be a great meal that we all really enjoyed. All the preparation can be done 24 hours in advance, so that made this meal an even better choice for company. I rubbed the meat down and made the salsa about 7 hours before dinner, which was plenty of time for the flavors to infuse the meat and for the salsa to get really yummy.
The steak alone has a bit of kick. The cool, vinegary, slightly sweet salsa is a great complement to the spice. I served this with a green salad, simple scalloped potatoes, and baguette. The recipe recommends using any leftover steak and salsa mixed in with scrambled eggs and cheese. I wish we’d had more leftovers!
Here are the very few changes I made to the recipe.
I used one 2-pound steak since there were only four of us. However, I made the same amount of rub, so that makes me think that if you plan to make 4 pounds of steak you may want to consider doubling the rub ingredients.
The 1/2 cup of olive oil in the salsa just seemed like too much to me, so I reduced it to 1/4 cup and added just a slight drizzle more. Mix up the salsa and use your own judgement and preferences as you do so. Add a small amount to start, then add more if you need it.
These muffins, while a tad bit crumbly, are so incredibly delicious. I have a true and undying love for pecans, and so these had me from the very beginning. The combination of cinnamon and pecans in these muffins is wonderful, and greasing and sugaring the muffins cups gave them such a great crunchy, sweet exterior. You can always use paper muffins cups instead of greasing the muffin pan. These are on the sweeter side for breakfast muffins, but I don’t mind that. Anything I can do to fit in another dessert in my day is a good thing.
I found the recipe on Group Recipes, but used melted butter instead of the oil originally called for in the recipe. Here is the link to the original recipe. The oil would probably make them more moist, so I might try that the next time I make these…and there will be a next time.
These are great when enjoyed warm, but also great at room temperature. I warmed mine in the microwave for about 15 seconds each morning as I enjoyed them all week. That’s just one of those things you must deal with while living with only one other person, leftovers always last a long time. Sometimes this is a good thing, like with these muffins. Other times I wish I had more people to eat the last couple servings of a dish. Our family is growing, but Baby won’t be enjoying these muffins for a while!
Cinnamon Pecan Muffins
Ingredients
1 1/2cups all-purpose flour
3/4 cup sugar
2 teaspoons baking powder
1 teaspoon ground cinnamon shopping list
1/2 teaspoon salt
1 egg
1/2 cup milk
1/2 cup, 1 stick, melted butter
1 cup chopped pecans
Directions
Mix first 5 ingredients together, then add egg, milk and butter.
Mix until almost blended, adding pecans. Do not over mix batter.
Fill greased and sugared muffin pans two-thirds full.
 This is a healthier version of a sloppy joe, but no less sloppy or tasty. Ground turkey takes the place of ground beef, and the addition of grated carrots and tomatoes makes these more nutritious. We ate these last night when my friend Carrie and her 3 girls came through Amarillo on their way to Albuquerque. It pleased the adults and the kiddos. Thank you Martha Stewart! Here is the link to her recipe.


